
Nod-Krai Valiant Chronicles
Travelers, participate in Game8's Version 7.1 Survey!
◆ Hot: 7.2 Livestream & Codes, 7.1 Tier List
◆ Builds: Vesna, Vodyanitsa, Skirk, Escoffier
◆ 7.1: Snowball Fight, 2026 Anniversary
◆ Future: Version 7.2, Mitya, Valeriy

Valiant Chronicles are Local Legend bounty challenges in Nod-Krai in Genshin Impact. Check out all the Valiant Chronicles Local Legends, how to unlock them, their location, and all the rewards here in this guide!
| All Local Legends Guides | |||||
|---|---|---|---|---|---|
| Chenyu Vale | Fontaine | Natlan | |||
| Valiant Chronicle Guides | |||||
| Nod-Krai | Snezhnaya | ||||
List of Contents
Valiant Chronicles Local Legends
Mushteshir Valiant Chronicles Information
| Mushteshir Local Legend Location | |
|---|---|
 |
|
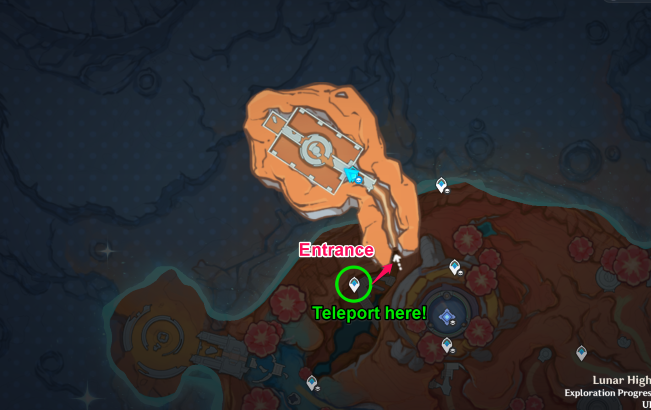
| Location | Northwest of Lunar Highlands (Lunar Highlands, Frost Moon) |
| Unlock Requirement | Discover Mushteshir to Unlock |
| Bounty Challenges |
・Defeat Local Legend: Mushteshir. ・Paralyze Mushteshir by destroying all 4 detection devices deployed during its first deployment of the Suppression Field. ・Defeat Mushteshir while it is paralyzed. |
Mushteshir is located in the northwest parts of the Lunar Highlands. It can be found by teleporting in the waypoint in the northwest and walking a bit to the north until you see an underground passage.
Mushteshir Valiant Chronicle Guide
Defeat it While Paralyzed
It’s very important for you to reduce Mushteshir’s HP as much as possible before it summons the devices, as you must defeat it while it is paralyzed. Mushteshir will be paralyzed after destroying the devices.
Once paralyzed, burst it down with everything you've got. This is another reason why Sandrone is best here, as her Burst can literally deal massive damage to nuke enemies.
Nonetheless, units that can deal massive damage in a short time, like Skirk, should suffice.
Prism Slime Valiant Chronicles Information
| Prism Slime Local Legend Location | |
|---|---|
 |
|
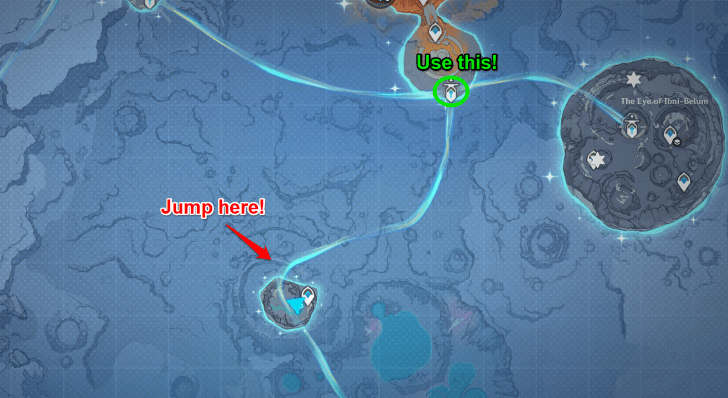
| Location | South of Lunar Highlands (Lunar Highlands, Frost Moon) |
| Unlock Requirement | Discover Prism Slime to Unlock |
| Bounty Challenges |
・Defeat Local Legend: Prism Slime. ・Before the Prism Slime first gathers light and swells, make sure it attempts to absorb energy no more than 2 times. ・Defeat the Prism Slime before it enters its light-gathering mode for the third time. |
Prism Slime can be found in the southern parts of the Lunar Highlands. You can access it by using the High-Speed Transit and jumping mid-flight when you see the crater with a waypoint.
Prism Slime Valiant Chronicle Guide
Let It Absorb a Different Element
Upon approaching, the Prism Slime will immediately start absorbing the active character's energy. It can do this twice to fill up the gauge fully, but you can also fill the gauge with elemental attacks to expedite the process.
The best strategy with this is to let it absorb an element that isn't a major contributor to the team's overall damage. For this instance, we let it absorb Nicole's element and energy since it doesn't contribute to Sandrone's team damage.
Characters like Mavuika and Skirk cannot have their energy absorbed. However, it will still gain immunity to their element. So the aforementioned strategy still remains.
Maha Vasudevayaputra Valiant Chronicles Information
| Maha Vasudevayaputra Local Legend Location | |
|---|---|
 |
|
| Location | Northwest of Desert Pavilion (Temple of Space, Dornman Port) |
| Unlock Requirement | Discover Maha Vasudevayaputra to Unlock |
| Bounty Challenges |
・Defeat Local Legend: "Maha Vasudevayaputra." ・Defeat "Maha Vasudevayaputra" after forcing him to revert to his normal state at least once. ・After "Maha Vasudevayaputra" reverts back to its normal state for the first time, defeat it before it goes into the Scorched state. |
Maha Vasudevayaputra is located northwest of the Desert Pavilion in the Temple of Space. You can teleport to the bottom Waypoint of Desert Pavilion and start walking northwest until you encounter Mardava.
Maha Vasudevayaputra Valiant Chronicle Guide
Keep the Dendro Bar Full With Bloom or Lunar-Bloom
To effectively deal with Maha, you must always keep the Dendro bar below his HP filled up to prevent it from going back to its Scorched State. Apply Dendro consistently and use Bloom or Lunar-Bloom to fill the Dendro bar.
Characters like Lauma and Columbina are highly recommended, as the duo alone can fill the Dendro bar themselves.
Keeping this Dendro Bar full throughout the fight will help you achieve all three Valiant Chronicle objectives for this boss.
Do note that triggering any other reaction will automatically let Maha return to its Scorched state.
Can Be Brute-Forced but Not Recommended
Maha can be brute-forced with teams like Hyperbloom and/or Lunar-Charged. However, it is not recommended, as it will render the fight more difficult than it seems and will prevent you from obtaining the Valiant Chronicle rewards.
Churldric Valiant Chronicles Information
| Churldric Local Legend Location | |
|---|---|
 |
|
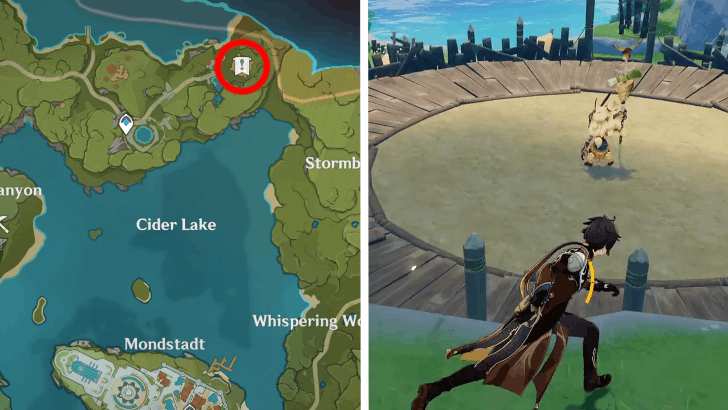
| Location | North of Cider Lake |
| Unlock Requirement | Discover Churldric to Unlock |
| Bounty Challenges |
・Defeat Local Legend: Churldric. ・Deal damage to the Delicious Hot Pot summoned by Churldric and defeat it. ・Defeat Churldric before he can finish cooking with the Delicious Hot Pot. |
Churldric is located just north of Cider Lake in Mondstadt. It is situated at the center of a large stage and is very hard to miss.
Churldric Valiant Chronicle Guide
Destroy the Delicious Hot Pot
After taking a certain amount of DMG, Churldric will summon a Delicious Hot Pot and start mixing a stew that it will use to heal itself, which will drag the battle on longer than it should be.
Conversely, destroying the pot will not only prevent Churldric's healing, but it will also cause it to explode, dealing significant DMG to it.
This pot is considered a Geo construct, so the most effective element against it is Geo. Defeating Churldric as he is mixing the pot without destroying it is an achievement, so be sure to try and do so!
Avoid the Falling Fruits
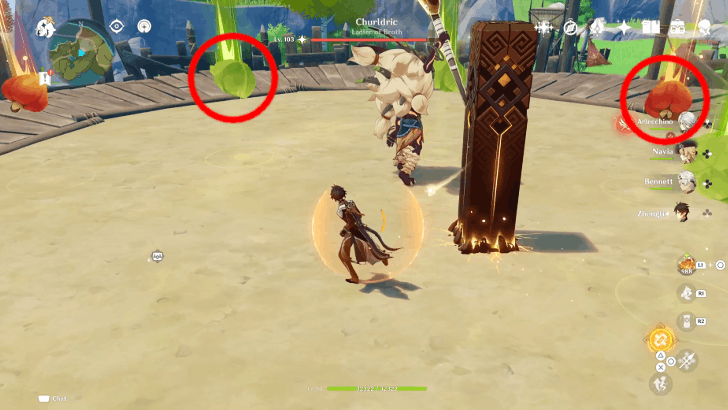
While they may seem harmless, the fruits that Churldric will summon from the sky to fall down on you can actually cause heavy DMG.
When you see those prediction lines, be sure to react swiftly and avoid them at all costs.
Avoid Plunging Attacks

Another attack of Churldric's that you should watch out for is its plunging attacks.
It will leap into the air and do three plunging attacks at your immediate location. Once again, once you see those prediction lines, act accordingly!
The Homesick Lonewolf Valiant Chronicles Information
| The Homesick Lonewolf Local Legend Location | |
|---|---|
 |
|
| Location | Northeast of Cliffwatch Camp (Ashveil Peak, Nod Krai) |
| Unlock Requirement | Discover The Homesick Lonewolf to Unlock |
| Bounty Challenges |
・Defeat Local Legend: "The Homesick Lone Wolf.". ・Defeat "The Homesick Lone Wolf" after destroying its summoned Ancestral Wolf Spirit only once. ・When "The Homesick Lone Wolf" unleashes "Wrath of the Wolves," break its Ancestral Wolf Spirit and defeat it. |
The Homesick Lonewolf is located Northeast of Cliffwatch Camp. In order to get to it, teleport to the Statue of the New Moon in Cliffwatch Camp and follow the trail to the right. You will eventually encounter the Lonewolf on top of a staircase.
The Homesick Lonewolf Valiant Chronicles Guide
Defeat the Ancestral Spirit with Pyro or Electro Swirl
At one point during the fight with the Homesick Lonewolf, he will summon an Ancestral Spirit. Use a Pyro or Electro Swirl to quickly defeat the spirit.
Sucrose and/or Lynette with Fischl is a simple yet effective combo against this boss, as Fischl constantly applies Electro and can easily be swirled.
Defeat the Homesick Lonewolf During Wrath of the Wolves
The Homesick Lonewolf will enter the Wrath of the Wolves state to attack his opponent. This state is indicated by the Lonewolf's large green claws.
When these large claws are out, defeat the Lonewolf in order to beat one of the challenges in the Valiant Chronicles.
Bringing a unit that can dish out tremendous damage in one instance like Mavuika is recommended to quickly beat the Lonewolf in this state.
Hiljetta Valiant Chronicles Information
| Hiljetta Local Legend Location | |
|---|---|
 |
|
| Location | Southeast of Favonius Keep (Ashveil Peak, Nod Krai) |
| Unlock Requirement | Discover Hiljetta to Unlock |
| Bounty Challenges |
・Defeat Local Legend: Hiljetta. ・Trigger the Frozen reaction when Hiljetta summons her battle armor to prevent the armor from attaching. ・Defeat Hiljetta before she summons her battle armor for the third time. |
Hiljetta is located in the southeast of Favonius Keep, on Ashveil Peak in Nod-Krai.
Once you teleport to the southeast waypoint, walk to the right and under the cliff to where you're walking, Hiljetta can be found near a pile of crates.
Hiljetta Valiant Chronicle Guide
Stagger or Immobilize Hiljetta to Prevent Her From Gaining an Armor
After the third punch that Hiljetta throws, she’ll move backwards and summon a device that provides her with armor.
Prevent her from gaining a shield by staggering or immobilizing her when she summons this device.
Overload is amazing in staggering and preventing her from gaining an Armor, but Freeze is a must if you want to achieve one of the challenges.
Defeat Her Before She Summons Her Armor Again
In order to achieve the third challenge, you must beat Hiljetta before she summons her Armor again.
Skirk and Escoffier combo can make this fight incredibly easy because of the high damage output that they dish out in a short time, while also being a Freeze-centric duo.
Hexadecatonic Mandragora Valiant Chronicles Information
| Hexadecatonic Mandragora Local Legend Location | |
|---|---|
 |
|
| Location | Southwest of Dreadshade Mire (Ashveil Peak, Nod Krai) |
| Unlock Requirement | Discover Hexadecatonic Mandragora to Unlock |
| Bounty Challenges |
・ Defeat Local Legend: Hexadecatonic Mandragora. ・ Defeat the Hexadecatonic Mandragora when it falls to the ground. ・ When the Hexadecatonic Mandragora unleashes "Sporebloom" for the first time, clear out all the Mandragora spores before they merge. |
Hexadecatonic Mandragora can be found on the southwest side of Dreadshade Mire in Ashveil Peak of Nod-Krai.
Use the Waypoint Teleport in the west side of Dreadshade Mire near the cliff and glide downwards. You'll encounter the Hexadecatonic Mandragora in a patch of land.
Hexadecatonic Mandragora Valiant Chronicle Guide
Deplete the Dendro Bar
Hexadecatonic Mandragora requires you to deplete its Dendro Bar to decrease its RES.
Using Pyro is the quickest way to deplete the Dendro Bar as it can trigger burning.
Quickly Defeat the Mandragora Spores During Sporebloom
Once you have depleted the Dendro Bar, Hexadecatonic Mandragora will spawn Spores. Defeat them quickly before the Hexadecatonic Mandragora absorbs them, gaining the Dendro Bar once again.
Venti and Sucrose are great against the Spores as they can group them together, making it easy to defeat them at once.
Defeating all the spores before they merge with the Hexadecatonic Mandragora completes the third achievement in Valiant Chronicles.
Defeat It While Its Down
After defeating all the spores, Hexadecatonic Mandragora will be vulnerable to attack. Dish out all the damage that you have while its in this state. Do note that this state is relatively short before it goes up again.
Defeating the Hexadecatonic Mandragora in this state completes the second achievement in Valiant Chronicles.
Sigurd Valiant Chronicles Information
| Sigurd Local Legend Location | |
|---|---|
 |
|
| Location | Northeast of Barrowmoss Barrens (Lempo Isle, Nod Krai) |
| Unlock Requirement | Complete Bell of Mourning Echoes World Quest |
| Bounty Challenges |
・ Defeat Local Legend: Sigurd ・ Avoid getting hit by Sigurd's "Demonsbane Strike." ・ Eliminate all lured Wilderness Exiles before Sigurd can act. |
Sigurd is located in the northeast of Barrowmoss Barrens, below Blue Amber Lake in Lempo Isle, specifically where his grave is. You also need to complete the Bell of Mourning Echoes quest and three relics to unlock him!
Sigurd Valiant Chronicle Guide
How to Avoid Getting Hit by Demonsbane Strike
To avoid getting hit by Sigurd's Demonsbane Strike, watch out for when Sigurd momentarily slouches forward and a purple circular area appears where he's standing. You have about 1-2 seconds to get move out of the hit zone, so make sure that you quickly keep your distance between your character and him the moment you've seen him take this form!
Keep in mind that Demonsbane Strike is only available during Sigurd's first phase, which means after getting to the second phase of his battle without being hit by this attack, there's no need to watch out for it!
How to Eliminate all Lured Wilderness Exiles
To eliminate all Lured Wilderness Exiles, we recommend bringing an Anemo unit who can effectively group mobs such as Venti, Kazuha, or Sucrose. Take note that you only have a limited amount of time before eliminating all the Exiles, as Sigurd will detonate them thru an AOE attack that will K-O your active character!
Crab Tsar Valiant Chronicles Information
| Crab Tsar Local Legend Location | |
|---|---|
 |
|
| Location | Frostmoon Enclave Underground (Hiisi Island, Nod Krai) |
| Unlock Requirement | Complete The Mirrors, the Maze, and the Tsar World Quest |
| Bounty Challenges |
・ Defeat Local Legend: Crab Tsar ・ Convert at least 10 of the Crab Tsar's Stoneborne. ・ Shoot down the Crab Tsar before it executes its "Almight Bombardment" for the second time. |
Crab Tsar is located in the underground area of Frostmoon Enclave in Hiisi Island, Nod-Krai. The entrance to the underground is through the huge hole at the southwest side of Hiisi Island, near the teleport waypoint.
Going down the hole will trigger The Mirrors, the Maze, and the Tsar quest, which is also a requirement to unlock this Valiant Chronicle bounty.
Crab Tsar Valiant Chronicle Guide
How to Shoot Down the Crab Tsar for the Second Time
To shoot down the Crab Tsar before it executes its Almight Bombardment for the second time, make sure that you're actively on the lookout of the shield of the Crab. The moment the Crab Tsar obtains a second shield, it means you have failed the challenge, hence we recommend teleporting out of the battle to recoup.
Unfortunately, this challenge is a pure DPS-check, which means you'll have to bring your best Bloom/Hyperbloom team to whittle down the HP of the Tsar, and defeat it before it floats the second time!
Raskolnikov Valiant Chronicles Information
| Raskolnikov Local Legend Location | |
|---|---|
 |
|
| Location | Top of Kuuvahki Experiment Design Bureau (Paha Isle, Nod-Krai) |
| Unlock Requirement | The Shoemaker's Children Go Barefoot |
| Bounty Challenges |
・ Defeat Local Legend: Raskolnikov ・ Destroy Raskolnikov's "Experimental Multi-Shield." ・ Avoid getting hit by any of Raskolnikov's Electro attacks. |
Raskolnikov is located at the top of the Kuuvahki Experiment Design Bureau in Paha Isle, Nod-Krai. You can use the teleport waypoint near the center of the facility, the one on the northwest side.
However, you need to complete The Shoemaker's Children Go Barefoot world quest to unlock the Local Legend and gain access to the upper floors of the facility.
Raskolnikov Valiant Chronicle Guide
How to Avoid Getting Hit by Raskolnikov's Electro Attacks
To avoid getting hit by Raskolnikov's Electro Attacks, we recommend saving your Elemental Skiils and conserving your Stamina before he summons his Experimental Multi-Shield. His multi-shield is the only time that Raskolnikov casts his Electro skills, so it's a good gauge of when to be nimble and dash around, while avoiding his lightning strikes!
Additionally, we suggest looking out for the Electro aura right above your character's health bar, as it will tell you whether or not you've been hit by any Electro attacks!
How to Unlock Valiant Chronicles
Talk to Katheryne in Nod-Krai

The Valiant Chronicles unlocks after you talk to Katheryne at Nod-Krai's Adventurer's Guild. Choosing the Valiant Chronicles option will give you access to the list of available Local Legends bounty challenges and rewards.
Note that the Valiant Chronicles menu can only be accessed by talking to Katheryne at the Adventurer's Guild.
What is the Valiant Chronicle?
Compendium of Nod-Krai Local Legends

The Valiant Chronicles are a list of Local Legend bounty hunter challenges that you can complete in exchange for various rewards. You can challenge each Local Legend only once per day, while they respawn at server reset the next day.
Valiant Chronicles Rewards
Avatar Frame for Your In-Game Profile

Completing the bounty challenges and earning seven medals rewards you with an Avatar Frame that you can display on your Adventurer Profile.
Recommendations How to Get 7 Medals in Luna I
Since you can only challenge each of the Local Legends once per day, we recommend trying hard to get three medals from the Crab Tsar since it has the easiest challenges.
Then, you can split the other four medals by getting two each from Sigurd and Raskolnikov or getting three medals from one and one medal from the other.
Total Valiant Chronicles Rewards
| All Clink Clank Clash Event Rewards | ||
|---|---|---|
 Primogem
x180 |
 Mora
x75,000 |
 Mistshroud Helmet
x3 |
 Afterglow of Long Night Flint
x3 |
 Lakkaberry
x3 |
 Guide to Moonlight
x3 |
 Frost-Etched Warrant
x3 |
 Artful Device Replica
x3 |
|
Sigurd Bounty Challenges and Rewards
| All Sigurd Challenges and Rewards | |
|---|---|
| Defeat Local Legend: Sigurd | Primogem
x20 |
| Avoid getting hit by Sigurd's "Demonsbane Strike." | Primogem
x20 Mora
x25,000 |
| Eliminate all lured Wilderness Exiles before Sigurd can act. | Primogem
x20 |
Crab Tsar Bounty Challenges and Rewards
| All Crab Tsar Challenges and Rewards | |
|---|---|
| Defeat Local Legend: Crab Tsar | Primogem
x20 Lakkaberry
x3 |
| Convert at least 10 of the Crab Tsar's Stoneborne. | Primogem
x20 Mora
x25,000 |
| Shoot down the Crab Tsar before it executes its "Almight Bombardment" for the second time. | Primogem
x20 |
Raskolnikov Bounty Challenges and Rewards
| All Raskolnikov Challenges and Rewards | |
|---|---|
| Defeat Local Legend: Raskolnikov | Primogem
x20 |
| Destroy Raskolnikov's "Experimental Multi-Shield." | Primogem
x20 Mora
x25,000 |
| Avoid getting hit by any of Raskolnikov's Electro attacks. | Primogem
x20 |
Genshin Impact Related Guides

Nod-Krai Recommended Guides
| Recommended Nod-Krai Guides | |
|---|---|
 Meeting Points |
 Lunoculus Locations |
 Evermoon Seal Locations |
 Craftable Weapons |
 Remarkable Chests |
 Treasure Chests |
 Irismoon Seal Locations |
|
Nod-Krai Exploration Guides
 Kuuvahki
 Kuuhenki
 Viewpoints
 Shrines of Depths
 Valiant Chronicles
 Cleaning Bots
 How to Use Moonlanes
 Clever Little Sniffer Moles
 Moon Mirror Mechanism
 Kuuvahki Relay Mechanism
 Assembly Modules Mechanism
 Bipolar Objects and Unipolar Charges
 ID Cards Mechanism
 Statue of the New Moon
 Recon Bots
 Super Sharp Spireblooms
 Mandragoras
 Evil Eye of Blightseep
 Abyssal Riftlines
 Conch-Patterned Pages
 Stellafruit Locations
 Hiisi Island Three Statues
 Bounty Token Locations
 Barrowmoss Barrens Robot Puzzle
 Barrier Puzzle in Barrowmoss Barrens
 Waterfall Moon Mirrors Puzzle
 Lempo Isle Mole and Robot Challenge
 Mine Now Friend Achievement
 Boreas's Presence Sword
 How to Cleanse the Corruption
Nod-Krai Items
| Nod-Krai Local Specialties | ||
|---|---|---|
 Frostlamp Flower |
 Moonfall Silver |
 Portable Bearing |
 Winter Icelea |
 Pine Amber |
|
| Nod-Krai Materials | ||
 Midsommar Berry |
Lakkaberry |
 Nocturnal Blossom |
 Icy Pebble |
 Rainbowdrop Crystal |
|
Nod-Krai Enemies
 Knuckle Duckle
 Radiant Moonfly
 Frostnight Herra
 Super-Heavy Landrover Mechanized Fortress
 Lord of the Hidden Depths - Whisperer of Nightmares
 Crab Tsar
 Raskolnikov
 Sigurd
 Hexadecatonic Mandragora
 Hiljetta
 Homesick Lone Wolf
 Mushteshir
 Prism Slime
 Shadow of the Wild Hunt
 Landcruisers
 Radiant Beasts
 Frostnight Scion
 Oprichniki
 Fishers of Hidden Depths
All Interactive Map Guides

Comment
 Anonymous 9 months
The Wolf achievements guide is completely incorrect




Nod-Krai Valiant Chronicles

Premium Articles



Rankings
- We could not find the message board you were looking for.
Gaming News





Popular Games

Genshin Impact Walkthrough & Guides Wiki
Fire Emblem: Fortune's Weave (FEFW) Walkthrough & Guides Wiki
Aniimo Walkthrough & Guides Wiki
Wuthering Waves Walkthrough & Guides Wiki
Dragon's Dogma 2 (DD2) Dark Arisen Walkthrough & Guides Wiki
Umamusume: Pretty Derby Walkthrough & Guides Wiki
Honkai: Star Rail Walkthrough & Guides Wiki
Zenless Zone Zero Walkthrough & Guides Wiki
Pokemon TCG Pocket (PTCGP) Strategies & Guides Wiki
AION 2 Walkthrough & Guides Wiki









Recommended Games
Where Winds Meet Walkthrough & Guides Wiki
Fire Emblem Heroes (FEH) Walkthrough & Guides Wiki
Diablo 4: Lord of Hatred Walkthrough & Guides Wiki
Super Smash Bros. Ultimate Walkthrough & Guides Wiki
Persona 3 Reload Walkthrough & Guides Wiki
The Legend of Zelda: Tears of the Kingdom Walkthrough & Guides Wiki
Elden Ring Walkthrough & Guides Wiki
Pokemon Brilliant Diamond and Shining Pearl (BDSP) Walkthrough & Guides Wiki
Cyberpunk 2077: Ultimate Edition Walkthrough & Guides Wiki
Monster Hunter World Walkthrough & Guides Wiki










All rights reserved
Copyright© 2012-2024 HoYoverse — COGNOSPHERE. All Rights Reserved.
The copyrights of videos of games used in our content and other intellectual property rights belong to the provider of the game.
The contents we provide on this site were created personally by members of the Game8 editorial department.
We refuse the right to reuse or repost content taken without our permission such as data or images to other sites.
i think to see the valiant chronicles option when talking to katheryne you have to be AR 55