
Sandrone Best Builds and Teams
Travelers, participate in Game8's Version 7.1 Survey!
◆ Hot: 7.2 Livestream & Codes, 7.1 Tier List
◆ Builds: Vesna, Vodyanitsa, Skirk, Escoffier
◆ 7.1: Snowball Fight, 2026 Anniversary
◆ Future: Version 7.2, Mitya, Valeriy
Sandrone is a 5-star Cryo Claymore character in Genshin Impact who best functions as a Stellar-Conduct DPS. See her best builds, recommended weapons and artifacts, teams, and other info about her here!
| Sandrone's Character Guides | |||
|---|---|---|---|
 Build Guide |
 Materials |
 Special Dish |
|
List of Contents
Sandrone Rating and Info
Character Information
| Sandrone | ||
|---|---|---|
 |
Rating |

|
| Rarity | ||
| Element | ||
| Weapon | ||
| Voice Actors |
Deneen Melody (EN)
Honda Mariko (JP) |
|
 Cryo
 Claymore
Tier List Rankings
| Main DPS | Sub-DPS | Support | Exploration |
|---|---|---|---|
|
|
- | - |
|
Tier Rating
|
As a Main DPS With Odette's release, Sandrone receives another boost in damage and is now in an incredibly powerful state due to the near-exponential scaling of Stellar Glimmer. In teams where both Yae Miko and Odette are present, her damage output and simplicity become the new high score that most characters in SS-tier will be compared to. |
Character Tier List | Best Characters
How Would You Rate Sandrone?
Failed to submit your score. Please try again.
Submitting will update your vote
Sandrone's Stats
| Stat | Base Value |
|---|---|
| HP | 2671 |
| ATK | 69 |
| DEF | 152 |
| CRIT Rate% | 5% |
| Stat | Max Value |
|---|---|
| HP | 13226 |
| ATK | 342 |
| DEF | 752 |
| CRIT Rate% | 24.20% |
Base Stat Calculations
 | Stats indicated above are obtained from Sandrone's base values. These numbers also exclude the character's equipped weapon, artifacts, talents, or other passive effects that are not innate to the character. |
|---|---|
 | All characters start with 5% CRIT Rate, 50% CRIT DMG, 100% Energy Recharge, 0 Elemental Mastery, 0% Healing Bonus, and 0% Elemental DMG bonus before any additional stats are applied. The table above includes such values. |
 | The Level 20 stats indicated for this character are calculated before their first ascension. |
Sandrone's Ascension and Talent Material Summary
| All Ascension Materials Needed |
|---|
 Mora
×420, 000  Subdetection Unit
×168 |
| All Talent Materials Needed |
|
Mora
×4,957,500 |
 Shivada Jade Sliver
 Shivada Jade Fragment
 Shivada Jade Chunk
 Shivada Jade Gemstone
 Precision Drive Shaft
 Broken Drive Shaft
 Reinforced Drive Shaft
 Plume of the Fallen Watcher
 Philosophies of Vagrancy
 Guide to Vagrancy
 Teachings of Vagrancy
 Madman's Restraint
Sandrone Ascension and Talent Materials
Sandrone Strengths and Weaknesses
| Strengths | |||
|---|---|---|---|
|
• Allows the Stellar-Conduct reaction, a stronger and more potent variant of Superconduct. • High damage multipliers on Stellar-Conduct procs, which scale off both Sandrone and her allies. • Near-consistent DPS due to the ease of use of her combos, which flows well and is simple to use. |
|||
| Weaknesses | |||
| • While Sandrone deals immense amounts of damage, her main use case and source of damage is limited to Stellar-Conduct, which means using her elsewhere is a DPS loss in most scenarios. |
Sandrone Best Builds
| Build Summary |
|---|
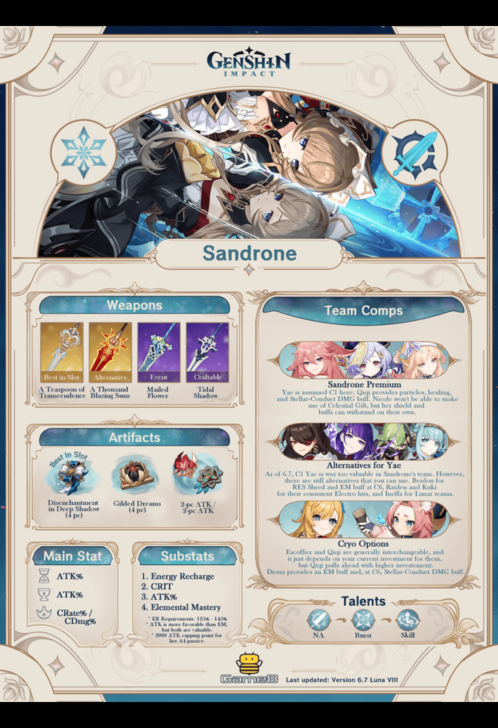 See full image |
Sandrone Stellar-Conduct Build
| Best Weapon | Alternative Weapons | |||
|---|---|---|---|---|
 A Teaspoon of Transcendence A Teaspoon of Transcendence Base ATK: 674 Bonus Stat: CRIT DMG 44.1% Skill Effect: • ATK increased by 28%. • Additionally, each time the equipping character hits an opponent with their Charged Attack, they attain "Surmount" for a short time: their Stellar-Conduct and Stellar Swirl DMG are increased by 16% for 5s. This effect can stack once every 0.2s, max 3 stacks. |
 A Thousand Blazing Suns A Thousand Blazing Suns Base ATK: 741 Bonus Stat: CRIT Rate 11.0% Skill Effect: Increases CRIT DMG by 28% and ATK by 20% after using Elemental Skill or Burst. This effect is extended by 2s after using a Normal or Charged Attack that deals Elemental DMG, up to a maximum of 6s. Additionally, being in Nightsoul's Blessing increases these bonuses by 75% and does not count down if the user is off-field.  Redhorn Stonethresher Redhorn Stonethresher Base ATK: 542 Bonus Stat: CRIT DMG 88.2% Skill Effect: DEF is increased by 28%. Normal and Charged Attack DMG is increased by 40% of DEF.  Verdict Verdict Base ATK: 674 Bonus Stat: CRIT Rate 22.1% Skill Effect: Increases ATK by 20%. When characters in your party obtain Elemental Shards from Crystallize reactions, the equipping character will gain 1 Seal, increasing Elemental Skill DMG by 18%. The Seal lasts for 15s, and the equipper may have up to 2 Seals at once. All of the equipper's Seals will disappear 0.2s after their Elemental Skill deals DMG.  Mailed Flower Mailed Flower Base ATK: 565 Bonus Stat: Elemental Mastery 110 Skill Effect: Within 8s after the character's Elemental Skill hits an opponent or the character triggers an Elemental Reaction, their ATK and Elemental Mastery will be increased by 12% and 48 respectively.  Tidal Shadow Tidal Shadow Base ATK: 510 Bonus Stat: ATK 41.3% Skill Effect: After the wielder is healed, ATK will be increased by 24% for 8s. This can be triggered even when the character is not on the field. |
|||
| Best Artifact | Artifact Stats | |||
 Disenchantment in Deep Shadows Disenchantment in Deep Shadows 2-PC: ATK +18%. 4-PC: Increases Superconduct Reaction DMG by 80% and Stellar-Conduct Reaction DMG by 40%. When the wielder attacks opponents affected by Superconduct or Stellar-Conduct, this attack's CRIT Rate is increased by 16%. |
 Sands: ATK% or EM  Goblet: ATK% or EM  Circlet: CRIT DMG >= CRIT Rate Artifact Sub Stats 1. Energy Recharge (until requirement) 2. CRIT DMG 3. CRIT Rate 4. ATK 5. Elemental Mastery |
|||
| Alternate Artifact | ||||
 Gilded Dreams Gilded Dreams 2-PC: Elemental Mastery +80 x44-PC: Within 8s of triggering an Elemental Reaction, the character equipping this will obtain buffs based on the Elemental Type of the other party members. ATK is increased by 14% for each member whose Elemental Type is the same as the equipping character, and EM is increased by 50 for every member with a different Elemental Type. Each of the buffs will count up to 3 characters. This effect can be triggered once every 8s and even when not on the field. |
||||
| General Team Comps | ||||
  
Sandrone's Premium team with her best teammates right now. Yae is assumed C1 here. |
  
F2P team for Sandrone. You need to swap twice with Sucrose to keep the uptime of her buffs. |
|||
When it comes to building Sandrone, she preferably wants to have a ton of ATK to enhance her Stellar-Conduct DMG.
In most cases, having an ATK/ATK on Sands and Goblet is better than the alternative because of her A4 passive that converts a portion of her ATK into Elemental Mastery, which makes the latter less prioritized.
Grab Energy Recharge until you meet the requirement to consistently Burst before switching to CRIT stats.
Sandrone Stat Goal Values
| Stat | Goal Value |
|---|---|
| ATK | 2,000+ |
| Energy Recharge | 125 ~ 145% |
| CRIT Rate | 30~40% before Disenchantment in Deep Shadows CRIT Rate bonus and her Ascension Stat. |
| CRIT DMG | 180% or Above |
| Elemental Mastery | 150 - 200 |
Sandrone wants as much ATK as possible, with 2,000 ATK being a good stopping point to cap out her A4 passive. 125 ~ 145% Energy Recharge to consistently use her Burst every rotation before prioritizing the rest of the remaining stats.
Sandrone has an abundance of CRIT Rate from her Ascension stat and other sources, which allows her to prioritize CRIT DMG instead. Elemental Mastery is less of a priority because of her A4 passive. Nonetheless, it is still great to have EM if you see it in your substats.
Sandrone Talent Priority
| 1st | 2nd | 3rd |
|---|---|---|
| Normal Attack | Elemental Burst | Elemental Skill |
Sandrone primarily relies on her Charged Attack to deal damage, so her number one priority is to level up her Normal Attacks. Following this is the Elemental Burst, as it deals a massive amount of damage in her standard rotation.
Elemental Skill has decent damage and is usually only used to reduce the Decoding Power of Fagio. However, compared to NA and Elemental Burst, it should be your last priority, but it's not a bad one to level up.
Sandrone Best Weapons
CRIT DMG Claymores Are the Best
A Teaspoon of Transcendence is her best-in-slot weapon, as it gives her a massive boost in her overall Stellar-Conduct DMG.
Great alternatives will be A Thousand Blazing Suns and Redhorn Stonethresher due to their CRIT DMG bonuses.
F2P options will be Mailed Flower, which is an event weapon that can provide ATK and EM, or Tidal Shadow, a craftable weapon from Fontaine that can buff Sandrone's ATK when healed.
Best Claymores for Sandrone
| Best Weapons for Sandrone | |
|---|---|
| Best-in-Slot | A Teaspoon of Transcendence A Teaspoon of Transcendence Base ATK: 674 Bonus Stat: CRIT DMG 44.1% Skill Effect: • ATK increased by 28%. • Additionally, each time the equipping character hits an opponent with their Charged Attack, they attain "Surmount" for a short time: their Stellar-Conduct and Stellar Swirl DMG are increased by 16% for 5s. This effect can stack once every 0.2s, max 3 stacks. |
| A Teaspoon of Transcendence is her signature weapon and synergizes with her kit very well. The effects of the weapon can give Sandrone ATK% by default and Stellar-Conduct DMG whenever she does her Charged Attack. | |
| Alternative | A Thousand Blazing Suns A Thousand Blazing Suns Base ATK: 741 Bonus Stat: CRIT Rate 11.0% Skill Effect: Increases CRIT DMG by 28% and ATK by 20% after using Elemental Skill or Burst. This effect is extended by 2s after using a Normal or Charged Attack that deals Elemental DMG, up to a maximum of 6s. Additionally, being in Nightsoul's Blessing increases these bonuses by 75% and does not count down if the user is off-field. |
| A Thousand Blazing Suns boasts a massive CRIT DMG after using Skill or Burst. Sandrone often involves her in both of those things in her rotation, making this weapon's effect viable, as she benefits a lot from the bonuses. | |
| For CRIT DMG | Redhorn Stonethresher Redhorn Stonethresher Base ATK: 542 Bonus Stat: CRIT DMG 88.2% Skill Effect: DEF is increased by 28%. Normal and Charged Attack DMG is increased by 40% of DEF. |
| This weapon is mainly an option for the CRIT DMG that it provides in its bonus stat. The effect is lost on Sandrone, as you don't want to build DEF on her. Still, a great alternative even just for the CRIT DMG. | |
| F2P (Event) | Mailed Flower Mailed Flower Base ATK: 565 Bonus Stat: Elemental Mastery 110 Skill Effect: Within 8s after the character's Elemental Skill hits an opponent or the character triggers an Elemental Reaction, their ATK and Elemental Mastery will be increased by 12% and 48 respectively. |
| Provides ATK and Elemental Mastery bonuses that Sandrone can use to boost her overall damage. As Sandrone wants to trigger Stellar-Conduct all the time, maintaining the uptime of the bonuses would be easy. This weapon is an event weapon that was available during the 2023 Windblume event. There's a chance that some players don't have this as an option. |
|
| F2P (Craftable) | Tidal Shadow Tidal Shadow Base ATK: 510 Bonus Stat: ATK 41.3% Skill Effect: After the wielder is healed, ATK will be increased by 24% for 8s. This can be triggered even when the character is not on the field. |
| An easy-to-trigger effect that provides a massive ATK buff when healed. This is easy for Sandrone teams, as some of her best teammates can heal, such as Escoffier and Qiqi, for example. | |
| F2P (Gacha) |  Lithic Blade Lithic Blade Base ATK: 510 Bonus Stat: ATK 41.3% Skill Effect: For every character in the party who hails form Liyue, the character who equips this weapons gains 7% ATK increase and a 3% CRIT Rate increase. This effect stacks up to 4 times. |
| Since Sandrone's F2P team composition can include Beidou and Qiqi, she can wield this claymore since both characters hail from Liyue. The ATK and CRIT Rate buff can reach up to 2 stacks because of this, which are highly valuable for Sandrone's overall damage. | |
Other Claymores for Sandrone
| Recommended Weapons | How to Get |
|---|---|
| Battle Pass | |
| Gacha | |
| Gacha | |
| Gacha | |
| Gacha | |
| Gacha | |
| Gacha | |
| Event | |
| Crafted | |
| Gacha | |
| Gacha | |
| Event | |
 Forged by the Golden Melody
 Beacon of the Reed Sea
 Gest of the Mighty Wolf
 Wolf's Gravestone
 Ultimate Overlord's Mega Magic Sword
Sandrone Best Artifacts
Disenchantment in Deep Shadows Over Anything
Disenchantment in Deep Shadows is best in almost every case for Sandrone, as she can easily make use of its 4-pc effects with Stellar-Conduct and further boost the DMG of the said reaction.
Alternatives to this can be Gilded Dreams for the EM and/or ATK buff and a double 2-pc ATK artifact as a temporary option.
We highly recommend farming for Disenchantment in Deep Shadows, as it is Sandrone's best-in-slot by a wide margin.
Best Artifacts for Sandrone
| Best Artifact Sets for Sandrone | |
|---|---|
| Best-in-Slot | Disenchantment in Deep Shadows Disenchantment in Deep Shadows 2-PC: ATK +18%. 4-PC: Increases Superconduct Reaction DMG by 80% and Stellar-Conduct Reaction DMG by 40%. When the wielder attacks opponents affected by Superconduct or Stellar-Conduct, this attack's CRIT Rate is increased by 16%. |
| Sandrone' Best-in-Slot Artifact Set due her gameplay loop revolving around Stellar-Conduct. This set provides a buff to the said reaction and increases CRIT Rate when triggered, improving Sandrone's overall damage. | |
| Alternative | Gilded Dreams Gilded Dreams 2-PC: Elemental Mastery +80 4-PC: Within 8s of triggering an Elemental Reaction, the character equipping this will obtain buffs based on the Elemental Type of the other party members. ATK is increased by 14% for each member whose Elemental Type is the same as the equipping character, and EM is increased by 50 for every member with a different Elemental Type. Each of the buffs will count up to 3 characters. This effect can be triggered once every 8s and even when not on the field. |
| A great alternative for Sandrone, as she benefits a lot from either buffs, but mostly from the ATK buff. Moreover, her team composition usually involves either Cryo or another element like Electro, making the set's effect benefit Sandrone. | |
| Temporary/ F2P |
 Gladiator's Finale x2 Gladiator's Finale x2 2-PC: ATK +18%. 4-PC: If the wielder of this artifact set uses a Sword, Claymore or Polearm, increases their Normal Attack DMG by 35%.  A Day Carved from Rising Winds x2 A Day Carved from Rising Winds x2 2-PC: ATK +18%. 4-PC: After a Normal Attack, Charged Attack, Elemental Skill or Elemental Burst hits an opponent, gain the Blessing of Pastoral Winds effect for 6s: ATK is increased by 25%. If the equipping character has completed Witch's Homework, Blessing of Pastoral Winds will be upgraded to Resolve of Pastoral Winds, which also increases the CRIT Rate of the equipping character by an additional 20%. This effect can be triggered even when the character is off-field. |
| A 2-pc ATK combo can be used during the early build phase as a temporary set while you farm for more preferable artifacts. The 4-star variants should also still suffice. | |
Sandrone Artifact Stat Priority
| Stat Priority | ||
|---|---|---|
|
|
|
| Substats: Energy Recharge > CRIT DMG > CRIT Rate >= ATK > Elemental Mastery |
||
| Summary: • Stellar-Conduct primarily revolves around ATK. • Sandrone has a passive that converts a percentage of her ATK into EM, making the latter less prioritized. • ATK/ATK on Sands and Goblet is generally always better, but there are cases where EM/ATK can work if Sandrone can gain a lot of ATK externally. • CRIT DMG usually pulls ahead over CRIT Rate since Sandrone already has an abundance of the latter due to her Ascension stat and preferred Artifact sets. Nonetheless, a 2:1 ratio is still an ideal goal. • Cryo DMG% on Goblet is not recommended. |
||
List of Artifacts and Set Bonuses
Sandrone Best Team Comps
Stellar-Conduct Teams
As a character that centers around Stellar-Conduct, Sandrone prefers having Cryo or Electro to trigger the said reaction. She needs at least one Cryo character to alleviate her ER needs.
Beyond that, teammates that can provide ATK buffs are highly appreciated, as it synergizes very well with her A4 passive. This includes characters like Nicole and Bennett.
Stellar-Conduct Teams
| Sandrone Best Stellar Conduct Team | |||
|---|---|---|---|
|
Sandrone
|
Yae Miko
(C1) Beidou
(C6) |
Odette
 Escoffier |
Alyosha
 Nicole |
|
Team Summary C1 Yae Miko is her best teammate so far with the massive Stellar-Conduct DMG buff that she provides. Odette can significantly buff Stellar-Glimmer DMG. Alyosha serves as the team's secondary Electro trigger and buffer with Hunter's Mark, while also providing healing for the team. Alternate Teammates Escoffier can pull ahead if the team composition has three Cryo characters. She can also be used alongside Odette if you ever need to. C6 Beidou is an alternative to Yae, who can RES Shred and buff the team's EM. However, she requires a lot of ER to comfortably use her Burst consistently. Regardless, she is a good alternative, especially if you don't have C1 Yae Miko. Nicole cannot make use of Celestial Gift, as there are no other Hexerei members in it. Nonetheless, her shield and teamwide ATK buff can more than justify her placement in the team. |
|||
Notable Teammates
| Alternative | Explanation |
|---|---|
|
Yae Miko
(C1) |
Sub-DPS/Support C1 Yae Miko is Sandrone's best teammate right now. She provides a decent amount of personal damage in the overall rotation and an astounding 50% Stellar-Conduct buff. She is a cut above the rest than any of Sandrone's teammates. That being said, this is strictly regarding C1 Yae. |
|
Odette
|
Sub-DPS/Support Odette is bound to be part of Sandrone's team for the massive amount of buffs she gives for Stellar-Glimmer DMG. She can also deal off-field DMG to add to the overall team damage. |
|
Qiqi
|
Support Similar to Yae, Qiqi can also buff Stellar-Conduct DMG and Cryo DMG, but with the buffs, she also provide an off-field coordinated attack when Sandrone performs her Charged Attack Most importantly, Qiqi can now generate particles during her coordinated attack, alleviating Sandrone's ER needs. She is usable at any Constellation, but is valued more the higher you go. |
|
Escoffier
|
Sub-DPS A competitor to Qiqi's role. She is usually used if Sandrone's team consist of three Cryo units and one Electro to make use of her passive, providing Sandrone a 15% Cryo RES shred. Escoffier and Qiqi are generally interchangeable with little difference, but Qiqi tends to pull ahead in higher investment. |
|
Nicole
|
Support Despite not being placed in a Hexerei team, Nicole can still pull her own weight by providing massive ATK on the team. With her buffs, Sandrone can get an abundance of ATK to amplify her damage. Moreover, the ATK buff isn't limited to Sandrone but also to her teammates, notably Yae Miko. Nicole's shield also provides comfort during Sandrone's Charged Attack. |
|
Beidou
(C6) |
Sub-DPS An alternative to Yae Miko if you don't have her at C1. With the buffs that she received at C6, Beidou provides a 15% Electro and Cryo RES Shred and an Elemental Mastery during her Burst, both of which Sandrone appreciates. However, she requires a massive amount of ER to consistently use her Elemental Burst. |
 Diona
(C6) |
Support At C6, Diona can provide Sandrone an Elemental Mastery and Stellar-Conduct DMG buff, which is roughly similar to Qiqi and Yae's contribution. She also provides healing and shield for comfort. |
|
Yae Miko
(C0) |
Sub-DPS At C0, Yae Miko loses her supportive capabilities and just serves as a Stellar-Conduct off-field DMG. She loses her value compared to her C1 variant, but can still be used to gain more stacks for the Polestar Field. |
 Bennett |
Support If Nicole is not available, Bennett can substitute as a good option to boost Sandrone's attack provided she stays in his circle. |
 Kazuha |
Support His swirls can improve the individual Cryo and Electro damage done by allies, leading to slightly more DPS even if it does not impact Stellar-Conduct. |
Sandrone Best Constellations
| Narcissorolegium |
|---|
 |
Constellation and Effects
| Sandrone's Constellations | |
|---|---|
| C1 |
Morrow After the Golden Dusk When in Decoding mode, Fagio's Decoding Power increases at a 50% lower rate, and all party members deal 30% increased Stellar-Conduct DMG. |
| C2 |
An Heiress Gazed Into the Looking-Glass Radiance: Stellar-Conduct: Increases CRIT DMG from Charged Attack condensed beams by 40%. Also, each time a beam is fired, CRIT DMG dealt by all condensed beams fired during this Decoding mode period will be further increased by 20%. Max 3 stacks. |
| C3 |
Refuse the Wake of Dusk, the Moonlit Yoke Increases the Level of Formule Phenomenale: Self-Evident Proposition by 3. Maximum upgrade level is 15. |
| C4 |
In Knowledge Lies the World's True Ground When Sandrone deals Stellar-Conduct DMG to an opponent, she will also summon an extra Prismatic Resonance Cannon to fire off a coordinated attack which deals Cryo DMG at 125% of her ATK. This DMG is considered Stellar-Conduct DMG, and the effect can occur once every 4s. |
| C5 |
Of All Beside, She Takes No Part Increases the Level of Formule Phenomenale: Q.E.D. by 3. Maximum upgrade level is 15. |
| C6 |
Narcissus Wakes, Her Eyes Upon the Dawn When Fagio fires a condensed beam for the third time while in Decoding mode, the beam becomes a more powerful Condensed Cluster Beam that fires continuously. This beam will deal up to 4 additional instances of AoE Cryo DMG at 100% of Sandrone's ATK on top of any subsequent original beam fired. Radiance: Stellar-Conduct: The Condensed Cluster Beam will instead deal 4 additional instances of AoE Cryo DMG at 80% of Sandrone's ATK. This DMG is considered Stellar-Conduct DMG. Additionally, all Stellar-Conduct DMG dealt by Sandrone is elevated by 20%. |
Best Constellation Rating and Explanation
| Rating | Constellation Effect / Merits | |
|---|---|---|
| C1 | ★★☆ |
• Slows down Decoding Power's accumulation rate, allowing for more attacks before needing to refresh. • Increases teamwide Stellar-Conduct DMG by 30%. |
| C2 | ★★★ | • Grants up to 100% bonus CRIT DMG from Sandrone's Charged Attacks, starting from 40% upon first firing her condensed beam. |
| C4 | ★★☆ | • Summons an independent instance of damage towards opponents whenever Sandrone deals Stellar-Conduct DMG. Has a cooldown of 4s. |
Go for Weapon R1 First, Then C2
Sandrone's kit is already well-equipped at C0, and you should focus on getting her signature weapon at R1 since that provides the most impactful upgrade for her.
Afterwards, look to get C2 as it provides Sandrone a perpetual scaling bonus of CRIT DMG, which raises both her damage floor, and the damage ceiling if she's highly invested into.
How to Play Sandrone
Enables Stellar-Conduct
Sandrone's presence in the team enables Stellar-Conduct through her passive, which is a more powerful version of Superconduct that amplifies ally Cryo and Electro damage, shreds Physical resistances, and deals more damage in general.
Stellar-Conduct can be triggered by using Cryo and Electro within a Polestar Field, which is summoned whenever any team with Sandrone deals Superconduct damage, meaning she can function as both a DPS and a reaction enabler.
Stellar-Conduct Reaction Guide
Uses Charged Attack to Enter Decoding Mode
When Sandrone uses Charged Attacks, she summons Fagio to deal Cryo damage by firing beams at opponents. This accumulates Decoding Power, represented by the bars on the sides of the crosshair while aiming.
When Decoding Power is at its maximum value, it will enter an overloaded state, greatly slowing its damage and speed. This must be mitigated by using her Elemental Skill to clear the Decoding Power.
Elemental Skill Mounts Hovermech
Using her Elemental Skill lets Sandrone mount a chair-like hovermech, greatly increasing her mobility, firing prism shots at opponents, and most importantly decreasing Fagio's existing Decoding Power.
Alternate this with your Charged Attacks to refresh Decoding Power and allow Sandrone to deal damage for longer periods of time by giving her another opportunity to bombard enemies with her Charged Attacks.
Briefly Mounts When Attacking
It is also worth noting that Sandrone mounts this hovermech when using her Charged Attacks independent of the skill itself, giving her brief mobility while attacking.
Doubles as an Exploration Skill
Sandrone's hovermech can also be used in a non-combative way to move across terrain, essentially letting her glide in the air for a brief period of time.
Elemental Burst Deals AoE DMG
Sandrone summons several mechanical devices that deal massive AoE Cryo DMG during her Burst. If she is within the Polestar Field, this counts as Stellar-Conduct DMG.
Extra Snacks When Claiming Daily Commissions
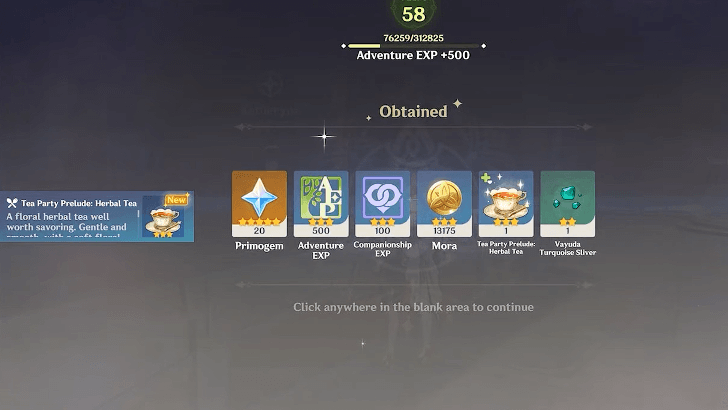
If Sandrone is in the party when you claim your Daily Commissions, Katheryne will give you additional snack rewards.
Invite Characters to Tea Time
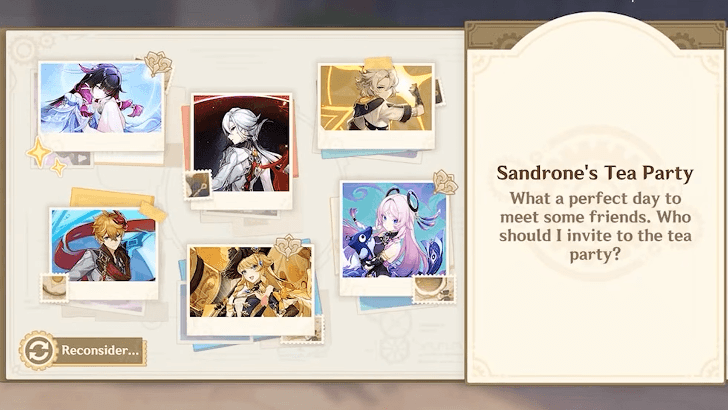
As a Sandrone-exclusive feature, she seems to be able to invite certain characters to a tea time cutscene where they can chat in a cutscene-based format.
Use this as an opportunity to peer more into Sandrone's relationships with the people she can invite.
How to Get Sandrone
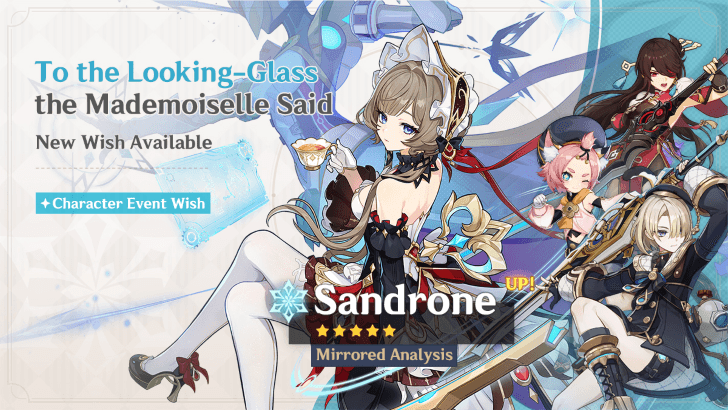
Pull From Sandrone's Banner
|
|
| Banner Status | Inactive |
|---|---|
Sandrone was available in her own debut banner during Phase 1 of Version 6.7, which will run from July 1, 2026 to July 21, 2026. She ran alongside Citlali's rerun banner!
In addition, the 4-stars Beidou, Diona, and Freminet received rate-ups during this banner period.
Sandrone Banner Dates and Characters
Sandrone Release Date
| Genshin Impact Version 6.7 Luna VIII | |
|---|---|
 |
|
| Phase 1 Date | July 1, 2026 |
Sandrone was released as part of the Version 6.7 update during its Phase 1, which released on July 01, 2026!
6.7 - Luna VIII Release Date and Details
Genshin Impact Related Guides

All Characters and Voice Actors
List of All Characters
| Characters by Element | |||
|---|---|---|---|
 Pyro |
 Anemo |
 Electro |
 Hydro |
 Dendro |
 Geo |
 Cryo |
|
Playable Characters
 Chasca
 Faruzan
 Heizou
 Ifa
 Jahoda
 Jean
 Lan Yan
 Lynette
 Mizuki
 Prune
 Sayu
 Traveler (Anemo)
 Varka
 Venti
 Vesna
 Wanderer
 Xianyun
 Xiao
 Aloy
 Ayaka
 Charlotte
 Chongyun
 Citlali
 Eula
 Freminet
 Ganyu
 Kaeya
 Layla
 Lohen
 Mika
 Rosaria
 Shenhe
 Skirk
 Traveler (Cryo)
 Wriothesley
 Alhaitham
 Baizhu
 Collei
 Emilie
 Kaveh
 Kinich
 Kirara
 Lauma
 Nahida
 Nefer
 Tighnari
 Traveler (Dendro)
 Yaoyao
 Clorinde
 Cyno
 Dori
 Fischl
 Flins
 Iansan
 Ineffa
 Keqing
 Lisa
 Ororon
 Raiden
 Razor
 Sara
 Sethos
 Shinobu
 Traveler (Electro)
 Varesa
 Albedo
 Chiori
 Gorou
 Illuga
 Itto
 Kachina
 Linnea
 Navia
 Ningguang
 Noelle
 Traveler (Geo)
 Xilonen
 Yun Jin
 Zhongli
 Zibai
 Aino
 Ayato
 Barbara
 Candace
 Columbina
 Dahlia
 Furina
 Kokomi
 Mona
 Mualani
 Neuvillette
 Nilou
 Sigewinne
 Tartaglia
 Traveler (Hydro)
 Vodyanitsa
 Xingqiu
 Yelan
 Amber
 Arlecchino
 Chevreuse
 Dehya
 Diluc
 Durin
 Gaming
 Hu Tao
 Klee
 Lyney
 Mavuika
 Thoma
 Traveler (Pyro)
 Xiangling
 Xinyan
 Yanfei
 Yoimiya
Upcoming Characters
| All Upcoming Characters |
 Alice |
 Capitano |
 Dainsleif |
 Danica |
|---|---|---|---|
 Dottore |
 Mitya |
 Noy |
 Pantalone |
 Pierro |
 Pulcinella |
 Rerir |
 Tsaritsa |
 Valeriy |
|||
Character Lists
| Characters by Rarity | |
|---|---|
| 5-Star Characters | 4-Star Characters |
| Free Characters | |
| Characters by Weapon Used | |
| Sword Users | Claymore Users |
| Polearm Users | Bow Users |
| Catalyst Users | |
| Characters by Role | |
| Main DPS Characters | Sub DPS Characters |
| Support Characters | Healers |
| Shield Characters | Buff Providers |
| Best for Exploration | Local Specialty Passives |
| Double Reward Passives | |
| Characters by Gender | |
| Male Characters | Female Characters |
| Short Male Characters | Short Female Characters |
| Medium Male Characters | Medium Female Characters |
| Tall Male Characters | Tall Female Characters |
| Characters by Height | |
| Short Characters | Medium Characters |
| Tall Characters | |
| Characters by Region | |
| Mondstadt Characters | Liyue Characters |
| Inazuma Characters | Sumeru Characters |
| Fontaine Characters | Natlan Characters |
| Nod-Krai Characters | Snezhnaya Characters |
Comment
 Anonymous 2 months
Also what about the new Snezhnaya Claymores? do they outrank Tidal Wave for Sandrone? Blade of Atonement (forgeable) Triggering an Elemental Reaction increases the equipping character's Elemental Mastery, while triggering a Stellar Glimmer reaction increases their ATK. Forged by the Golden Melody (Battle Pass) Every 10s, the equipping character plays a "Harmonic Movement" of the corresponding type for a boost in the following order: ATK > Elemental Mastery > Stellar Glimmer reaction DMG.




Sandrone Best Builds and Teams

Premium Articles
Rankings
- We could not find the message board you were looking for.
Gaming News





Popular Games

Genshin Impact Walkthrough & Guides Wiki
Fire Emblem: Fortune's Weave (FEFW) Walkthrough & Guides Wiki
Aniimo Walkthrough & Guides Wiki
Wuthering Waves Walkthrough & Guides Wiki
Dragon's Dogma 2 (DD2) Dark Arisen Walkthrough & Guides Wiki
Umamusume: Pretty Derby Walkthrough & Guides Wiki
Honkai: Star Rail Walkthrough & Guides Wiki
Zenless Zone Zero Walkthrough & Guides Wiki
Pokemon TCG Pocket (PTCGP) Strategies & Guides Wiki
AION 2 Walkthrough & Guides Wiki









Recommended Games
Where Winds Meet Walkthrough & Guides Wiki
Fire Emblem Heroes (FEH) Walkthrough & Guides Wiki
Diablo 4: Lord of Hatred Walkthrough & Guides Wiki
Super Smash Bros. Ultimate Walkthrough & Guides Wiki
Persona 3 Reload Walkthrough & Guides Wiki
The Legend of Zelda: Tears of the Kingdom Walkthrough & Guides Wiki
Elden Ring Walkthrough & Guides Wiki
Pokemon Brilliant Diamond and Shining Pearl (BDSP) Walkthrough & Guides Wiki
Cyberpunk 2077: Ultimate Edition Walkthrough & Guides Wiki
Monster Hunter World Walkthrough & Guides Wiki










All rights reserved
Copyright© 2012-2024 HoYoverse — COGNOSPHERE. All Rights Reserved.
The copyrights of videos of games used in our content and other intellectual property rights belong to the provider of the game.
The contents we provide on this site were created personally by members of the Game8 editorial department.
We refuse the right to reuse or repost content taken without our permission such as data or images to other sites.
How does the Artifact Set "Heart of the Furnace" look for Sandrone? 4-Piece Bonus Increases the equipping character's ATK by 12% for 12s when they trigger a Stellar Glimmer reaction or deal Stellar Glimmer reaction DMG. Also increases Stellar Glimmer reaction DMG dealt by all nearby party members by 50%. The above effects can trigger even when the equipping character is not on the field, and the DMG bonus from multiple Artifact Sets with the same name do not stack.