
Yae Miko Rating and Best Builds
Travelers, participate in Game8's Version 7.1 Survey!
◆ Hot: 7.2 Livestream & Codes, 7.1 Tier List
◆ Builds: Vesna, Vodyanitsa, Skirk, Escoffier
◆ 7.1: Snowball Fight, 2026 Anniversary
◆ Future: Version 7.2, Mitya, Valeriy

Yae Miko is a 5-star Electro Catalyst character in Genshin Impact, who best functions as an Electro Stellar-Conduct Sub-DPS. See her recommended weapons and artifacts, materials, and our rating of this character in this guide!
| Yae Miko's Character Guides | |||
|---|---|---|---|
 Build Guide |
 Lore |
 Special Dish |
|
List of Contents
Yae Miko Rating and Info
Character Information
| Yae Miko | ||
|---|---|---|
 |
Rating |

|
| Rarity | ||
| Element | ||
| Weapon | ||
| Voice Actors |
Ratana (EN)
Ayane Sakura (JP) |
|
 Electro
 Catalyst
Tier List Rankings
| Main DPS | Sub-DPS | Support | Exploration |
|---|---|---|---|
| - |
|
- |

|
Tier Rating
|
As a Sub-DPS With Version 7.0's release, Yae Miko has received new allies in the form of Odette, Cryo Traveler, and Alyosha, which coincidentally is also one of her best team comps barring Sandrone. When especially paired with Stellar-Conduct-enhancing allies like Odette and Alyosha, Yae Miko's damage reaches new heights, and she has solidified herself as one of the top dogs of this current patch. |
Character Tier List | Best Characters
How Would You Rate Yae Miko?
Failed to submit your score. Please try again.
Submitting will update your vote
Yae Miko's Stats
| Stat | Base Value |
|---|---|
| HP | 2095 |
| ATK | 69 |
| DEF | 115 |
| CRIT Rate% | 5% |
| Stat | Max Value |
|---|---|
| HP | 10372 |
| ATK | 340 |
| DEF | 569 |
| CRIT Rate% | 24.2% |
Base Stat Calculations
 | Stats indicated above are obtained from Yae Miko's base values. These numbers also exclude the character's equipped weapon, artifacts, talents, or other passive effects that are not innate to the character. |
|---|---|
 | All characters start with 5% CRIT Rate, 50% CRIT DMG, 100% Energy Recharge, 0 Elemental Mastery, 0% Healing Bonus, and 0% Elemental DMG bonus before any additional stats are applied. The table above includes such values. |
 | The Level 20 stats indicated for this character are calculated before their first ascension. |
Yae Miko's Ascension and Talent Material Summary
| All Ascension Materials Needed |
|---|
 Mora
×420,000  Sea Ganoderma
×168  Famed Handguard
×36  Old Handguard
×18 |
| All Talent Materials Needed |
Mora
×4,957,500Famed Handguard
×93Old Handguard
×18 Guide to Light
×63 |
 Vajrada Amethyst Sliver
 Vajrada Amethyst Fragment
 Vajrada Amethyst Chunk
 Vajrada Amethyst Gemstone
 Dragonheir's False Fin
 Crown of Insight
Yae Miko's Strengths and Weaknesses
| Strengths | |||
|---|---|---|---|
|
• Great off-field Electro damage and application especially on Aggravate or Quicken teams. • Elemental Skill totems have wide targetting range and may hit any enemies in the vicinity. It also hits foes randomly, which can be an advantagous perk if you're battling against enemies that are spread out. • Gains access to the new Stellar-Conduct reaction, and is considered one of the better options for teams centered around it. • Recent Witch's Revelation buffs remedy her Elemental Skill's uptime interruption before, and is now more reliable once this is activated. |
|||
| Weaknesses | |||
|
• Full potential for modern relevance is locked behind her C1, requiring more investment than usual to unlocking her full potential. • Setup for placing her Elemental Skill require more on-field time, which may lead to team rotation issues. • Elemental Skill totems may unintentionally hit objects and animals in the overworld. |
Yae Miko Best Builds
Yae Miko Sub DPS Builds
Stellar-Conduct Sub-DPS
| Best Weapon | Alternative Weapons | |||
|---|---|---|---|---|
 Kagura's Verity Kagura's Verity Base ATK: 608 Bonus Stat: CRIT DMG 66.2% Skill Effect: Gains the Kagura Dance effect when using an Elemental Skill, causing the Elemental Skill DMG of the character wielding this weapon to increase by 12% for 16s. Max 3 stacks. This character will gain 12% All Elemental DMG Bonus when they possess 3 stacks. |
 A Thousand Floating Dreams A Thousand Floating Dreams Base ATK: 542 Bonus Stat: Elemental Mastery 265 Skill Effect: Equipping Character gains buffs based on other party members' elemental type. If their elemental type is the same as the equipping character, Elemental Mastery is increased by 32. If not, the equipping character's elemental DMG Bonus is increased by 10%. Each effect can stack by a maximum of 3. All nearby party members will also gain an additional 40 Elemental Mastery.  Skyward Atlas Skyward Atlas Base ATK: 674 Bonus Stat: ATK 33.1% Skill Effect: Increases Elemental DMG Bonus by 12%. Normal attack hits have a 50% chance to earn the favor of the clouds, which actively seeks out nearby enemies to attack for 15s. Dealing 160% ATK DMG. Can only occur once every 30s.  The Widsith The Widsith Base ATK: 510 Bonus Stat: CRIT DMG 55.1% Skill Effect: When a character takes the field, they will gain a random theme song for 10s. This can only occur once every 30s. Recitative: ATK is increased by 60%. Aria: Increases all Elemental DMG by 48%. Interlude: Elemental Mastery is increased by 240.  Etherlight Spindlelute Etherlight Spindlelute Base ATK: 510 Bonus Stat: Energy Recharge 45.9% Skill Effect: For 20s after using an Elemental Skill, the equipping character's Elemental Mastery is increased by 100.  Flowing Purity Flowing Purity Base ATK: 565 Bonus Stat: ATK 27.6% Skill Effect: When using an Elemental Skill, All Elemental DMG Bonus will be increased by 8% for 15s, and a Bond of Life worth 24% of Max HP will be granted. This effect can be triggered once every 10s. When the Bond of Life is cleared, every 1,000 HP cleared in the process will provide 2% All Elemental DMG Bonus. Max 12% All Elemental DMG can be gained this way, and lasts 15s. |
|||
| Best Artifact | Artifact Stats | |||
 Disenchantment in Deep Shadows Disenchantment in Deep Shadows 2-PC: ATK +18%. 4-PC: Increases Superconduct Reaction DMG by 80% and Stellar-Conduct Reaction DMG by 40%. When the wielder attacks opponents affected by Superconduct or Stellar-Conduct, this attack's CRIT Rate is increased by 16%. |
 Sands: ATK% or Elemental Mastery  Goblet: ATK%  Circlet: CRIT DMG or CRIT Rate Artifact Sub Stats 1. CRIT DMG 2. CRIT Rate 3. Energy Recharge 4. Elemental Mastery 5. ATK% |
|||
| Alternate Artifacts | ||||
 Gilded Dreams Gilded Dreams 2-PC: Elemental Mastery +80 4-PC: Within 8s of triggering an Elemental Reaction, the character equipping this will obtain buffs based on the Elemental Type of the other party members. ATK is increased by 14% for each member whose Elemental Type is the same as the equipping character, and EM is increased by 50 for every member with a different Elemental Type. Each of the buffs will count up to 3 characters. This effect can be triggered once every 8s and even when not on the field. |
||||
| General Team Comps | ||||
  
Yae Miko's new Best-in-Slot team, featuring Stellar-Conduct. |
 
An easier to acquire variant for Stellar-Conduct, but still requiring Sandrone. |
|||
When focused on Yae Miko's new specific role as a Stellar-Conduct trigger, running Disenchantment in Deep Shadows as an artifact set is one of her most important breakpoints, with Kagura's Verity and the artifact substats to feed her selfish damage.
ATK% on both Sands and Goblet is highly recommended, given that Stellar-Conduct scales a lot with ATK stats. You can use EM on Sands if the team has ATK buffers like Nicole. It's best to note that at C2, EM will get less value.
Electro DMG% on Goblet is not recommended here.
Electro Sub-DPS
| Best Weapon | Alternative Weapons | |||
|---|---|---|---|---|
| Kagura's Verity Kagura's Verity Base ATK: 608 Bonus Stat: CRIT DMG 66.2% Skill Effect: Gains the Kagura Dance effect when using an Elemental Skill, causing the Elemental Skill DMG of the character wielding this weapon to increase by 12% for 16s. Max 3 stacks. This character will gain 12% All Elemental DMG Bonus when they possess 3 stacks. |
A Thousand Floating Dreams A Thousand Floating Dreams Base ATK: 542 Bonus Stat: Elemental Mastery 265 Skill Effect: Equipping Character gains buffs based on other party members' elemental type. If their elemental type is the same as the equipping character, Elemental Mastery is increased by 32. If not, the equipping character's elemental DMG Bonus is increased by 10%. Each effect can stack by a maximum of 3. All nearby party members will also gain an additional 40 Elemental Mastery. Skyward Atlas Skyward Atlas Base ATK: 674 Bonus Stat: ATK 33.1% Skill Effect: Increases Elemental DMG Bonus by 12%. Normal attack hits have a 50% chance to earn the favor of the clouds, which actively seeks out nearby enemies to attack for 15s. Dealing 160% ATK DMG. Can only occur once every 30s. The Widsith The Widsith Base ATK: 510 Bonus Stat: CRIT DMG 55.1% Skill Effect: When a character takes the field, they will gain a random theme song for 10s. This can only occur once every 30s. Recitative: ATK is increased by 60%. Aria: Increases all Elemental DMG by 48%. Interlude: Elemental Mastery is increased by 240.  Dawning Frost Dawning Frost Base ATK: 510 Bonus Stat: CRIT DMG 55.10% Skill Effect: For 10s after a Charged Attack hits an opponent, Elemental Mastery is increased by 72. For 10s after an Elemental Skill hits an opponent, Elemental Mastery is increased by 48. Flowing Purity Flowing Purity Base ATK: 565 Bonus Stat: ATK 27.6% Skill Effect: When using an Elemental Skill, All Elemental DMG Bonus will be increased by 8% for 15s, and a Bond of Life worth 24% of Max HP will be granted. This effect can be triggered once every 10s. When the Bond of Life is cleared, every 1,000 HP cleared in the process will provide 2% All Elemental DMG Bonus. Max 12% All Elemental DMG can be gained this way, and lasts 15s. |
|||
| Best Artifact | Artifact Stats | |||
 Golden Troupe Golden Troupe 2-PC: Elemental Skill DMG +20% 4-PC: Increases Elemental Skill DMG by 25%. Additionally when not on the field, Elemental Skill DMG will be further increased by 25%. This effect will be cleared 2s after taking the field. |
Sands: ATK% or Elemental MasteryGoblet: Electro DMG BonusCirclet: CRIT Rate or CRIT DMG Artifact Sub Stats 1. CRIT Rate 2. CRIT DMG 3. Elemental Mastery 4. Energy Recharge 5. ATK% |
|||
| Alternate Artifacts | ||||
Gilded Dreams
x2  Gladiator's Finale
x2 |
||||
| General Team Comps | ||||
  
Yae Miko's more general use case as a Sub-DPS in Aggravate teams. |
  
A variant of Overload featuring Yae Miko. |
|||
For a general Yae Miko, Kagura's Verity along with a full set of Golden Troupe is taken to increase the damage of her totems while she is off-field, and is usually placed into teams like Aggravate or Hyperbloom.
Aggravate and Hyperbloom teams incentivize the use of Elemental Mastery Sands to help the trigger damage, while ATK% Sands are taken if Yae Miko is placed into other teams like Overload, or even Electro-Charge.
Yae Miko Goal Stat Values
| Stat | Goal Value |
|---|---|
| ATK | 2,000+ |
| Energy Recharge | 130 - 140% (Double Electro) 160%+ (Solo Electro) Not recommended |
| CRIT Rate | 60~70% |
| CRIT DMG | 175% or Above |
| Elemental Mastery | 100 - 200 |
Regardless of your build, Yae Miko normally wants around 2,000 ATK or more to capitalize off her own raw damage, with Energy Recharge at around 130~140% at least to help charge her Elemental Burst.
Afterwards, focus on 60~70% CRIT Rate to capitalize on the frequent Off-Field damage she provides, and as much CRIT DMG as you can add.
Yae Miko's Talent Priority
| 1st | 2nd | 3rd |
|---|---|---|
| Elemental Skill | Elemental Burst | Normal Attack |
Yae Miko's Elemental Skill has a very short cooldown and will mostly remain active throughout the fight. Prioritize leveling her Elemental Skill over her Elemental Burst to deal more consistent DMG.
Yae Miko Best Weapons
CRIT or Elemental Skill Catalysts
Regardless of whether or not she gets slotted into Stellar-Conduct or Aggravate, Kagura's Verity remains her best-in-slot due to how it interacts with her Elemental Skill-based gameplay.
Alternatives include A Thousand Floating Dreams for a more Aggravate-focused comp, and Skyward Atlas and The Widsith for general options.
Best Catalysts for Yae Miko
| Best Weapons for Yae Miko | |
|---|---|
| Best-in-Slot | Kagura's Verity Kagura's Verity Base ATK: 608 Bonus Stat: CRIT DMG 66.2% Skill Effect: Gains the Kagura Dance effect when using an Elemental Skill, causing the Elemental Skill DMG of the character wielding this weapon to increase by 12% for 16s. Max 3 stacks. This character will gain 12% All Elemental DMG Bonus when they possess 3 stacks. |
| Kagura's Verity is Yae Miko's best competitive option since it gives Yae Miko an increase to both Elemental Skill damage and Stellar-Conduct damage up to a maximum of 36%, which is easily triggered by her moveset. In addition to this, she gains a 12% Elemental DMG once all 3 stacks are online, which should always be active all of the time during her rotations. |
|
| Aggravate | A Thousand Floating Dreams A Thousand Floating Dreams Base ATK: 542 Bonus Stat: Elemental Mastery 265 Skill Effect: Equipping Character gains buffs based on other party members' elemental type. If their elemental type is the same as the equipping character, Elemental Mastery is increased by 32. If not, the equipping character's elemental DMG Bonus is increased by 10%. Each effect can stack by a maximum of 3. All nearby party members will also gain an additional 40 Elemental Mastery. |
| A Thousand Floating Dreams gains more leverage over other options if Yae Miko is playing in an Aggravate or Dendro-focused team, to which this becomes a strong preference-based weapon for her. | |
| Generalist Option | Skyward Atlas Skyward Atlas Base ATK: 674 Bonus Stat: ATK 33.1% Skill Effect: Increases Elemental DMG Bonus by 12%. Normal attack hits have a 50% chance to earn the favor of the clouds, which actively seeks out nearby enemies to attack for 15s. Dealing 160% ATK DMG. Can only occur once every 30s. |
| Good general purpose weapon for its ATK stats and the 12% Elemental DMG bonus, which can mimic a fraction of Kagura's Verity's strength. | |
| 4-Star | The Widsith The Widsith Base ATK: 510 Bonus Stat: CRIT DMG 55.1% Skill Effect: When a character takes the field, they will gain a random theme song for 10s. This can only occur once every 30s. Recitative: ATK is increased by 60%. Aria: Increases all Elemental DMG by 48%. Interlude: Elemental Mastery is increased by 240. |
| Considering that Yae Miko frequently swaps out due to her off-field nature, she can make use of every part of The Widsith's Debut passive, and will find success regardless of the team she slots into. It should be worth noting that this comes with a small hit to ATK due to its low base ATK, but is still favored over other options besides her Signature due to how convenient it can be. |
|
| F2P (Craftable) | Flowing Purity Flowing Purity Base ATK: 565 Bonus Stat: ATK 27.6% Skill Effect: When using an Elemental Skill, All Elemental DMG Bonus will be increased by 8% for 15s, and a Bond of Life worth 24% of Max HP will be granted. This effect can be triggered once every 10s. When the Bond of Life is cleared, every 1,000 HP cleared in the process will provide 2% All Elemental DMG Bonus. Max 12% All Elemental DMG can be gained this way, and lasts 15s. |
| Arguably her best F2P option, but requires a healer to proc the last parts of its Elemental DMG bonus passive. Otherwise, it at least guarantees an 8% Elemental DMG bonus upon Elemental Skill cast. | |
All Recommended Weapons for Yae Miko
| Recommended Weapons | How to Get |
|---|---|
| Gacha | |
| Gacha | |
| Gacha | |
| Gacha | |
| Gacha | |
| Gacha | |
| Gacha | |
| Event | |
| Battle Pass | |
| Battle Pass | |
| Crafted | |
| Event | |
| Starglitter Exchange | |
| Gacha | |
| Crafted | |
| Crafted | |
 Lost Prayer to the Sacred Winds
 Memory of Dust
 Sacrificial Jade
 Solar Pearl
 Oathsworn Eye
 Blackcliff Agate
 Favonius Codex
 Hakushin Ring
 Mappa Mare
Yae Miko Best Artifacts
Stellar-Conduct or Elemental Skill Sets
Yae Miko generally wants Golden Troupe as her best-in-slot when using her in 90% of scenarios due to its universal usefulness.
However, Disenchantment in Deep Shadows now gain more traction for her due to the Stellar-Conduct buffs, making it her specialized and even best option under the right conditions.
Best Artifacts for Yae Miko
| Best Artifact Sets for Yae Miko | |
|---|---|
| Best-in-Slot | Golden Troupe Golden Troupe 2-PC: Elemental Skill DMG +20% 4-PC: Increases Elemental Skill DMG by 25%. Additionally when not on the field, Elemental Skill DMG will be further increased by 25%. This effect will be cleared 2s after taking the field. |
| Her overall Best-in-Slot no matter the circumstance since it buffs her Elemental Skill DMG, which is the main source of her damage. | |
| Stellar | Disenchantment in Deep Shadows Disenchantment in Deep Shadows 2-PC: ATK +18%. 4-PC: Increases Superconduct Reaction DMG by 80% and Stellar-Conduct Reaction DMG by 40%. When the wielder attacks opponents affected by Superconduct or Stellar-Conduct, this attack's CRIT Rate is increased by 16%. |
| With Stellar-Conduct now as an option for Yae Miko, her frequent Electro hits will proc Stellar-Conduct and allow her to reap near-constant benefits from it. This is her best option if using her solely in Stellar-Conduct teams. | |
| Substitute | Gilded Dreams x2 Gilded Dreams x2 2-PC: Elemental Mastery +80 4-PC: Within 8s of triggering an Elemental Reaction, the character equipping this will obtain buffs based on the Elemental Type of the other party members. ATK is increased by 14% for each member whose Elemental Type is the same as the equipping character, and EM is increased by 50 for every member with a different Elemental Type. Each of the buffs will count up to 3 characters. This effect can be triggered once every 8s and even when not on the field. Gladiator's Finale x2 Gladiator's Finale x2 2-PC: ATK +18%. 4-PC: If the wielder of this artifact set uses a Sword, Claymore or Polearm, increases their Normal Attack DMG by 35%. |
| Generalist alternatives that work for Yae while farming for either Golden Troupe or Disenchantment sets. 2-pc. Golden Troupe is also available in place of either 2-pc. sets if you can get two pieces with solid substats. | |
Best 4-Star Artifact for Yae Miko
| Artifact | Artifact Bonuses |
|---|---|
 Gambler |
2-PC: Increases Elemental Skill DMG by 20%. 4-PC: Defeating an enemy has a 100% chance to remove Elemental Skill CD. Can only occur once every 15s. |
Yae Miko Artifact Stat Priority
| Stat Priority | ||
|---|---|---|
|
|
|
| Substats: Energy Recharge > ATK > CRIT Rate > CRIT DMG > Elemental Mastery |
||
| Summary: • ATK% Sands are mostly preferred over Elemental Mastery, but the latter gains more traction when Yae is run in Aggravate teams. • Energy Recharge should be sought after in substats, but not as a main stat. • Electro DMG Bonus is picked above all other options due to Yae's damage being mostly raw Electro. • CRIT Rate is preferred over CRIT DMG due to most of her weapons having CRIT DMG secondary stats. |
||
List of Artifacts and Set Bonuses
Yae Miko Best Team Comps
Prefers Dendro or Stellar Teams
Yae Miko is a Sub-DPS that provides off-field Electro DMG by setting up her Sesshou Sakura turrets.
She shines best in Aggravate, Stellar-Conduct, or Overload teams that can make use of her frequent Electro application.
Stellar-Conduct Teams
| Yae Miko Stellar-Conduct | |||
|---|---|---|---|
|
Yae Miko
|
Sandrone
|
Qiqi
Diona
|
Nicole
 Xilonen |
|
Team Summary With the introduction of Stellar-Conduct, it is now Yae Miko's best team and best use case to be paired with Sandrone as a Stellar-Conduct trigger alongside Qiqi for the buffs. Nicole is there for the general ATK buffs, even despite the lack of Hexerei: Secret Rite's presence. Alternate Teammates Diona can take Qiqi's place within the team for similar effect, and Xilonen can take Nicole's place to instead grant RES shred for the team. |
|||
Dendro Teams
| Yae Miko Dendro | |||
|---|---|---|---|
|
Yae Miko
|
Alhaitham
 Tighnari |
Nahida
 Kirara |
 Baizhu  Fischl |
|
Team Summary Pretty much, Yae Miko can work in any team that has a Dendro presence, allowing her to proc Aggravate and/or Hyperbloom if the situation allows for it, though the latter is less recommended due to Yae Miko wanting ATK most of the time. She will most often be paired with Dendro staples like Alhaitham and Nahida due to her own abundance of Electro. |
|||
Overload Teams
| Yae Miko Overload | |||
|---|---|---|---|
|
Yae Miko
|
Chevreuse
|
 Bennett  Sara
Nicole |
 Raiden  Yoimiya  Clorinde  Arlecchino |
|
Team Summary One of Yae Miko's other use cases is in Overload teams with Raiden, Yoimiya, or other applicable DPS units. Chevreuse is nearly non-negotiable in any of these teams, and the last slot is saved for extra buffers like Bennett, Kujou Sara, or Nicole. |
|||
Notable Teammates
| Character | Explanation |
|---|---|
|
Sandrone
|
Main DPS Sandrone's best teammate by far, especially with C1. Yae Miko provides Electro hits for the Polestar Field, and in C1, she gives a massive Stellar-Conduct DMG%. |
|
Raiden
|
Main DPS Her general best-in-slot. Yae and Raiden synergize very well - Raiden lowers Yae's ER Requirements while Yae provides Resolves stacks. |
|
Sara
|
Support A staple in buffing Electro units, Sara provides significant ATK boost and, at C6, CRIT DMG buffs. |
|
Fischl
|
Sub-DPS Amazing pair, especially in reaction teams. Fischl greatly reduces Yae's ER requirements with her A4 passive and Yae can be a reaction driver for it. Best used in Aggravate teams. |
|
Nahida
|
Sub-DPS Amazing off-field Dendro application. Nahida and Yae makes an incredible duo in an Aggravate team. |
|
Chevreuse
|
Support Yae's off-field Electro application allows Chevreuse's buff to be constantly available. Chevreuse also buffs Yae's ATK and, at C6, her Electro DMG. |
|
Arlecchino
|
Main DPS Arlecchino and Yae pairs well in Overload teams. Adding Chevreuse, the team benefits a lot of DMG boosts and the off-field Electro DMG allows Arlecchino to utilize Overload DMG. |
 Kazuha |
Support Kazuha gives significant DMG buff and RES shred with 4pc Viridescent Venerer. His grouping capability is a good bonus. |
|
Xilonen
|
Support Similar to Kazuha, Xilonen provides RES shred and DMG buff. However, her buffs last longer and heals enough. In exchange, she does not provide any personal damage. |
 Xiangling |
Sub-DPS Consistent off-field Pyro application as well as good amount of personal damage allows Xiangling to synergize well with Yae Miko, especially in Overload teams. |
|
Alhaitham
|
Main DPS Premier On-field Dendro DPS. A significant asset and often used in Aggravate teams with Yae. |
Yae Miko Best Constellations
| Divina Vulpes |
|---|
 |
Constellation and Effects
| Yae Miko's Constellations | |
|---|---|
| C1 |
Yakan Offering Each time Great Secret Art: Tenko Kenshin activates a Tenko Thunderbolt, Yae Miko restores 8 Elemental Energy to herself. After Yae Miko triggers a Superconduct or Stellar-Conduct reaction, or deals Stellar-Conduct DMG, nearby party members will gain a 50% Electro DMG and Stellar-Conduct DMG Bonus for 10s. Triggering these reactions again will refresh the duration of the DMG bonuses. |
| C2 |
Fox's Mooncall Sesshou Sakura start at Level 2 when created, their max level is increased to 4, and their attack range is increased by 60%. Additionally, when there are Sesshou Sakura in the field, Yae Miko's and your current active character's Elemental Mastery will also be increased by 60/90/120/200 points, depending on the level of the Sesshou Sakura. |
| C3 |
The Seven Glamours Increases the Level of Yakan Evocation: Sesshou Sakura by 3. Maximum upgrade level is 15. |
| C4 |
Sakura Channeling When Sesshou Sakura lightning hits opponents, the Electro DMG Bonus of all nearby party members is increased by 20% for 5s, and Yae Miko regenerates 8 Elemental Energy. The aforementioned Elemental Energy recovery effect can trigger once every 5s. Additionally, Yae Miko's Elemental Burst DMG is increased by 100%. |
| C5 |
Mischievous Teasing Increases the level of Great Secret Art: Tenko Kenshin by 3. Maximum upgrade level is 15. |
| C6 |
Forbidden Art: Daisesshou Sesshou Sakura's attacks will ignore 60% of the opponents' DEF. The CRIT DMG of Yae Miko's Stellar-Conduct DMG is increased by 200%. |
Best Constellations Rating and Explanation
| Rating | Constellation Effect / Merits | |
|---|---|---|
| C1 | ★★★ |
• Massively reduces her Energy Recharge requirements. • Massively increases Stellar-Conduct DMG. |
| C2 | ★★☆ |
• Significantly increases the range and damage of her Elemental Skill. • Increases the Elemental Mastery of Yae Miko and the active character. |
C1 for a Massive Boost in Stellar-Conduct
With the Witch's Revelation buffs, her C1 grants a significant damage boost in Stellar-Conduct, which makes her a staple support for teams that benefit a lot from this.
The contribution of the buff is so significant, that she is expected to have a role in teams that are centered around Stellar-Conduct.
Yae Miko Talents and How to Use
Normal Attack
| Normal Attack: Spiritfox Sin-Eater |
|---|
| Summons forth kitsune spirits, initiating a maximum of 3 attacks that deal Electro DMG.
Charge Attack Consumes a certain amount of Stamina to deal AoE Electro DMG after a short casting time. Plunge Attack: Plunges toward the ground from mid-air, damaging all opponents in her path with thunderous might. Deals AoE Electro DMG upon impact with the ground. |
| Attribute | Effect (Lvl 1) |
|---|---|
| 1-Hit DMG | 39.70% |
| 2-Hit DMG | 38.5% |
| 3-Hit DMG | 56.90% |
| Charged ATK DMG | 142.90% |
| Charged ATK Stamina Cost | 50.0% |
| Plunge DMG | 56.8% |
| Low/High Plunge DMG | 114%/142% |
Deal AoE Damage with Charged Attacks
 Normal Attack: Spiritfox Sin-Eater |
Yae Miko's Normal Attacks can combo up to three times and her Charged Attacks can deal AoE Electro DMG in a straight line, which can be quite useful against mob enemies.
Animation Cancel Yae Miko's Charged Attack

While Yae Miko has a powerful Charged Attack, the animation has quite a long wind up which takes up time. You can cancel this long animation by jumping as soon as you see the Electro Fox wind Yae Miko's right shoulder!
Elemental Skill
| Yakan Evocation: Sesshou Sakura |
|---|
| To Yae, such dull tasks as can be accomplished by driving spirits out need not be done personally. Moves swiftly, leaving a Sesshou Sakura behind.
Sesshou Sakura ・Periodically strikes one nearby opponent with lightning, dealing Electro DMG. ・When there are other Sesshou Sakura nearby, their level will increase, boosting the DMG dealt by these lightning strikes. ・This skill has three charges. A maximum of 3 Sesshou Sakura can exist simultaneously. The initial level of each Sesshou Sakura is 1, and the initial highest level each sakura can reach is 3. If a new Sesshou Sakura is created too close to an existing one, the existing one will be destroyed. |
| Attribute | Effect (Lvl 1) |
|---|---|
| Level 1 DMG | 60.7% |
| Level 2 DMG | 75.80% |
| Level 3 DMG | 94.80% |
| Level 4 DMG | 118.50% |
| Duration | 14.0s% |
| CD | 4.0s |
Spawn Electro Fox Turrets
 Elemental Skill: Yakan Evocation - Sesshou Sakura |
Yae Miko's Elemental Skill, Yakan Evocation - Sesshou Sakura, places a Sesshou Sakura fox turret that periodically attacks an enemy, dealing Electro DMG. A maximum of three Sesshou Sakuras can be placed at a time.
Place the Fox Turrets Close

To maximize the Sesshou Sakura damage, all of them need to close and connect together. The most efficient to do this is by creating a small triangle. Note that you can create a turret right beside the other one, as long as you don't create another one in the same place!
Unlock Ascension Passive to Reset

After unlocking The Shrine's Sacred Shade passive talent, destroying a turret will reset the cooldown for one of the turrets as well. A turret is destroyed once you deploy a new turret on the field or when the duration runs out.
Can be used to Dash Away from Enemies

When you use a Sesshou Sakura Yae Miko will teleport a short distance forward, if you're running and backwards if you're idle. Skillful use of this would put some distance from enemy attacks and create another turret to strike enemies!
However, you need to carefully place it away from potentially harmful items (like exploding barrels, torches, or water) to avoid hurting Yae Miko or your party.
Elemental Skill Forward and Backwards
| Elemental Skill Animation | |
|---|---|
 Forward (While Moving) |
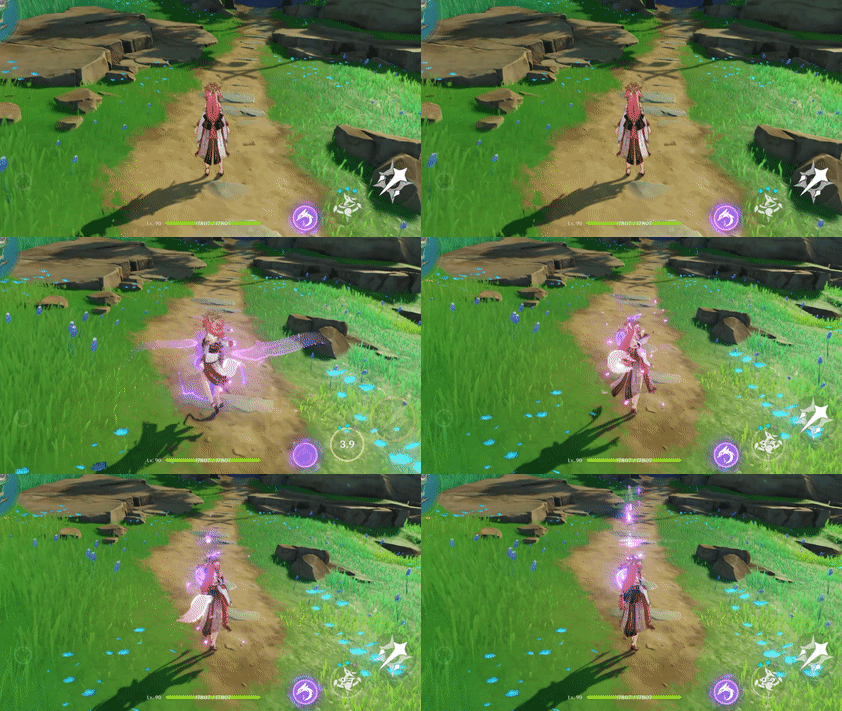 Backward (While Idle) |
Yae Miko's Elemental Skill have different animations; when used while running or walking, she will dash forward and when she's idle or just standing for a short period of time, she will dash backward!
Elemental Burst
| Great Secret Art: Tenko Kenshin |
|---|
| Legends of "kitsunetsuki," or the manifestation of a kitsune's might, are common in Inazuma's folktales. One that particularly captures the imagination is that of the Sky Kitsune, said to cause lightning to fall down upon the foes of the Grand Narukami Shrine. Summons a lightning strike, dealing AoE Electro DMG.
When she uses this skill, Yae Miko will unseal nearby Sesshou Sakura, destroying their outer forms and transforming them into Tenko Thunderbolts that descend from the skies, dealing AoE Electro DMG. Each Sesshou Sakura destroyed in this way will create one Tenko Thunderbolt. Flavor Text: Only at times like these will Yae reveal her Sky Kitsune form and wield lightning itself. None have seen the Lady Guuji's tails and lived to tell the story... so remember, as far as you are concerned, Lady Yae does not have a tail. |
| Attribute | Effect (Lvl 1) |
|---|---|
| Skill DMG | 260% |
| Tenko Thunderbolt DMG | 334% |
| CD | 22.0s |
| Energy Cost | 90 |
Electrify Enemies with Burst
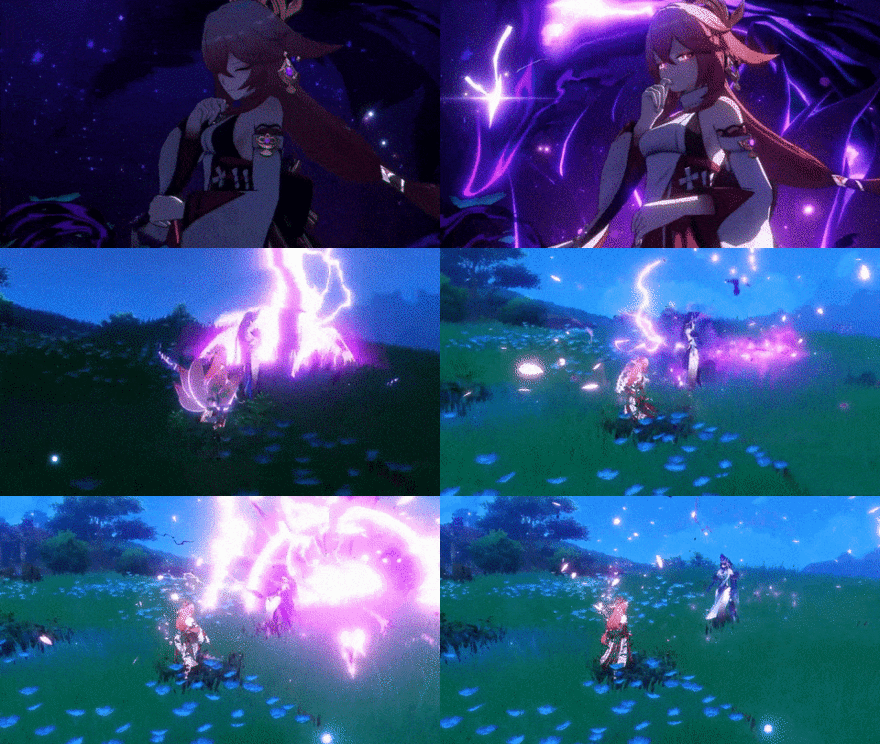 Elemental Burst: Great Secret Art - Tenko Kenshin |
When Yae Miko uses her Elemental Burst, she will use up all nearby Sesshou Sakura to deal devastating AoE Electro DMG. After the initial hit, succeeding bolts of lightning will strike the area based on the number of Sesshou Sakura available prior to usage!
Fox Turrets increase Burst DMG
| Without Fox Turrets | With Fox Turret |
|---|---|
 |
|
To increase Yae Miko's Elemental Burst, you need to deploy her fox turrets so that it pulses more with Electro DMG!
Passive Talent 1
| The Shrine's Sacred Shade |
|---|
| When casting her Elemental Burst, Great Secret Art: Tenko Kenshin, each Sesshou Sakura destroyed resets the cooldown for one charge of her Elemental Skill, Yakan Evocation: Sesshou Sakura. |
Passive Talent 2
| Enlightened Blessing |
|---|
| Every point of Elemental Mastery Yae Miko possesses will increase Sesshou Sakura DMG by 0.15%. |
Passive Talent 3
| Meditations of a Yako |
|---|
| Has a 25% chance to get 1 regional Character Talent Material (base material excluded) when crafting. The rarity is that of the base material.
The extra Talent Material created is from the same region and of the same rarity, but of a random type. |
Yae Miko Witch's Revelation Buffs
Totems Do Not Disappear
Upon unlocking her Witch's Revelation buff, Yae Miko's Elemental Skill totems will no longer disappear after using her Elemental Burst, allowing for far more uptime when using her abilities.
In addition, dedicated instances of Yae Miko's Elemental Skill attacks are converted to Stellar-Conduct DMG while under the influence of a Stellar-Conduct Polestar Field.
Yae Miko Ascension and Talent Materials
Yae Miko Ascension Materials
| Lv.20→Lv.40 | |
|---|---|
| Lv.40→Lv.50 |
Old Handguard
×15Sea Ganoderma
×10 |
| Lv.50→Lv.60 |
Sea Ganoderma
×20 |
| Lv.60→Lv.70 |
Sea Ganoderma
×30 |
| Lv.70→Lv.80 |
Famed Handguard
×12Sea Ganoderma
×45 |
| Lv.80→Lv.90 |
Famed Handguard
×24Sea Ganoderma
×60 |
Yae Miko Talent Level-Up Materials
| Daily Domain Drops | Enemy Drops | Weekly Boss Drops |
|---|---|---|
Wed/Sat/Sun Teachings of Light |
Nobushis Old Handguard
|
Raiden Shogun Challenge Reward The Meaning of Aeons |
|
Guide to Light
|
 Kageuchi Handguard |
|
 Philosophies of Light |
Famed Handguard
|
How to Get Yae Miko
Pull on Yae Miko's Banner
|
|
| Banner Status | Inactive |
|---|---|
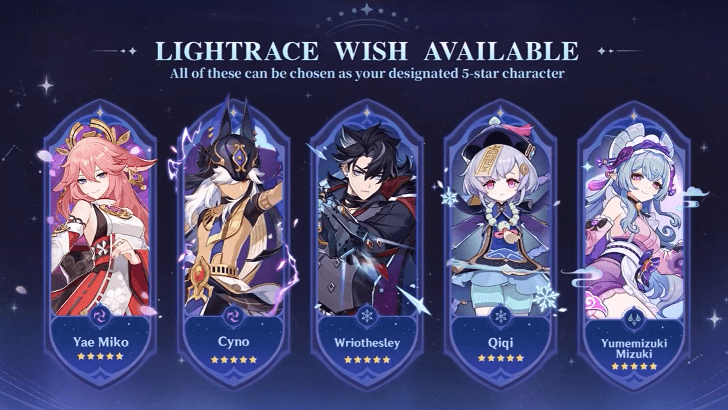
Yae Miko was one of the featured characters in the exclusive Lightrace Wish banner, which was available from July 1, 2026 until July 21, 2026 during Phase 1 of Version 6.7.
She shared this exclusive Chronicled Wish banner with Cyno, Wriothesley, Qiqi, and Yumemizuki Mizuki.
Related Wish Banner Guides
| Click to view a Banner Guide! | ||
|---|---|---|
 Banner Info |
 Wish Sim |
 All Wishes |
Genshin Impact Character Guides

All Characters and Voice Actors
List of All Characters
| Characters by Element | |||
|---|---|---|---|
 Pyro |
 Anemo |
 Electro |
 Hydro |
 Dendro |
 Geo |
 Cryo |
|
Playable Characters
 Chasca
 Faruzan
 Heizou
 Ifa
 Jahoda
 Jean
 Lan Yan
 Lynette
 Mizuki
 Prune
 Sayu
 Sucrose
 Traveler (Anemo)
 Varka
 Venti
 Vesna
 Wanderer
 Xianyun
 Xiao
 Aloy
 Ayaka
 Charlotte
 Chongyun
 Citlali
 Escoffier
 Eula
 Freminet
 Ganyu
 Kaeya
 Layla
 Lohen
 Mika
 Odette
 Rosaria
 Shenhe
 Skirk
 Traveler (Cryo)
 Wriothesley
 Collei
 Emilie
 Kaveh
 Kinich
 Lauma
 Nefer
 Traveler (Dendro)
 Yaoyao
 Alyosha
 Cyno
 Dori
 Flins
 Iansan
 Ineffa
 Keqing
 Lisa
 Razor
 Sethos
 Traveler (Electro)
 Varesa
 Albedo
 Chiori
 Gorou
 Illuga
 Itto
 Kachina
 Linnea
 Navia
 Ningguang
 Noelle
 Traveler (Geo)
 Yun Jin
 Zhongli
 Zibai
 Aino
 Ayato
 Barbara
 Candace
 Columbina
 Dahlia
 Furina
 Kokomi
 Mona
 Mualani
 Neuvillette
 Nilou
 Sigewinne
 Tartaglia
 Traveler (Hydro)
 Vodyanitsa
 Xingqiu
 Yelan
 Amber
 Dehya
 Diluc
 Durin
 Gaming
 Hu Tao
 Klee
 Lyney
 Thoma
 Traveler (Pyro)
 Xinyan
 Yanfei
Upcoming Characters
| All Upcoming Characters |
 Alice |
 Capitano |
 Dainsleif |
 Danica |
|---|---|---|---|
 Dottore |
 Mitya |
 Noy |
 Pantalone |
 Pierro |
 Pulcinella |
 Rerir |
 Tsaritsa |
 Valeriy |
|||
Character Lists
| Characters by Rarity | |
|---|---|
| 5-Star Characters | 4-Star Characters |
| Free Characters | |
| Characters by Weapon Used | |
| Sword Users | Claymore Users |
| Polearm Users | Bow Users |
| Catalyst Users | |
| Characters by Role | |
| Main DPS Characters | Sub DPS Characters |
| Support Characters | Healers |
| Shield Characters | Buff Providers |
| Best for Exploration | Local Specialty Passives |
| Double Reward Passives | |
| Characters by Gender | |
| Male Characters | Female Characters |
| Short Male Characters | Short Female Characters |
| Medium Male Characters | Medium Female Characters |
| Tall Male Characters | Tall Female Characters |
| Characters by Height | |
| Short Characters | Medium Characters |
| Tall Characters | |
| Characters by Region | |
| Mondstadt Characters | Liyue Characters |
| Inazuma Characters | Sumeru Characters |
| Fontaine Characters | Natlan Characters |
| Nod-Krai Characters | Snezhnaya Characters |
Comment
 Anonymous about 2 months
Wait for the new electro reaction in Khaenriha, Raiden will step up




Yae Miko Rating and Best Builds

Premium Articles

Rankings
Gaming News





Popular Games

Genshin Impact Walkthrough & Guides Wiki
Fire Emblem: Fortune's Weave (FEFW) Walkthrough & Guides Wiki
Aniimo Walkthrough & Guides Wiki
Wuthering Waves Walkthrough & Guides Wiki
Dragon's Dogma 2 (DD2) Dark Arisen Walkthrough & Guides Wiki
Umamusume: Pretty Derby Walkthrough & Guides Wiki
Honkai: Star Rail Walkthrough & Guides Wiki
Zenless Zone Zero Walkthrough & Guides Wiki
Pokemon TCG Pocket (PTCGP) Strategies & Guides Wiki
AION 2 Walkthrough & Guides Wiki









Recommended Games
Where Winds Meet Walkthrough & Guides Wiki
Fire Emblem Heroes (FEH) Walkthrough & Guides Wiki
Diablo 4: Lord of Hatred Walkthrough & Guides Wiki
Super Smash Bros. Ultimate Walkthrough & Guides Wiki
Persona 3 Reload Walkthrough & Guides Wiki
The Legend of Zelda: Tears of the Kingdom Walkthrough & Guides Wiki
Elden Ring Walkthrough & Guides Wiki
Pokemon Brilliant Diamond and Shining Pearl (BDSP) Walkthrough & Guides Wiki
Cyberpunk 2077: Ultimate Edition Walkthrough & Guides Wiki
Monster Hunter World Walkthrough & Guides Wiki










All rights reserved
Copyright© 2012-2024 HoYoverse — COGNOSPHERE. All Rights Reserved.
The copyrights of videos of games used in our content and other intellectual property rights belong to the provider of the game.
The contents we provide on this site were created personally by members of the Game8 editorial department.
We refuse the right to reuse or repost content taken without our permission such as data or images to other sites.
She and Sandrone are easily the strongest characters at the moment