
Edge of Survival Guide
Travelers, participate in Game8's Version 7.1 Survey!
◆ Hot: 7.2 Livestream & Codes, 7.1 Tier List
◆ Builds: Vesna, Vodyanitsa, Skirk, Escoffier
◆ 7.1: Snowball Fight, 2026 Anniversary
◆ Future: Version 7.2, Mitya, Valeriy
Edge of Survival is a TPS combat challenge mode in Genshin Impact. Check out how to unlock it, level strategies, how to play and the rewards that you can get in this guide!
| All Third-Person Shooter Guides | |||||
|---|---|---|---|---|---|
 All Gun Upgrades |
 Edge of Survival |
 Vault Access Card |
|||
 Shadow Realm Locations |
 Shadow Wingdrop Locations |
||||
List of Contents
How to Unlock Edge of Survival
Complete Three Specific Shadow Realms
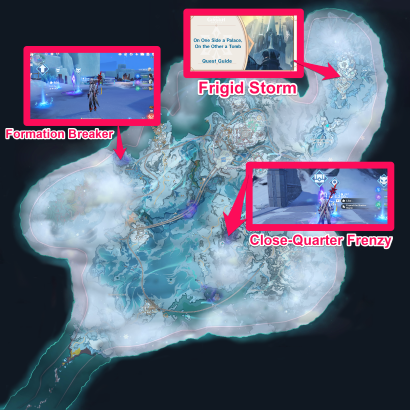
You will need to complete specific Shadow Realms from the overworld to unlock Edge of Survival and its stages. Stages that you can unlock are dependent on what Shadow Realm you have completed.
- Formation Breaker - Can be unlocked in the Shadow Realm in Flamechaser Valley.
- Close-Quarter Frenzy - Can be unlocked in the Shadow Realm in Fellfrost Peak.
- Frigid Storm - Must progress through On One Side a Palace, On the Other a Tomb World Quest to unlock.
Third-Person Shooting Traveler Gameplay
Edge of Survival Level Strategies
Formation Breaker
Use Freeze and Melt to Easily Defeat Enemies
The Freeze elemental reaction is essential in this level since it immobilizes enemies and gives you a chance to deal heavy damage against them using Balsag’s Sunwheel. Since enemies move around often in an attempt to search for cover, it would be a great advantage to freeze them while they are in the open.
Prioritize Eliminating the Medics
Medics are high priority targets that you must eliminate first, above all. If left unchecked, these medics will provide an electro elemental shield to nearby enemies, making them much more difficult to defeat. Defeat these medics before they summon shields for their allies.
Save a Frag Crystal for the Boss
The boss in this level is capable of dealing devastating melee and ranged damage, and it is recommended to have at least one Hydro Frag Crystal saved to make the boss fight much easier. Keep your distance from him to avoid getting hit by his clustered ranged attacks and powerful melee attacks.
Recommended Loadout
| Weapon | Attachment |
|---|---|
| Shatunaya's Frostsilver | • Muzzle • Ammo Feed |
| Balsag's Sunwheel | • Ammo Feed • Gunsights |
| Grenade | |
| Frag Crystal - Hyrdo | |
Close-Quarter Frenzy
Stellar Conduct Can Deal Significant Damage
Ashamez's Thunder is a powerful weapon for this level since it can easily trigger any electro related elemental reactions. Stellar Conduct is useful for quickly shaving down enemy HP, and Overload is a great way to break shields or stagger enemies.
Use Overload to Knock Enemies in the Air
Overload is a great elemental reaction to take advantage of in this level since many enemies are easy to launch in the air or have cryo elemental shields.
Shoot the Explosive Barrels
Make use of surrounding Explosive Barrels to damage nearby enemies and launch them in the air. Additionally, this will also apply a pyro infliction on them, allowing you to trigger overload for an additional chance to knock them in the air.
Watch Out for Snipers
It is easy to be distracted by the close-range enemies nearing your position, but it is best to be aware that snipers can also spawn on high ground and deal significant damage to you. Make sure to observe and eliminate them first before proceeding to other enemies.
Alternate Between Staying in Cover and Moving Around
The enemies in this level force you out of cover when possible, so make sure to keep moving and watch out for any grenades or AoE attacks heading towards you.
Recommended Loadout
| Weapon | Attachment |
|---|---|
| Ashamez's Thunder | • Muzzle • Ammo Feed • Gunstock • Gunsights |
| Balsag's Sunwheel | • Ammo Feed • Gunsights |
| Grenade | |
| Frag Crystal - Pyro | |
Frigid Storm
Make Use of Stellar Conduct and Overload
Stellar Conduct excels at breaking the Cryo shields that certain elite enemies envelop themselves in, while Overload is a good way to take care of multiple enemies at once due to its AoE explosion. You can combine the both of them for maximum lethality.
Prioritize Defeating Moldered Enemies First
Moldering Mark is a debuff in this level wherein you periodically lose health unless you defeat another enemy. Defeating a moldered enemy while you are already debuffed will reapply moldered, so it is best to defeat moldered enemies first and then defeat the non-moldered enemies last to avoid having a lasting infliction on yourself. Moldered enemies are marked with a distinct red glow surrounding them.
Destroy the Lingering Illusion's Anemo Orbs to Prevent a Devastating Attack
The Ever-Lingering Illusion boss will occasionally summon multiple Anemo Orbs around itself in an attempt to activate a devastating attack. Make sure to destroy the orbs by shooting them to prevent this attack from being charged and to stagger the boss, giving you a large window to deal damage to it.
Recommended Loadout
| Weapon | Attachment |
|---|---|
| Ashamez's Thunder | • Muzzle • Ammo Feed • Gunstock • Gunsights |
| Balsag's Sunwheel | • Ammo Feed • Gunsights |
| Grenade | |
| Frag Crystal - Pyro | |
How to Play Edge of Survival
Defeat as Many Enemies Within the Time Limit
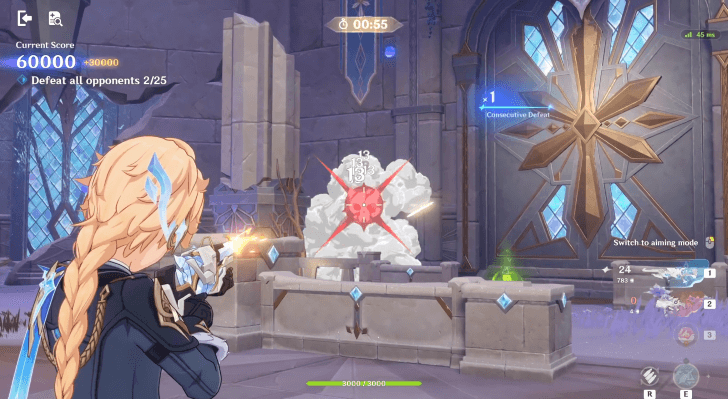
The main goal of Edge of Survival is to defeat enemies as much as possible before the time limit ends. Defeating opponents in quick succession will earn you more points and adds more duration to your timer.
The points and time that you earn is dependent on how strong the opponent that you have defeated.
Select Clauses to Earn More Points
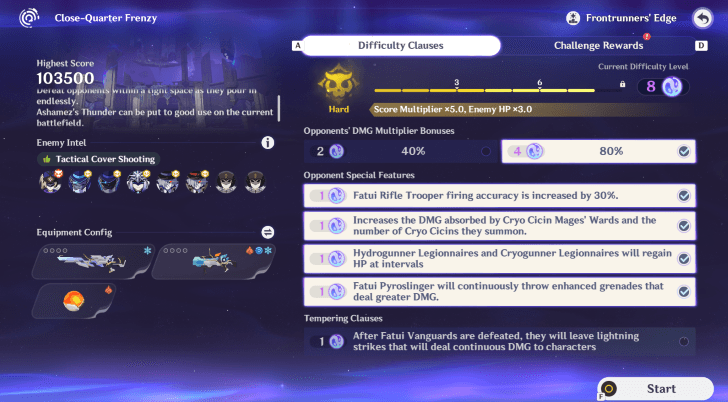
Before the challenge starts, you may select clauses for the stage that will increase the overall difficulty of it, but will allow you to earn more points in exchange. The higher the difficulty, the more points that you earn.
Earn Medals Depending on Your Challenge Score
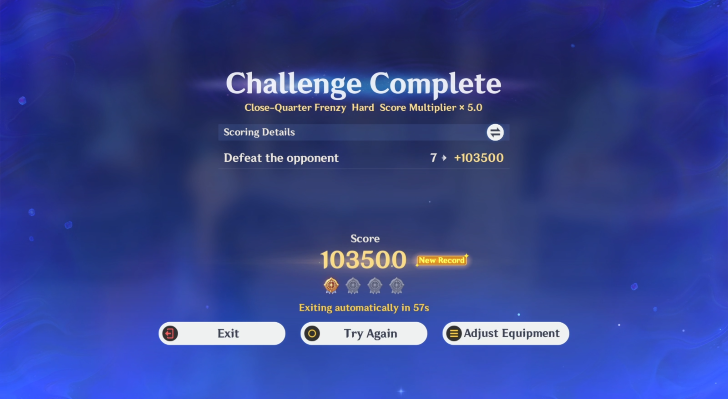
You can earn medals depending on the points that you have acquired after completing the stage. Each medal requires different amount of points and the higher you have, the more medals you earn.
Edge of Survival Rewards
Stage Rewards
| Points | Rewards |
|---|---|
| 50,000 Challenge Score |
 Primogem
x15  Mora
x20,000 |
| 200,000 Challenge Score |
Primogem
x15 Mora
x20,000 |
| 400,000 Challenge Score |
Mora
x20,000 |
| 600,000 Challenge Score |
Mora
x20,000 |
 Mystic Enhancement Ore
 Fragile Resin
 Sanctifying Unction
Genshin Impact Related Guides

Third-Person Shooter (TPS) Guide
All Third-Person Shooter (TPS) Guides
| All TPS Guides | |
|---|---|
| All Gun Blueprints and Upgrades | Edge of Survival |
| Shadow Realm Locations | Shadow Wingdrop Locations |
| How to Raise Shadow Vault Access | - |
Comment




Edge of Survival Guide

Premium Articles


Rankings
- We could not find the message board you were looking for.
Gaming News





Popular Games

Genshin Impact Walkthrough & Guides Wiki
Fire Emblem: Fortune's Weave (FEFW) Walkthrough & Guides Wiki
Aniimo Walkthrough & Guides Wiki
Wuthering Waves Walkthrough & Guides Wiki
Dragon's Dogma 2 (DD2) Dark Arisen Walkthrough & Guides Wiki
Umamusume: Pretty Derby Walkthrough & Guides Wiki
Honkai: Star Rail Walkthrough & Guides Wiki
Zenless Zone Zero Walkthrough & Guides Wiki
Pokemon TCG Pocket (PTCGP) Strategies & Guides Wiki
AION 2 Walkthrough & Guides Wiki









Recommended Games
Where Winds Meet Walkthrough & Guides Wiki
Fire Emblem Heroes (FEH) Walkthrough & Guides Wiki
Diablo 4: Lord of Hatred Walkthrough & Guides Wiki
Super Smash Bros. Ultimate Walkthrough & Guides Wiki
Persona 3 Reload Walkthrough & Guides Wiki
The Legend of Zelda: Tears of the Kingdom Walkthrough & Guides Wiki
Elden Ring Walkthrough & Guides Wiki
Pokemon Brilliant Diamond and Shining Pearl (BDSP) Walkthrough & Guides Wiki
Cyberpunk 2077: Ultimate Edition Walkthrough & Guides Wiki
Monster Hunter World Walkthrough & Guides Wiki










All rights reserved
Copyright© 2012-2024 HoYoverse — COGNOSPHERE. All Rights Reserved.
The copyrights of videos of games used in our content and other intellectual property rights belong to the provider of the game.
The contents we provide on this site were created personally by members of the Game8 editorial department.
We refuse the right to reuse or repost content taken without our permission such as data or images to other sites.