
Trial of the Bastion Event Guide
Travelers, participate in Game8's Version 7.1 Survey!
◆ Hot: 7.2 Livestream & Codes, 7.1 Tier List
◆ Builds: Vesna, Vodyanitsa, Skirk, Escoffier
◆ 7.1: Snowball Fight, 2026 Anniversary
◆ Future: Version 7.2, Mitya, Valeriy

Trial of the Bastion is a base defense event in Genshin Impact Version 7.0. See the best placement for the mechanisms, how to complete all objectives, and the rewards for it here!
 |
|---|
 under the page title to keep track of this event's updates!
Trial of the Bastion Handling Event Schedule
Trial of the Bastion Stages and Unlock Dates
| Stages | Unlock Dates |
|---|---|
| Stage 1 - Hold the Pass | September 7, 2026 |
| Stage 2 - Triple Assault | September 8, 2026 |
| Stage 3 - Crossfire Attack | September 9, 2026 |
| Stage 4 - Three-Dimensional Front | September 10, 2026 |
| Stage 5 - Multi-Pronged Fortification | September 11, 2026 |
Stage 1 - Hold the Pass
| Hold the Pass | |
|---|---|
 |
|
| Objectives | • Score 1000 Challenge Rating • Score 2000 Challenge Rating • Score 3500 Challenge Rating |
| Enemies | Wave 1 x10 Wave 2  x1
x11 Wave 3
x2
x12 |
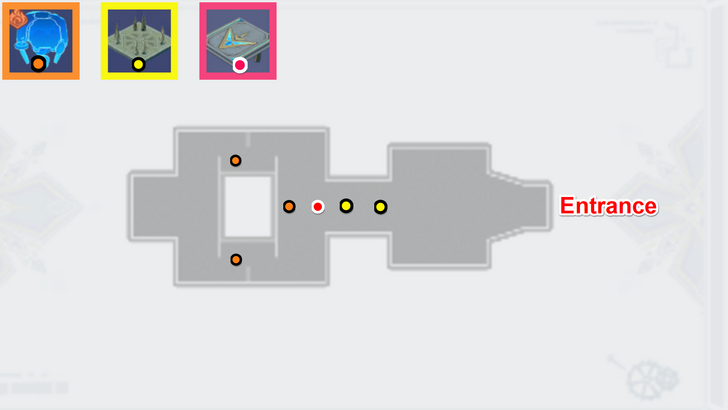
| Recommended Mechanisms |  Impact Shield  Suppression Device - Blaze  Spike Mechanism |
The mechanism placements are what we have found to be the most effective ones, but different strategies may find success as well.
We recommend placing yourself near the end of the hallway, near where we put the Impact Shield in our final mechanism placements.
Wave 1 Strategy
Most of the waves will start off with Volkodlak Sharpshooters running towards you in a straight line. We highly recommend using the Assault Rifle for it's Charged Attack that can penetrate multiple enemies to kill them all in one shot.
Wave 2 and 3 Strategy
Before Wave 2, place two Spike Mechanisms in the hallway and a Suppression Device at the end of the hallway to prevent the Fanged Zealot from progressing too far.
Use your Frag Grenades to quickly dispose of the Fanged Zealot. We have found success with the Electro Frags in conjunction with the Cryo Grenade Launcher create a Stellar-Conduct reaction. Be mindful that Frags has the possibility to get stuck in the walls if you're too far, so it's best to maintain a good distance when throwing them.
Stage 2 - Triple Assault
| Triple Assault | |
|---|---|
 |
|
| Objectives | • Score 1000 Challenge Rating • Score 2000 Challenge Rating • Score 3500 Challenge Rating |
| Enemies | Wave 1 Entrance 1:
 x10 Wave 2 Entrance 1:
 x1
x6 Entrance 2:
 x1
x4 Wave 3 Entrance 1:
x1
x7Entrance:
x1
x5
x4 |
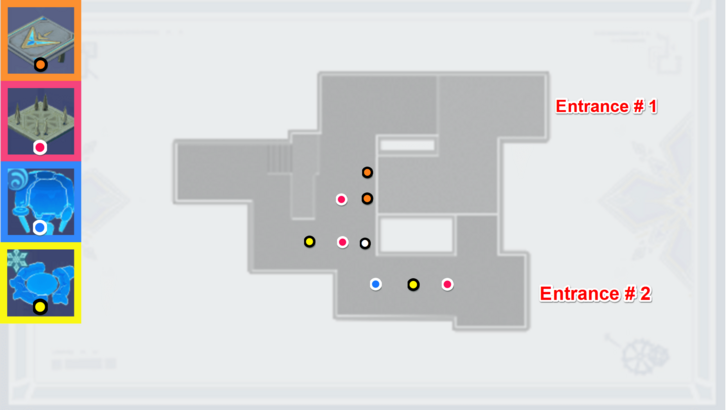
| Recommended Mechanisms | Impact Shield Ice Mist Trap  Suppression Device - Wild WavesSpike Mechanism |
The mechanism placements are what we have found to be the most effective ones, but different strategies may find success as well.
The white dot means that the mechanism is already there by default.
For this stage, we recommend shifting back and forth between the entrances, depending on which enemies go first. Generally, for the safest part, you can stay around the area where the two entrances converge since the enemies will pass through there regardless of entrance.
Wave 1 Strategy
Deploy the two Impact Shield near the upslope of Entrance 1, mostly in preparation for the subsequent waves. For the majority of Wave 1, focus only on Entrance 1 since most of the enemies will only go from there.
Mowing down the enemies with your guns should suffice to clear the waves.
Wave 2 Strategy
In wave 2, deploy a Suppression Device, Ice Mist Trap, and Spike Mechanism near Entrance 2 since you will be focusing mainly on Entrance 1 here. You can add more Spike Mechanisms and Ice Mist Trap in accordance with our Final Mechanism Placements. A Rugged Elder Leshy will spawn in Entrance 1, and you will need to focus on defeating it since it can heal itself after a period of time.
Let the mechanisms deal with or stall enemies at Entrance 2, but be mindful of the map in case any pass through them. In our run, only a few stragglers survived, and they were quickly dealt with.
Wave 3 Strategy
Focus first on the Rugged Elder Leshy on Entrance 1 before shifting towards Entrance 2. As always, be mindful of stragglers that may have passed through the mechanisms via the map.
Make use of Frags to deal with multiple enemies and trigger reactions. We used the Electro Frag in conjunction with the Cryo Grenade Launcher and found success with it.
Stage 3 - Crossfire Attack
| Crossfire Attack | |
|---|---|
 |
|
| Objectives | • Score 1000 Challenge Rating • Score 2000 Challenge Rating • Score 3500 Challenge Rating |
| Enemies | Wave 1 Entrance 1:
x3 Entrance 2:
x7Wave 2 Entrance 1:
x2Entrance 2:
 x1
x1
x10 Wave 3 Entrance 1:
x1
x6Entrance 2:
x1
x10Entrance 3:
x2 |
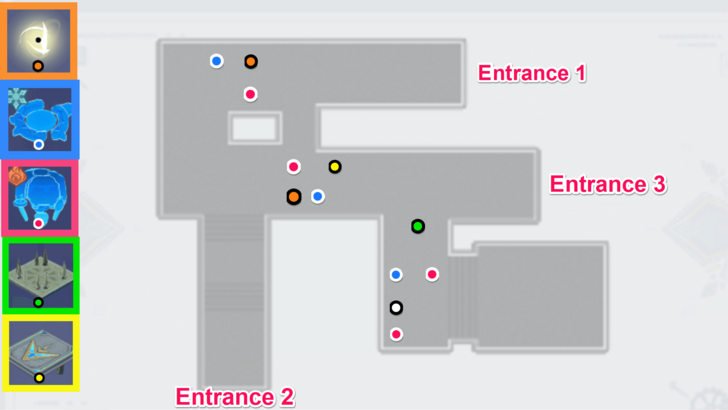
| Recommended Mechanisms | Impact ShieldIce Mist TrapSuppression Device - Blaze Pulling MechanismSpike Mechanism |
The mechanism placements are what we have found to be the most effective ones, but different strategies may find success as well.
The white dot means that the mechanism is already there by default.
In this stage, you will mainly focus on Entrance 2 since the enemies from Entrance 1 will go the same path anyways. We recommend positioning yourself at the bottom of the stairs leading to Entrance 2.
Wave 1 Strategy
Place a Suppression Device, a Pulling Mechanism, and an Ice Mist Trap near the path towards Entrance 1. Focus on Entrance 2 by mowing the enemies down with your guns. Most enemies from Entrance 1 should be dealt with the mechanism, but still be mindful of your map in case any stragglers managed to get passed them.
This should suffice for you to progress to Wave 2 without any enemies getting away.
Wave 2 Strategy
Similarly, place the same mechanisms as you did in Wave 1, but this time near the Entrace 2 staircase. A Glacial Warden will spawn in Entrance 2 and we have found that it's best to utilize an Electro Frag in conjunction with the Cryo Grenade Launcher. However, any reaction should be good here.
Eventually, place an Impact Shield near the Ice Mist Trap in Entrance 2 to stagger any enemies that pass through that path.
Wave 3 Strategy
Focus now on barricading the pathway to the exit by first placing a Spike Mechanism, 2 Suppression Device, and an Ice Mist Trap in accordance to our Final Mechanism Placements.
At the start, immediately place yourself near Entrance 3 since a lone Long-Eared Striker will spawn and then immediately shift towards Entrance 2 once again. Another one will spawn again eventually and the mechanisms that you placed near the exit should suffice in dealing with them. Still, practice caution by checking your map constantly.
Stage 4 - Three-Dimensional Front
| Three-Dimensional Front | |
|---|---|
 |
|
| Objectives | • Score 1000 Challenge Rating • Score 2000 Challenge Rating • Score 3500 Challenge Rating |
| Enemies | Wave 1 Entrance 1:
x6Entrance 2:
 x2
x4 Wave 2 Entrance 1:
x6Entrance 2:
x1
x6Entrance 3:
x3Wave 3 Entrance 1:
x1
x11Entrance 2:
x1
x4Entrance 3:
x5
x2 |
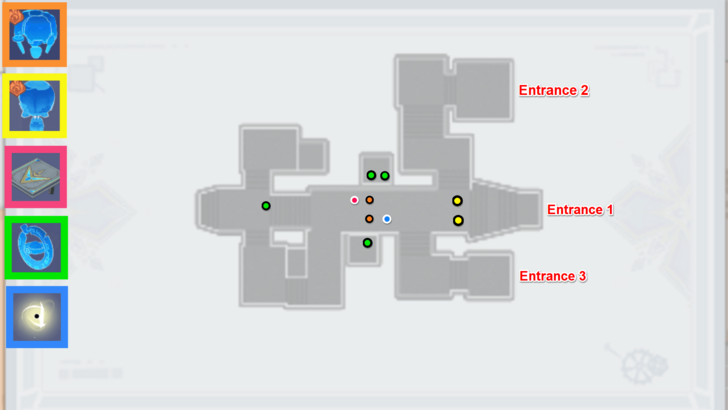
| Recommended Mechanisms | Impact ShieldSuppression Device - BlazePulling Mechanism Explosive Barrel Device  Suppression Device - Faster Blaster |
The mechanism placements are what we have found to be the most effective ones, but different strategies may find success as well.
Position yourself right in the middle area, where all the entrance paths converge. This is the best place for you to see all the enemies coming to your direction.
Wave 1 Strategy
First and foremost, deploy two Suppression Device - Faster Blaster in the middle area, where the platform is elevated; one from the north, one from the south. This is to prevent flying enemies from passing through you.
As for the rest of the enemies, mow them down with your guns.
Wave 2 Strategy
For this time around, deploy two Suppression Device - Blaze in the middle area and one should be facing sideways while the other is facing at the front. Afterwards, deploy another Suppression Device - Faster Blaster for good measure.
Use your frags against the high-priority enemies, such as the Glacial Warden and the Elder Leshy. From our runs, the Suppression Device - Faster Blaster is enough to deal with the flying enemies. However, still practice caution by checking your map or damaging them just a bit to make sure they don't get pass through.
Wave 3 Strategy
Finally, deploy two Explosive Barrel Device in the bottom staircase of Entrance 1. You can just shoot it if you want to trigger them, but we have found the best results by triggering it using a Frag, especially when high-priority enemies appear.
Within our run, we only 10 out of 12 mechanisms that you can deploy. Feel free to add two more mechanisms anywhere for more comfort!
Stage 5 - Multi-Pronged Fortification
| Multi-Pronged Fortification | |
|---|---|
 |
|
| Objectives | • Score 1000 Challenge Rating • Score 2000 Challenge Rating • Score 3500 Challenge Rating |
| Enemies | Wave 1 Entrance 1:
x8Entrance 2:
x4Wave 2 Entrance 1:
x1
x6Entrance 2:
x1
x5Entrance 3:
x3Wave 3 Entrance 1:
x2
x8Entrance 2:
x2
x6Entrance 3:
x6 |
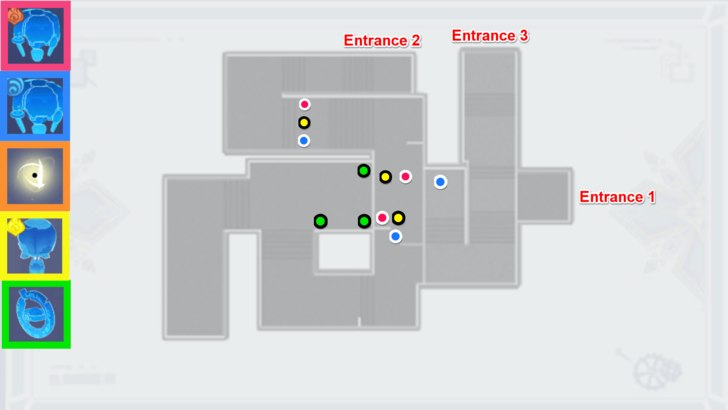
| Recommended Mechanisms | Suppression Device - Wild WavesSuppression Device - BlazePulling MechanismExplosive Barrel DeviceSuppression Device - Faster Blaster |
The mechanism placements are what we have found to be the most effective ones, but different strategies may find success as well.
Because of the presence of the Winged Halberd-Knight, you must have the Suppression Device - Faster Blaster. When placing an Elemental Suppression Device near an Explosion Barrel Device, place it facing towards the latter.
For this stage, you will want to position yourself near Entrance 1, underneath where the Faster Blasters were placed.
Wave 1 Strategy
Deploy a Suppression Device - Wild Waves near Entrance 1. Afterwards, do the formation with Blaze and Wild Waves, aimed towards an Explosive Device.
Wave 2 Strategy
Deploy two Faster Blasters near the exit point. Place another pair of Blaze and Explosive Device near the prior formation.
Focus more on the Fanged Zealot since they are generally much faster than other high-prio enemies. We recommend using the Frags to help you out in defeating them.
Wave 3 Strategy
Complete the deployment in accordance to our Final Mechanism Placements by placing another formation of Blaze, Wild Waves, and Explosion Device up the stairs near Entrance 2.
Still focus on the Fanged Zealot when they appear. The mechanisms in the central area should be sufficient for the rest, but still practice caution.
How to Play Trial of the Bastion
Defend the Stronghold Against Enemies
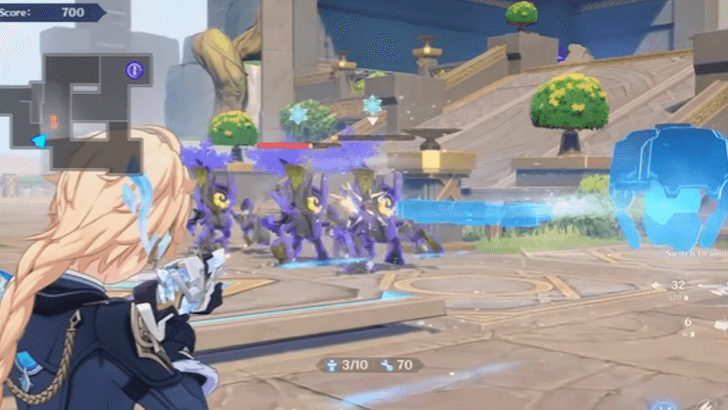
In Trial of the Bastion, players must guard against waves of enemies using various mechanisms and firearms. This event is similar to the Thwack 'n Smack Defense Bots minigame and the Operation Stronghold Defense event!
Third-Person Shooting Traveler Gameplay
Set Up Traps and Defenses
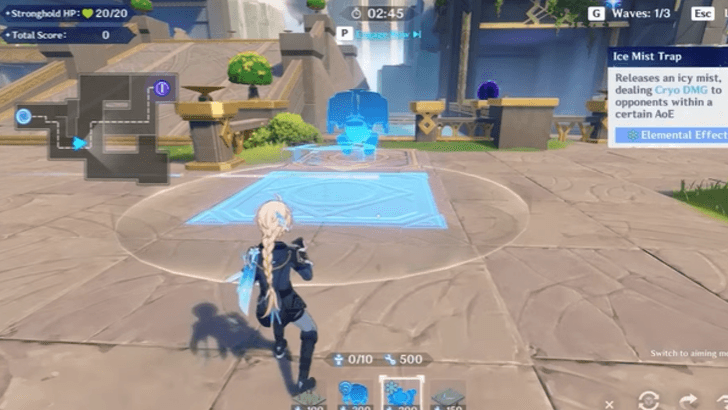
Before the battle begins, position offensive mechanisms along the enemy path to deal extra damage, and lay traps to slow down incoming waves.
Equip and Swap Different Firearms
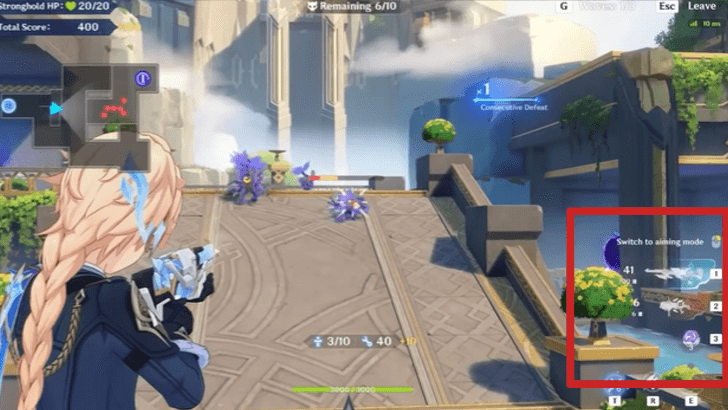
Unlike past Stronghold Defense events, you can now equip various firearms to shoot incoming enemies directly. Switch weapons on the fly to best counter different enemy types!
Trial of the Bastion Event Information
Trial of the Bastion Event Details

| Event Start | September 7, 2026 |
|---|---|
| Event End | September 17, 2026 |
| How to Unlock | • Adventure Rank 20 or above • Complete Archon Quest Prologue: Act III "Song of the Dragon and Freedom" • Complete the "Gunfire in the Silent Lands" quest of the Archon Quest Chapter VII: Act I "Everwinter Without Mercy." |
| Rewards | 


|
What is the Trial of the Bastion Event?
Trial of the Bastion is a base defense event for Snezhnaya's release, where players must use mechanisms and firearms to defend against waves of enemies!
Other Current & Upcoming Events
Trial of the Bastion Event Rewards
Total Trial of the Bastion Rewards
| Stage | Objectives | Rewards |
|---|---|---|
| 1 | Obtain 1000 points | Primogem
x50 |
| Obtain 2000 points | Primogem
x30 |
|
| Obtain 3500 points | Mora
x30000 |
|
| 2 | Obtain 1500 points | Primogem
x50 |
| Obtain 2500 points | Primogem
x30 |
|
| Obtain 4000 points | Mora
x30000 |
|
| 3 | Obtain 2000 points | Primogem
x50 |
| Obtain 3000 points | Primogem
x30 |
|
| Obtain 4500 points | Mora
x30000 |
|
| 4 | Obtain 2000 points | Primogem
x50 |
| Obtain 3500 points | Primogem
x30 |
|
| Obtain 5500 points | Mora
x30000 |
|
| 5 | Obtain 3000 points | Primogem
x50 |
| Obtain 4500 points | Primogem
x30 |
|
| Obtain 6500 points | Mora
x30000 |
 Muster of the Pale Star Army
 Intoxication of the Cellared Spiritual Nectar
 The Frost Emperor's Ceremony
Genshin Impact Related Guides

Current Events
| Event Guide | Date and Rewards |
|---|---|
 Starlit Gala |
10/01/2026 - 11/03/2026

|
 Carefree Snowball Fight |
10/21/2026 - 11/02/2026

+ Talent Up Materials |
Upcoming Events
| Event Guide | Date and Rewards |
|---|---|
 The Grand Defense: Defy the Unjust Judgement |
11/04/2026 - 12/16/2026

+ Talent Up Materials + Free 4star Character Selector |
 Stress Block Smashing Project |
11/20/2026 - 11/30/2026
+ Talent Up Materials |
 Frames of Fierce Splendor |
11/27/2026 - 12/07/2026
+ Talent Up Materials |
 Ley Line Overflow 7.2 Rerun |
12/07/2026 - 12/14/2026

|
 Overflowing Favor 7.1 Rerun |
10/26/2026 - 11/02/2026
Double Artifact Domain Drops
|
Permanent/Recurring Events
| Event Guide | Date and Rewards |
|---|---|
 To Temper Thyself and Journey Far |
08/10/2026 - 11/02/2026

+ 5-Star Stella Fortuna |
 Stygian Onslaught |
08/19/2026 - 09/22/2026
+ Dust of Enlightenment |
 Travelers' Tales |
Permanently Available after Version 6.0
|
 Repertoire of Myriad Melodies |
Permanently Available
|
 Test Run |
Permanently Available
+ Ascension Materials |
 Hangout Events |
Permanently Available after Version 1.4

+ Talent Materials + Specialty Dish |
 Baptism of Song |
Permanently Available
+ Free Barbara
|
 Daily Check-In |
2021/03/01 - Permanently Available

|
 Stellar Reunion Returnee Event |
Permanently Available
+ Prototype Rancour |
Past Events
Comment
 Anonymous about 1 month
thank you for the guide, you guys save me SO much time in these things




Trial of the Bastion Event Guide

Premium Articles


Rankings
- We could not find the message board you were looking for.
Gaming News





Popular Games

Genshin Impact Walkthrough & Guides Wiki
Fire Emblem: Fortune's Weave (FEFW) Walkthrough & Guides Wiki
Aniimo Walkthrough & Guides Wiki
Wuthering Waves Walkthrough & Guides Wiki
Dragon's Dogma 2 (DD2) Dark Arisen Walkthrough & Guides Wiki
Umamusume: Pretty Derby Walkthrough & Guides Wiki
Honkai: Star Rail Walkthrough & Guides Wiki
Zenless Zone Zero Walkthrough & Guides Wiki
Pokemon TCG Pocket (PTCGP) Strategies & Guides Wiki
AION 2 Walkthrough & Guides Wiki









Recommended Games
Where Winds Meet Walkthrough & Guides Wiki
Fire Emblem Heroes (FEH) Walkthrough & Guides Wiki
Diablo 4: Lord of Hatred Walkthrough & Guides Wiki
Super Smash Bros. Ultimate Walkthrough & Guides Wiki
Persona 3 Reload Walkthrough & Guides Wiki
The Legend of Zelda: Tears of the Kingdom Walkthrough & Guides Wiki
Elden Ring Walkthrough & Guides Wiki
Pokemon Brilliant Diamond and Shining Pearl (BDSP) Walkthrough & Guides Wiki
Cyberpunk 2077: Ultimate Edition Walkthrough & Guides Wiki
Monster Hunter World Walkthrough & Guides Wiki










All rights reserved
Copyright© 2012-2024 HoYoverse — COGNOSPHERE. All Rights Reserved.
The copyrights of videos of games used in our content and other intellectual property rights belong to the provider of the game.
The contents we provide on this site were created personally by members of the Game8 editorial department.
We refuse the right to reuse or repost content taken without our permission such as data or images to other sites.
stage two is 400 points for 3rd reward