
Seafeld City Treasure Chest Locations
★ Please participate in Game8's Version 4.6 Survey!
♦ Latest: 4.6 Banners and Events and 4.6 Redeem Codes
♦ 4.6 Phase 2: Pearl and Mortenax Blade
♦ Fate Collab Part 2: Rin Tohsaka and Gilgamesh
There are 36 Seafeld City chests to collect in Honkai: Star Rail. Check out our map guide for all Seafeld City chest locations!
List of Contents
Seafeld City Chest Locations
Seafeld City Interactive Map
Select icons to toggle them on/off
 |
Space Anchor |  |
Treasure Chest |
|---|---|---|---|
 |
Furbobo Treasure | - | |
Seafeld City Chests
| Seafeld City Chest Map | |||||||||||
|---|---|---|---|---|---|---|---|---|---|---|---|
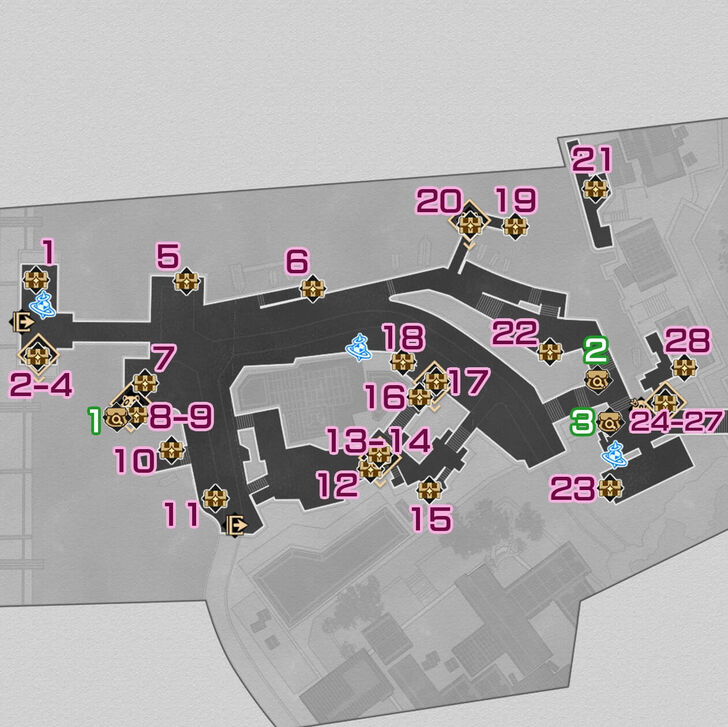 See Full Image |
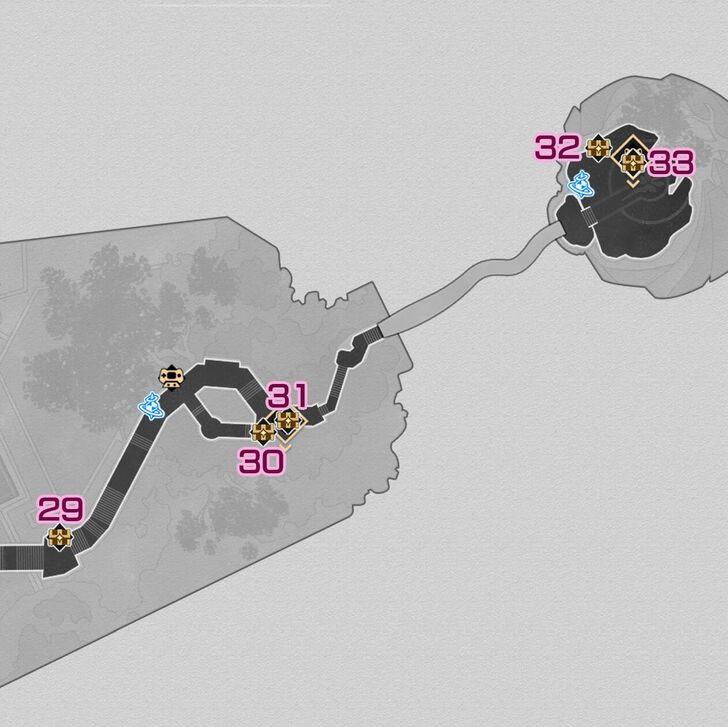 See Full Image |
||||||||||
| Seafeld City Treasure Chests | |||||||||||
| Chest 1 | Chest 2 | Chest 3 | Chest 4 | ||||||||
| Chest 5 | Chest 6 | Chest 7 | Chest 8 | ||||||||
| Chest 9 | Chest 10 | Chest 11 | Chest 12 | ||||||||
| Chest 13 | Chest 14 | Chest 15 | Chest 16 | ||||||||
| Chest 17 | Chest 18 | Chest 19 | Chest 20 | ||||||||
| Chest 21 | Chest 22 | Chest 23 | Chest 24 | ||||||||
| Chest 25 | Chest 26 | Chest 27 | Chest 28 | ||||||||
| Chest 29 | Chest 30 | Chest 31 | Chest 32 | ||||||||
| Chest 33 | |||||||||||
| Seafeld City Furbobo Treasure | |||||||||||
| Furbobo 1 | Furbobo 2 | Furbobo 3 | |||||||||
How to Get Seafeld City Chests
Seafeld City Chest 1
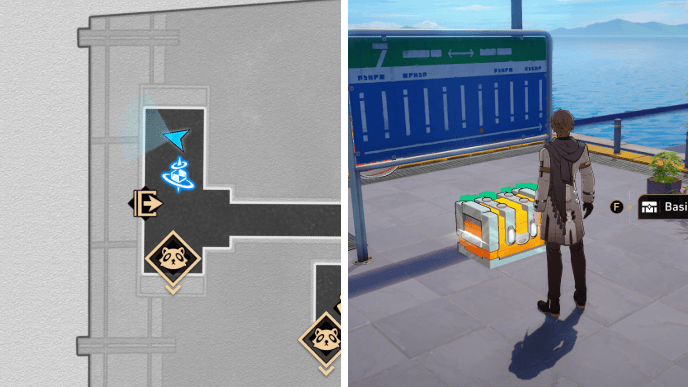
The first chest in Seafeld City can be found underneath the metal signboard at Seafeld Station.
Seafeld City Chest 2
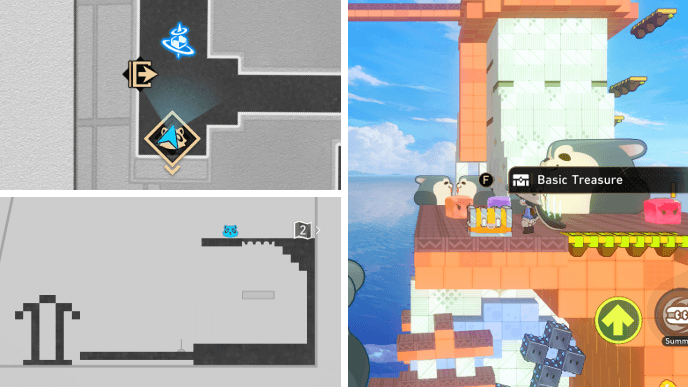
Seafeld City Chest 2 is in Level 1 of the Interplanar Jump Difficulty V stage a few steps south of the Seafeld Station Space Anchor. Use the HelpBot to get to the right side of the level. After making it to the other side, activate the lever and use the platforms to jump up to Chest 2.
Seafeld City Chest 3
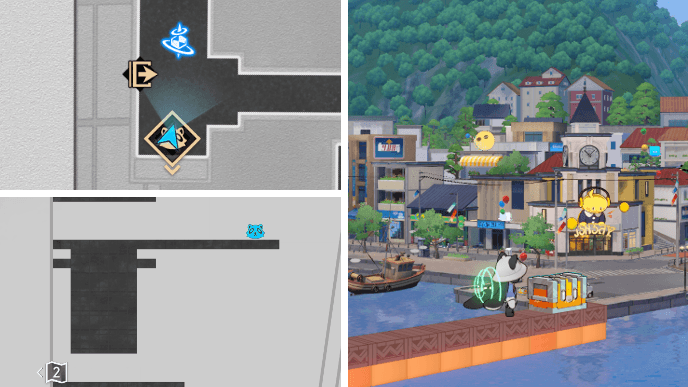
Chest 3 is in Level 3 of the Interplanar Jump Difficulty V stage a few steps south of the Seafeld Station Space Anchor. However, you can reach it by climbing the platforms leading up the tower in Level 2.
Seafeld City Chest 4
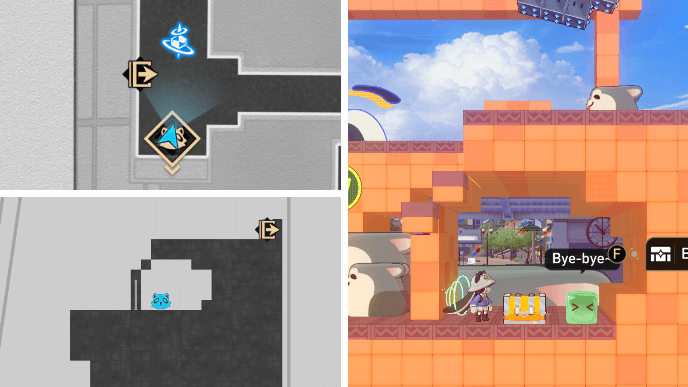
Chest 4 is also in Level 3 of the Interplanar Jump Difficulty V stage a few steps south of the Seafeld Station Space Anchor. Make your way to the right end of the level by dropping onto the giant Waldundun and hopping across the yellow blocks. Chest 4 will be in the space just before the exit pipe.
Seafeld City Chest 5
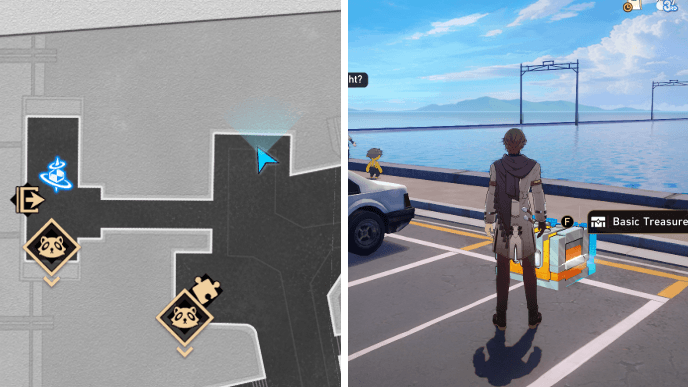
Chest 5 can be found in an empty parking space east of the Seafeld Station Space Anchor.
Seafeld City Chest 6
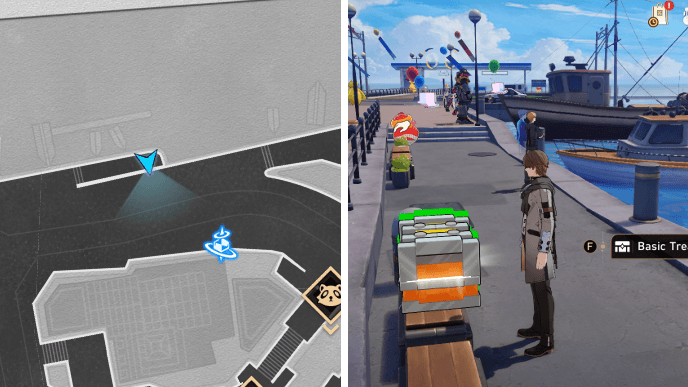
Chest 6 is on top of a bench along the small dock northwest of the Seaside Avenue Space Anchor.
Seafeld City Chest 7
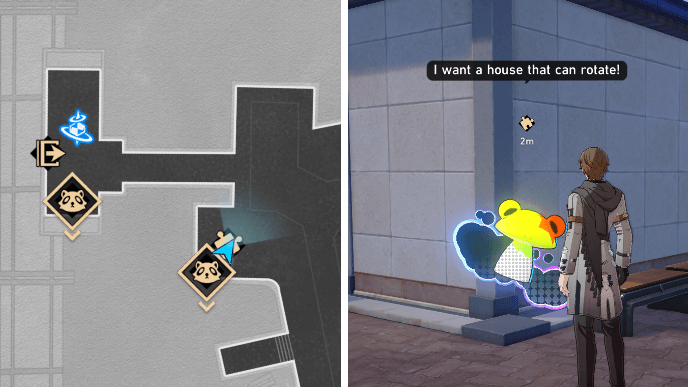
Chest 7 comes from a Shiftmation puzzle located behind the ticket machines near Seafeld Station. Solve the puzzle to get the chest!
Seafeld City Chest 8
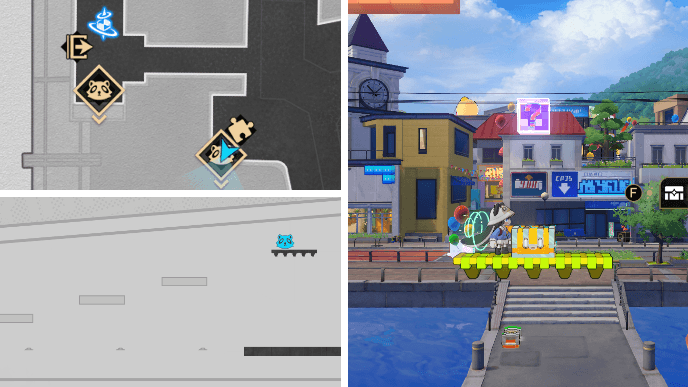
Chest 8 is in Level 1 of the Interplanar Jump Difficulty IV stage behind the ticket machines near Seafeld Station. Summon a HelpBot to go through the water, then jump across the platforms that appear as the HelpBot presses each button. You should eventually reach Chest 8.
Seafeld City Chest 9
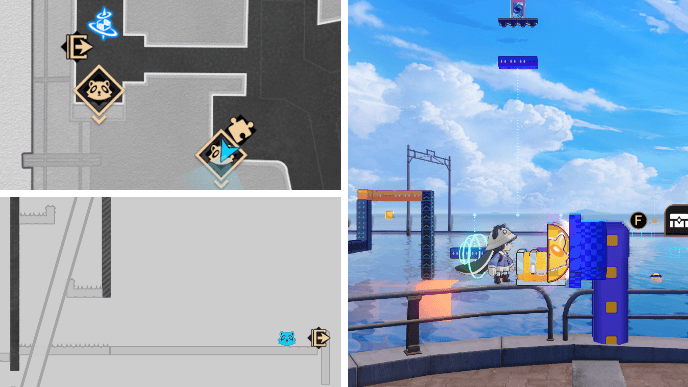
Chest 9 is in Level 2 of the Interplanar Jump Difficulty IV stage behind the ticket machines near Seafeld Station. Make your way to the end of Level 2 to find Chest 9 right in front of the exit pipe.
Seafeld City Chest 10
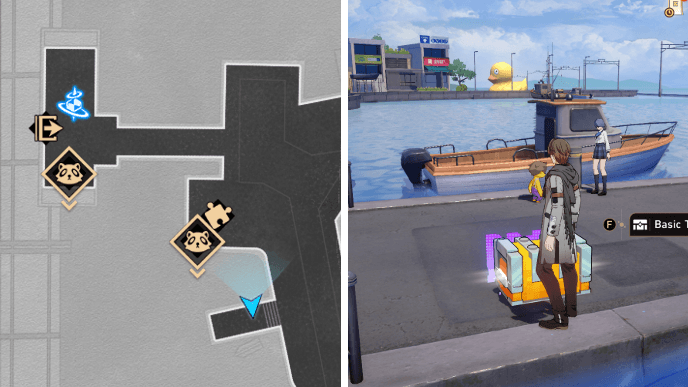
Chest 10 can be found at the small dock southeast of the Seafeld Station Space Anchor.
Seafeld City Chest 11
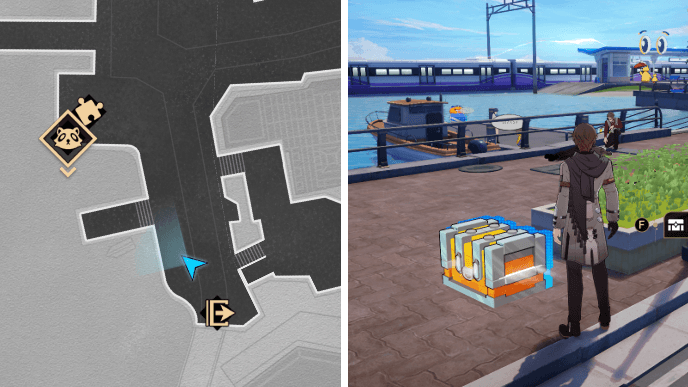
Chest 11 is located at the roadside near the exit that leads to Seafeld TV Tower.
Seafeld City Chest 12
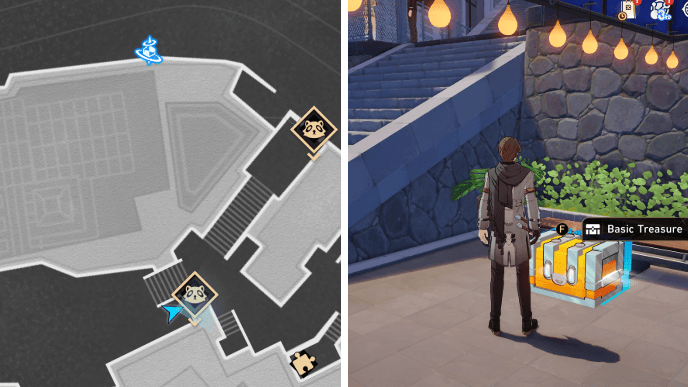
Chest 12 can be found on the right side of a staircase in the area south of the Seaside Avenue Space Anchor.
Seafeld City Chest 13
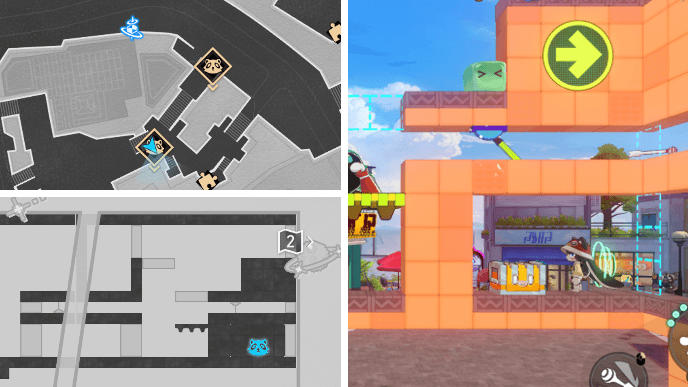
Chest 13 is in Level 1 of the Interplanar Jump Difficulty V stage south of the Seaside Avenue Space Anchor. Shoot an arrow to activate the levers. It will continuously loop around as long as you don't bump into it. Go through the obstacles as they toggle on and off until you reach the first section in Level 2.
Drop down to the bottom space just before the PiPinTun that's continuously falling through the disappearing platforms. You should find a hidden space on the left that's also blocked by toggling blocks. Go through once it's open to reach Chest 13 in the third section of Level 1.
Seafeld City Chest 14
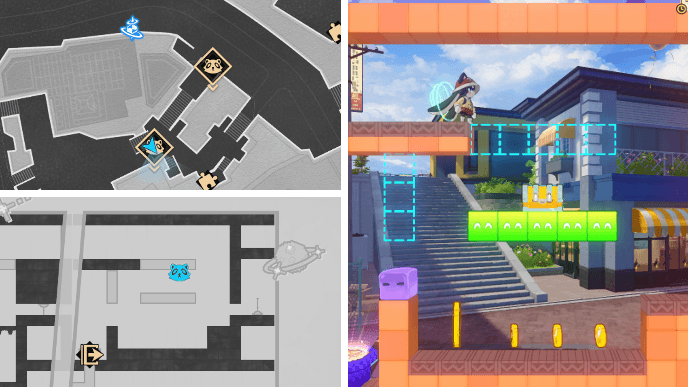
Chest 14 is in Level 2 of the Interplanar Jump Difficulty V stage south of the Seaside Avenue Space Anchor. Go through the obstacles as they appear and disappear until you reach the third section of Level 2. Chest 14 will be on a platform just before the exit pipe.
Seafeld City Chest 15
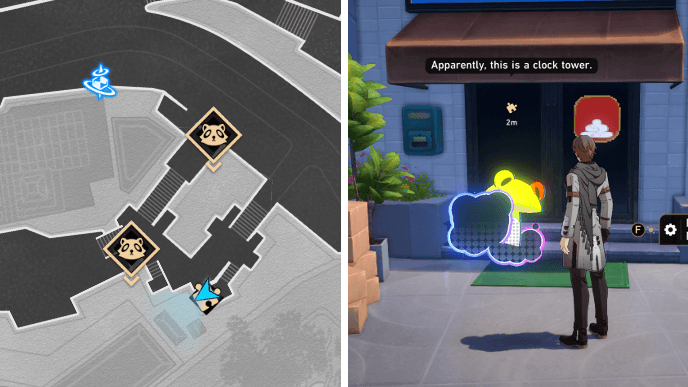
Chest 15 comes from a Shiftmation puzzle behind a fenced area southeast of the Seaside Avenue Space Anchor. Solve the puzzle to get the chest!
Seafeld City Chest 16
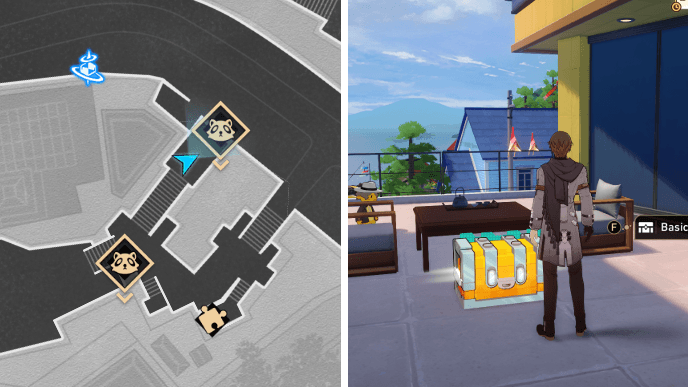
Chest 16 is in the small balcony area located southeast of the Seaside Avenue Space Anchor.
Seafeld City Chest 17
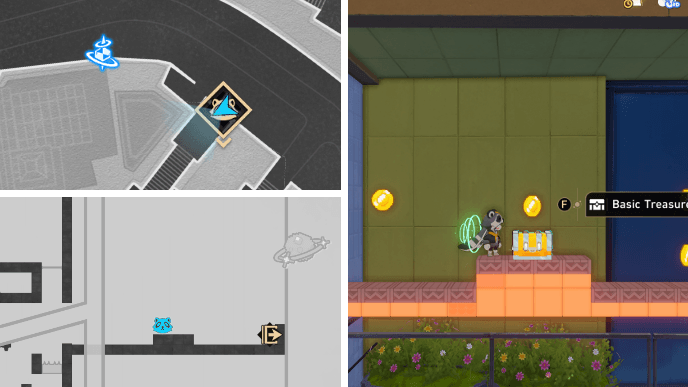
Chest 17 is in Level 3 of the Interplanar Jump Difficulty III stage east of the Seaside Avenue Space Anchor. Guide the Waldunduns so that they stay on the buttons to get through Level 1. Then, just continue onwards until you reach the end of Level 3, where Chest 17 will be.
Seafeld City Chest 18
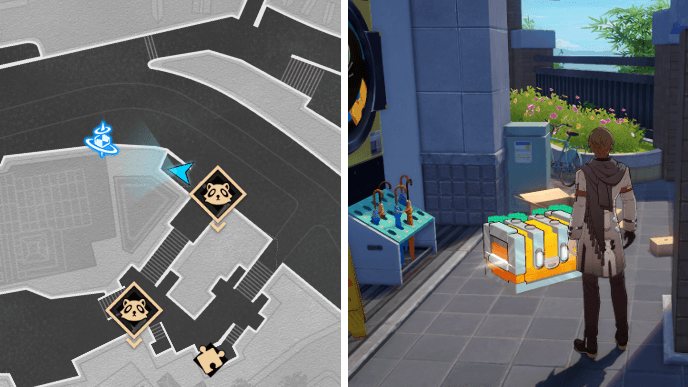
Chest 18 is next to an umbrella stand in the small area west of the entrance pipe to the Interplanar Jump Difficulty III stage east of the Seaside Avenue Space Anchor.
Seafeld City Chest 19
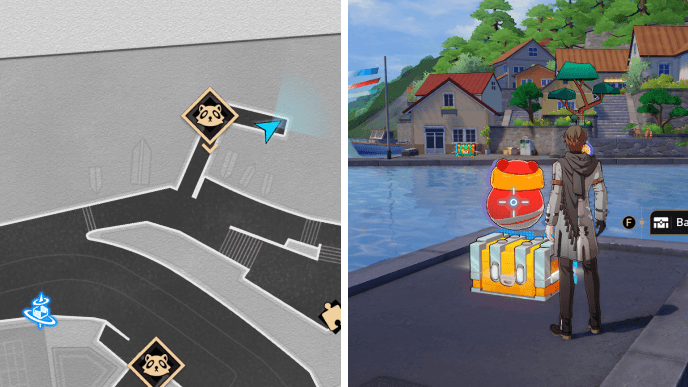
Chest 19 can be found at the end of the L-shaped pier northeast of the Seaside Avenue Space Anchor.
Seafeld City Chest 20
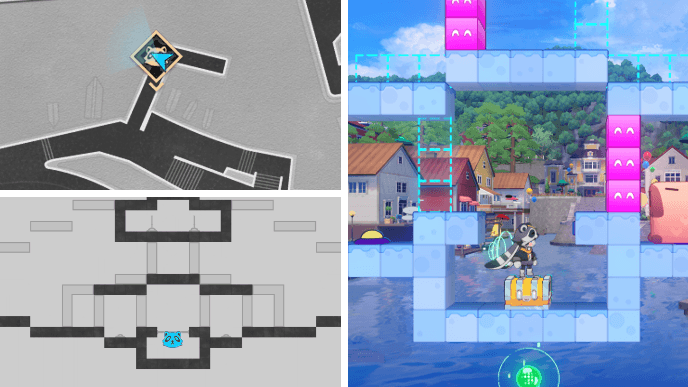
Chest 20 is in the middle of the Interplanar Jump Difficulty IV stage at the pier northeast of the Seaside Avenue Space Anchor. Guide the PiPinTun down to any of the yellow buttons by the chest. Once it's standing on a button, press the button on the other side to open the gate blocking Chest 20.
Seafeld City Chest 21
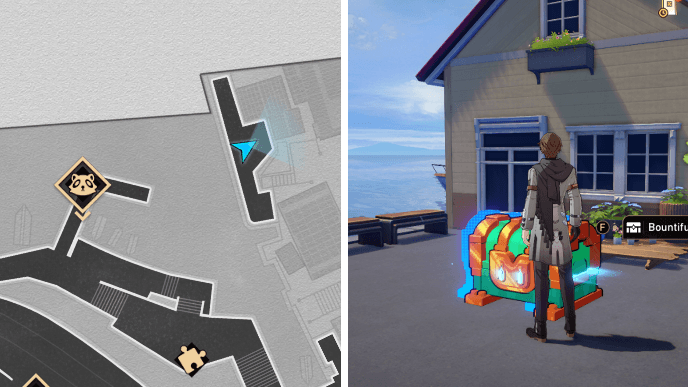
To reach Chest 21, you need to go through the exit pipe in the left area of the Interplanar Jump Difficulty IV stage at the L-shaped pier northeast of the Seaside Avenue Space Anchor. After reaching the isolated dock, you'll find Chest 21 in front of a small house.
Seafeld City Chest 22
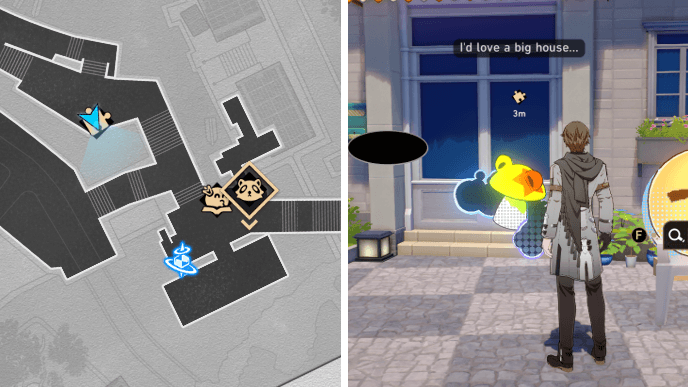
Chest 22 comes from a Shiftmation puzzle located northwest of the Mayor's Residence Space Anchor. Solve the puzzle to get the chest!
Seafeld City Chest 23
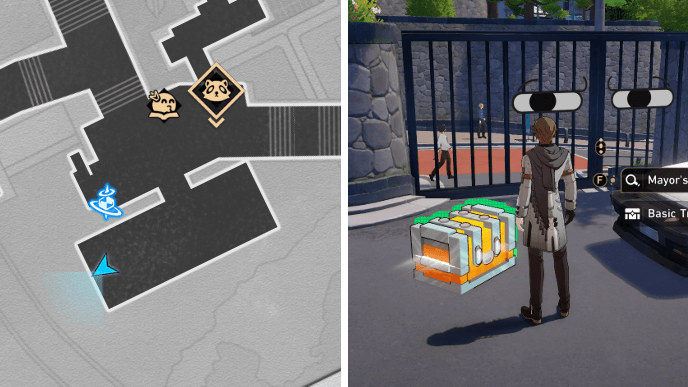
Chest 23 is in front of a parked car in the Mayor's Courtyard located south of the Mayor's Residence Space Anchor.
Seafeld City Chest 24
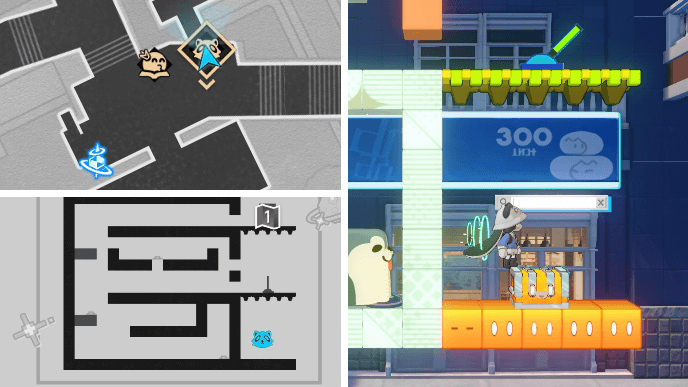
Chest 24 is in Level 2 of the Interplanar Jump Difficulty IV stage northeast of the Mayor's Residence Space Anchor. From the entrance, use the nearby Teleporter to reach Level 2.
Summon a HelpBot to go through the gap at the top floor of Level 2 and guide the middle Waldundun onto the button. Then, go to the middle floor and activate the lever to drop the HelpBot onto the next button and guide the lower Waldundun onto the bottom floor.
Finally, drop down to the locked chest and wait for the Waldundun to press the last button as it moves in your direction. Once the last button is activated, Chest 24 will be unlocked.
Seafeld City Chest 25
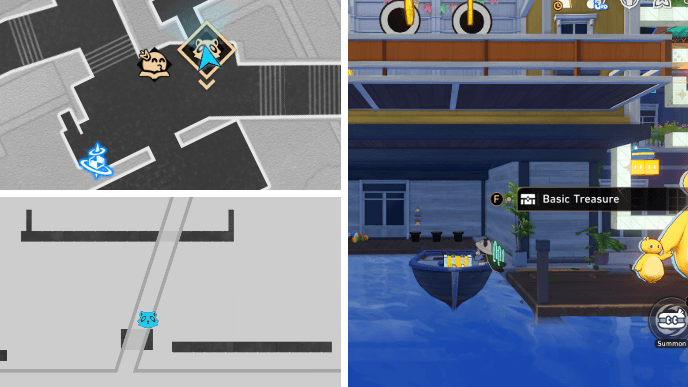
Chest 25 is in Level 1 of the Interplanar Jump Difficulty IV stage northeast of the Mayor's Residence Space Anchor. Walk along the transparent platform and drop down just before reaching the wooden balcony. Chest 25 will be on a boat underneath the balcony.
Seafeld City Chest 26
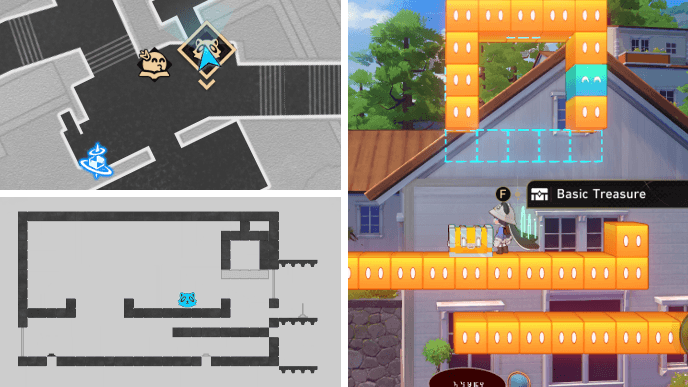
Chest 26 is in Level 1 of the Interplanar Jump Difficulty IV stage northeast of the Mayor's Residence Space Anchor. Go through the balcony areas to reach the upper puzzle area at the left end of Level 1.
Send a HelpBot through the gap near the level to remove the rubble at the bottom floor. Wait until the crane holding the Waldundun is positioned above the gap, then activate the lever to make it fall through.
Drop down to the bottom platform to make the Waldundun press the rightmost button first. Then, jump back to the platform with the lever and make the HelpBot go through the gap again. This will guide the Waldundun to the leftmost button and open the gates to Chest 26.
Seafeld City Chest 27
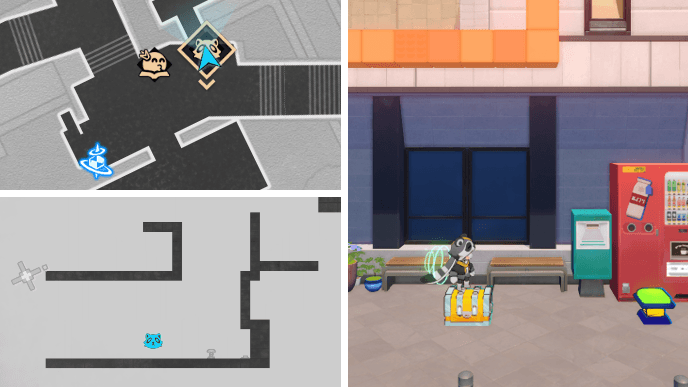
To get Chest 27, you need to play the Bizarre Melody on the speakers at the left end of Level 1 in the Interplanar Jump Difficulty IV stage northeast of the Mayor's Residence Space Anchor. To play the score, press the following keys: ⭡, ⭢, ⭧, ⭩, ⭠, ⭢, ⭧, ⭨. This will take you to another area with Chest 27.
Seafeld City Chest 28
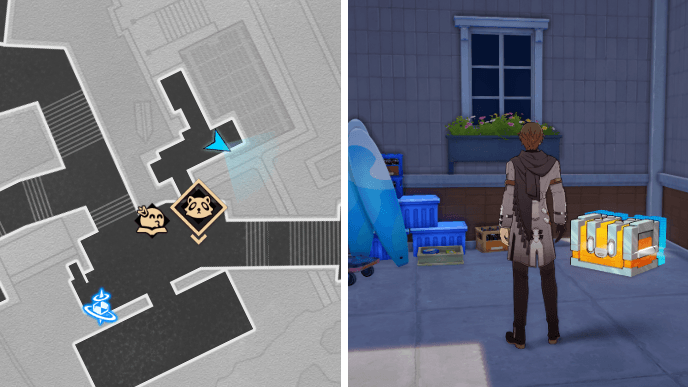
To reach Chest 28, you'll need to go through the Interplanar Jump Difficulty IV stage northeast of the Mayor's Residence Space Anchor again. From the entrance, head down to the platform below the wooden balcony and use the HelpBot to cross the water on the right.
You should come across another pipe directly underneath the one you entered the stage from. Exit through the pipe to reach a small, isolated area where Chest 28 is. There'll also be a pile of surfboards nearby.
Seafeld City Chest 29
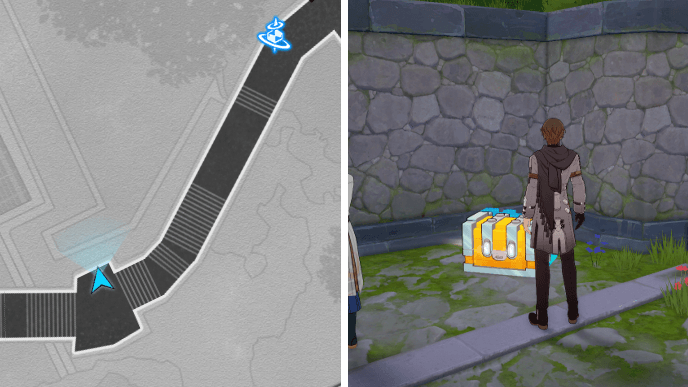
Chest 29 can be found along the mossy cobblestone path leading up to Seafeld Park.
Seafeld City Chest 30
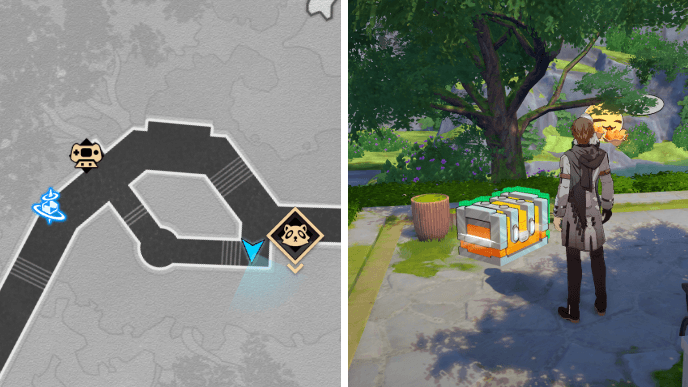
Chet 30 is in the small area east of the gazebo in Seafeld Park.
Seafeld City Chest 31
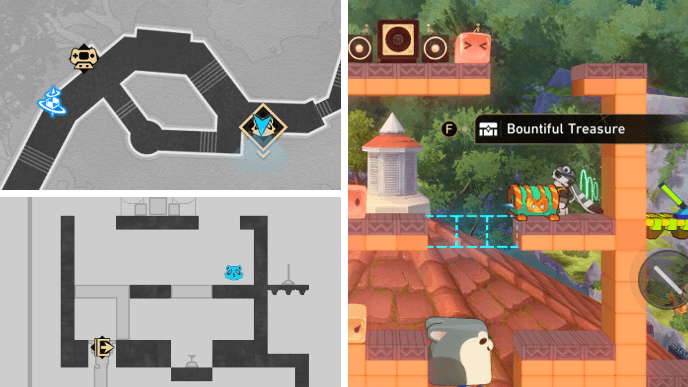
Chest 31 is in the Interplanar Jump Difficulty III stage in Seafeld Park. Reach the end of the stage to get Chest 31. You can also come across this chest during the So Laughed the Masses Trailblaze Mission.
Seafeld City Chest 32
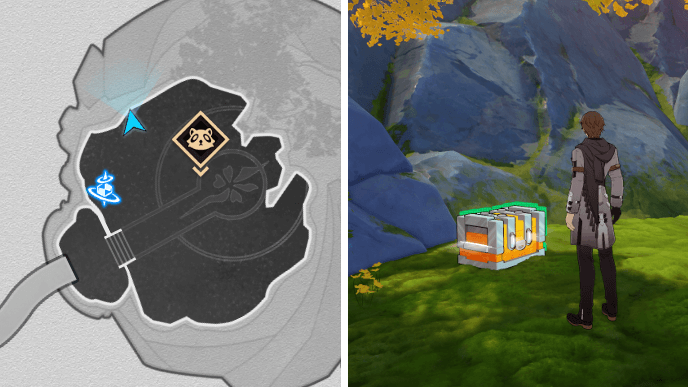
Chest 32 can be found in the grassy area a few steps northeast of the Court of Echoes Space Anchor.
Seafeld City Chest 33
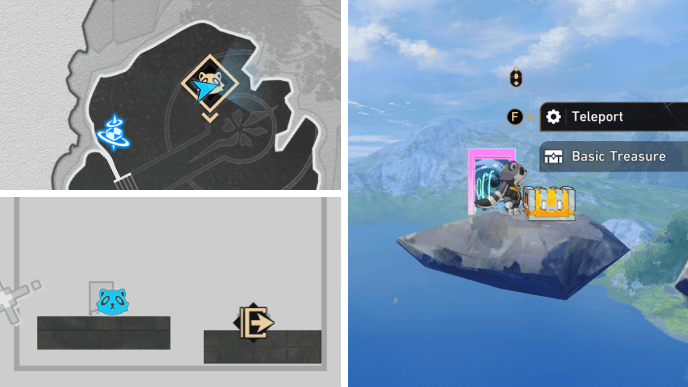
Chest 33 is in Level 2 of the Interplanar Jump Difficulty V stage in the Court of Echoes. To reach Level 2, you need to win first place in Level 1's race challenge. After starting the race, use the nearest Teleporter to go to the right section of the level with slippery blocks.
Make your way up to the section with the Alloy Pommy models and climb onto the conveyor belt on the left wall to continue upwards while easily avoiding the missiles. After winning the race, you can use the Teleporter at the top to reach Level 2 and get Chest 33.
Seafeld City Furbobo Treasure Locations
Seafeld City Furbobo Treasure 1
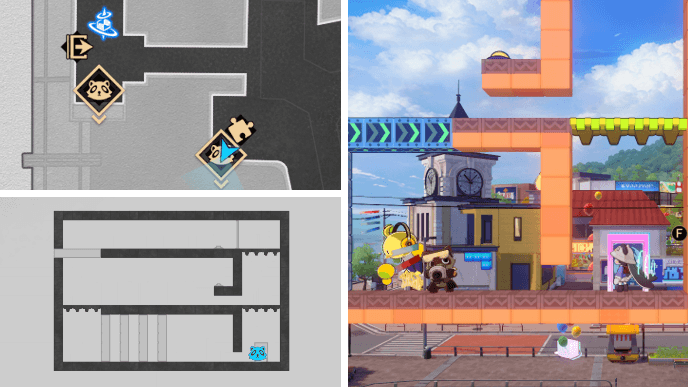
The first Seafeld City Furbobo Treasure is in Level 1 of the Interplanar Jump Difficulty IV stage near Seafeld Station. After reaching the platform near the middle, make the HelpBot activate the platforms up ahead, then take the elevator platform to reach a Teleporter that leads to a Shapeshifting Furbo.
Send the HelpBot through the gap to get rid of the rubble at the bottom floor, then make the clone stand on the button on the middle floor. Once the blue blocks at the top floor have been moved all the way, send another HelpBot through the gap on the middle floor.
Quickly make the clone ride the HelpBot that comes through so it can jump through the gap before the blue blocks return to their original position. With the clone at the top floor, you can make it press the button to open the gate at the top and catch the Shapeshifting Furbo.
Seafeld City Furbobo Treasure 2
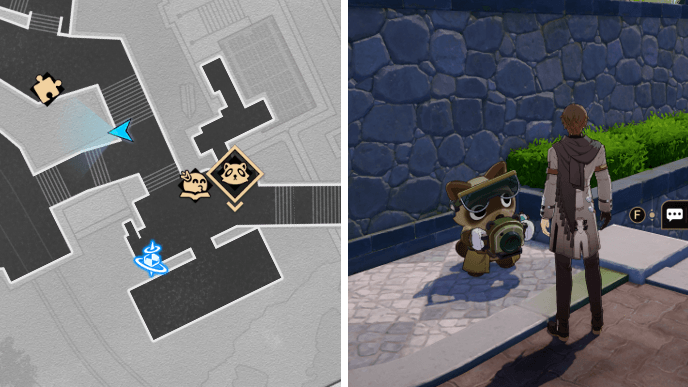
The next Seafeld City Furbobo Treasure can be found northwest of the Mayor's Residence Space Anchor. Speak to the Furbo Journalist by the bushes near the stairs. It will shapeshift into a small boat that's blocking the pathway nearby. Attack it to remove its disguise and get its treasure!
Seafeld City Furbobo Treasure 3
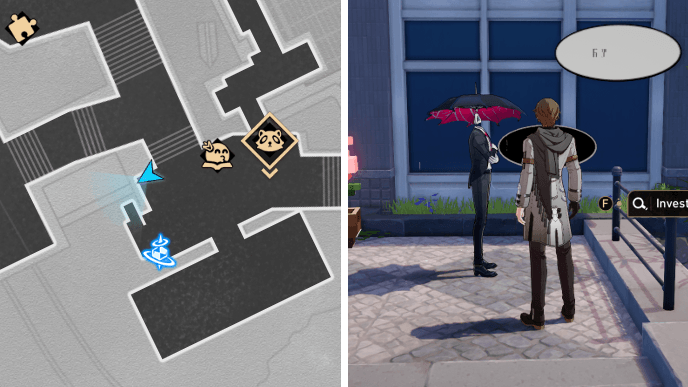
The third Seafeld City Furbobo Treasure is located a few steps north of the Mayor's Residence Space Anchor. Investigate Umbralle, the NPC with an umbrella head, to reveal the disguised Furbo Journalist. You'll need to defeat it in battle to get its treasure.
How to Unlock Seafeld City
Progress Through So Laughed the Masses
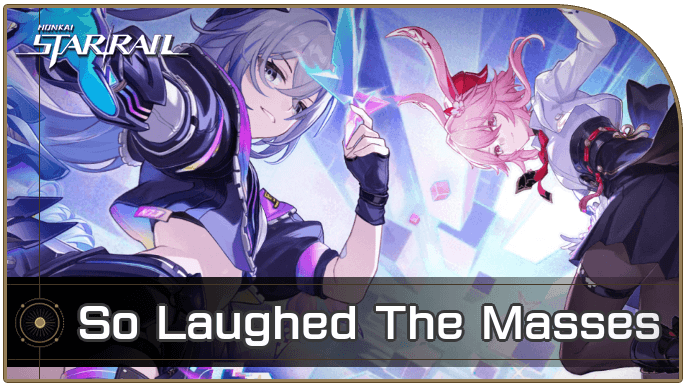
You can unlock Seafeld City by progressing through the So Laughed the Masses mission!
So Laughed The Masses Mission Guide
Honkai: Star Rail Related Guides
List of All Maps
| List of Maps | |
|---|---|
| Herta Space Station | Jarilo-VI |
| The Xianzhou Luofu | Penacony |
| Amphoreus | Planarcadia |
Treasure Chest Locations
Comment



Author

Seafeld City Treasure Chest Locations

Premium Articles
Rankings
- We could not find the message board you were looking for.
Gaming News





Popular Games

Genshin Impact Walkthrough & Guides Wiki
Fire Emblem: Fortune's Weave (FEFW) Walkthrough & Guides Wiki
Aniimo Walkthrough & Guides Wiki
Wuthering Waves Walkthrough & Guides Wiki
Dragon's Dogma 2 (DD2) Dark Arisen Walkthrough & Guides Wiki
Umamusume: Pretty Derby Walkthrough & Guides Wiki
Honkai: Star Rail Walkthrough & Guides Wiki
Zenless Zone Zero Walkthrough & Guides Wiki
Pokemon TCG Pocket (PTCGP) Strategies & Guides Wiki
AION 2 Walkthrough & Guides Wiki









Recommended Games
Fire Emblem Heroes (FEH) Walkthrough & Guides Wiki
Where Winds Meet Walkthrough & Guides Wiki
Diablo 4: Lord of Hatred Walkthrough & Guides Wiki
Super Smash Bros. Ultimate Walkthrough & Guides Wiki
Persona 3 Reload Walkthrough & Guides Wiki
The Legend of Zelda: Tears of the Kingdom Walkthrough & Guides Wiki
Elden Ring Walkthrough & Guides Wiki
Pokemon Brilliant Diamond and Shining Pearl (BDSP) Walkthrough & Guides Wiki
Cyberpunk 2077: Ultimate Edition Walkthrough & Guides Wiki
Monster Hunter World Walkthrough & Guides Wiki










All rights reserved
Copyright © 2024 HoYoverse, COGNOSPHERE. All Rights Reserved.
The copyrights of videos of games used in our content and other intellectual property rights belong to the provider of the game.
The contents we provide on this site were created personally by members of the Game8 editorial department.
We refuse the right to reuse or repost content taken without our permission such as data or images to other sites.