
Shiftmation Puzzle Solutions and Locations
★ Please participate in Game8's Version 4.6 Survey!
♦ Latest: 4.6 Banners and Events and 4.6 Redeem Codes
♦ 4.6 Phase 2: Pearl and Mortenax Blade
♦ Fate Collab Part 2: Rin Tohsaka and Gilgamesh

Honkai: Star Rail's Shiftmation puzzles require you to rotate your point of view in each stage to help the imagenae restore their color. See all Shiftmation locations in Version 4.6 and their solutions in this guide!
List of Contents
Version 4.6 Shiftmation Locations
Life Sciences Institute Shiftmations
| Life Sciences Institute F1 South | Life Sciences F1 North |
|---|---|
 |
 |
| Life Sciences Institute B1 | |
 |
|
| Life Sciences Institute Shiftmation Puzzles | |
| Puzzle 1 | Puzzle 2 |
| Puzzle 3 | - |
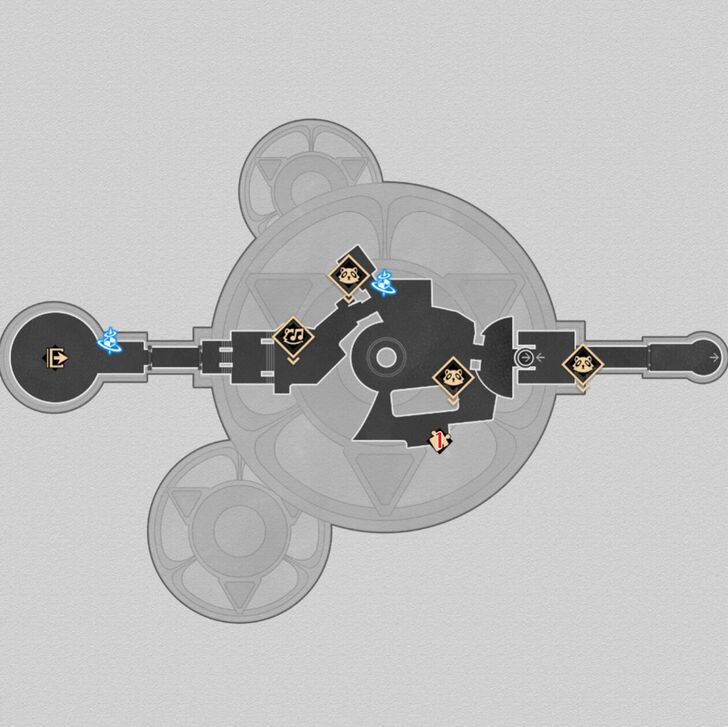
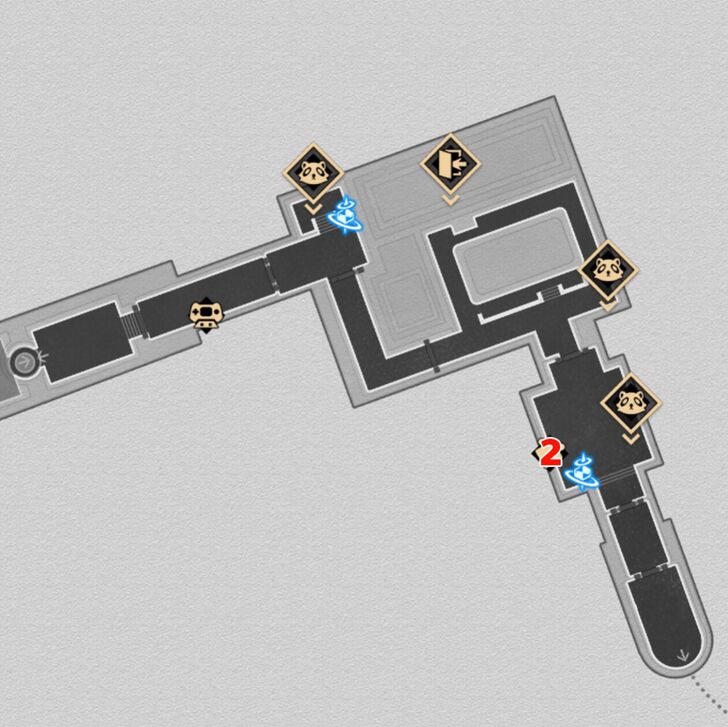
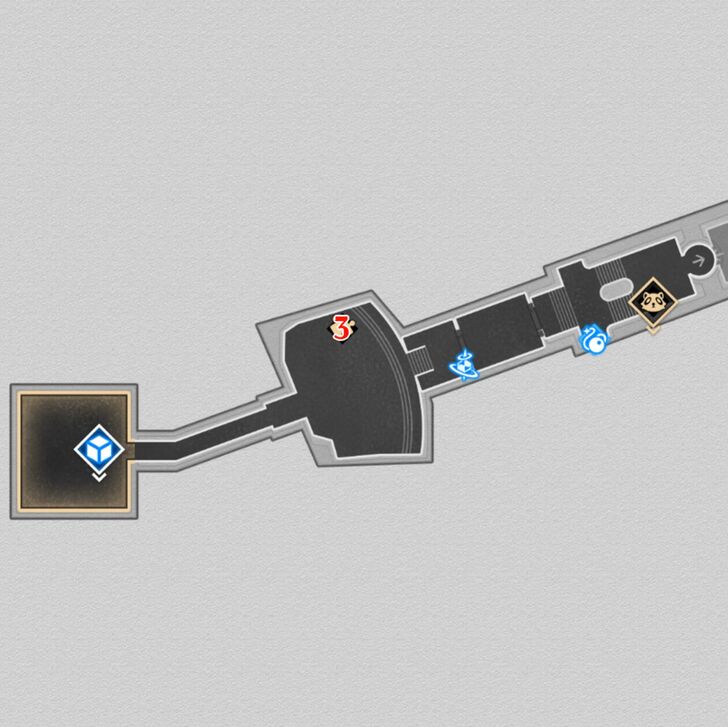
There are a total of 3 Shiftmation puzzles in Life Sciences Institute. The first one can be found in the south of the Wispae Eco-Park Space Anchor, close to an Interplanar Jump stage.
The second can be found just to the left of the Factory Main Gate Space Anchor. The last one is found a short walk to the west from the Life Sciences Institute Hub Space Anchor.
Life Sciences Institute Shiftmation 1
| Life Sciences Institute Shiftmation 1 | |
|---|---|
| Run straight to the right, and jump down from the first formation to claim the first paint. Go back to where you ran before jumping down, and then run to the edge on the left. Rotate clockwise once until you reach the edge to the right, then rotate clockwise again. Go to the top of the location, then reclaim the second paint. After the automatic rotation, rotate counterclockwise once, then jump to the nearby formation on the right. Go to the top to claim the Color Restoration Gift. |
|
| Stellar Jade |  x 20 |
▲ Back to Life Sciences Institute Top
Life Sciences Institute Shiftmation 2
| Life Sciences Institute Shiftmation 2 | |
|---|---|
| Run to the rightmost part of the starting area to claim the first paint. Then, go back to the door you just passed and enter there. In the room, exit using the door found on the left side. Once out, jump down to the left side and claim the second paint there. Move to the higher platform, then rotate clockwise twice. Jump down and run to the left side of the current location. Reset your spin counter there to go back to the room you entered earlier, then exit the same way you did earlier. Afterwards, run to the right to claim the Color Restoration Gift. |
|
| Stellar Jade |
x 20 |
▲ Back to Life Sciences Institute Top
Life Sciences Institute Shiftmation 3
| Life Sciences Institute Shiftmation 3 | |
|---|---|
| Near the starting point of the Shiftmation challenge, go to the right to reclaim the first paint. Rotate counterclockwise, then interact with the lever to make a nearby platform above. Jump up, then activate a second lever to activate another platform. On the higher formation, double jump to reach the third lever to activate yet another platform. Use the nearby pinwheel to reset your Spin Counter, then use the nearby spring to jump up to the platform you made just now. Jump to the green area to claim the third paint. After the auto-rotation, rotate counterclockwise twice, then move to the left to jump up the spring and reach the platform. Head to the higher formation on the right, then rotate counterclockwise. Afterwards, go to the left and wait for the moving platform before moving up. This is where you will get the third and final paint to reclaim. After the auto-rotation, simply move to the left and drop down to claim the Color Restoration Gift. |
|
| Stellar Jade |
x 20 |
▲ Back to Life Sciences Institute Top
Version 4.5 Shiftmation Locations
| Version 4.5 Shiftmation Puzzles | |
|---|---|
| Astropolis Central District | Lodestar Tower |
Click the links to jump to an area's puzzles!
Astropolis Central District Shiftmations
| Astropolis Central District | |
|---|---|
 |
|
| Astropolis Central District Shiftmation Puzzles | |
| Puzzle 1 | Puzzle 2 |
| Puzzle 3 | Puzzle 4 |
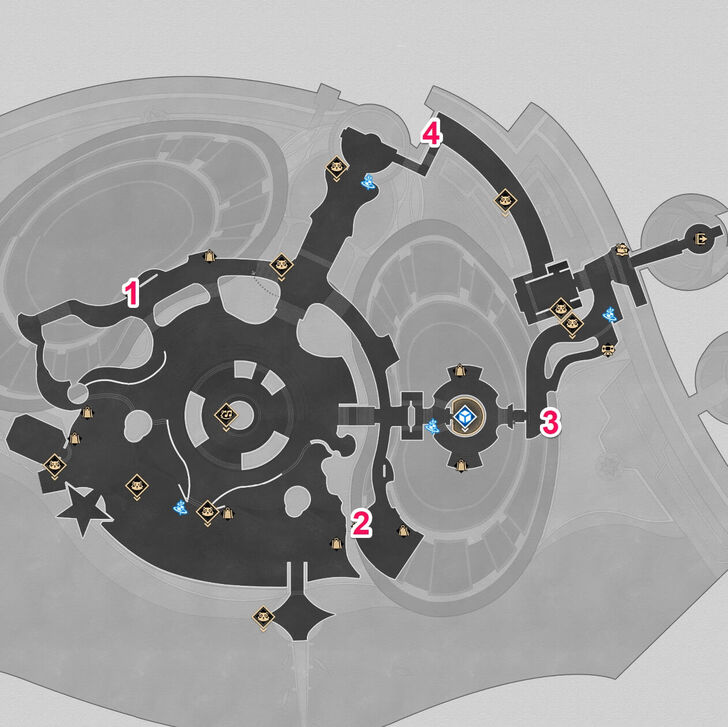
There are a total of 4 Shiftmation puzzles in Astropolis Central District. The first Shiftmation puzzle can be found northwest of the Seaside Park. The second one can be found near the Bot No. 1 store.
The third Shiftmation puzzle is located east of the Kenneth Shopping Center Space Anchor, and the fourth one is in the Lighthouse Plaza, near Chirplotte.
Astropolis Central District Shiftmation 1
| Astropolis Central District Shiftmation 1 | |
|---|---|
Rotate until you see another nearby platform. Jump onto it, rotate until you see a door, and then enter it. Exit through the other door in the locked room. Once outside, rotate until you see the block with the paint on the right side. Claim that block's paint before jumping up to the higher platform near it. Enter the door on that platform and exit through the other door within the locked room. Upon exiting, simply rotate until the last painted block is reachable. Make use of the spinning fan nearby if you run out of rotations. |
|
| Stellar Jade |
x 20 |
▲ Back to Astropolis Central District Top
Astropolis Central District Shiftmation 2
| Astropolis Central District Shiftmation 2 | |
|---|---|
| Rotate twice in the same direction so you can see the other side of the platform. Enter the now visible door in the middle of the platform. Exit through the other door in the locked room. Upon exiting, you should be able to easily get to the painted blocks located on each end of the platform. |
|
| Stellar Jade |
x 20 |
▲ Back to Astropolis Central District Top
Astropolis Central District Shiftmation 3
| Astropolis Central District Shiftmation 3 | |
|---|---|
| Enter the door and use the lever to activate the platforms outside. Exit the room, jump onto the now visible platform, and rotate twice in the same direction to see another door. Enter the new door, rotate until you see another lever, and activate that lever. Exit the room, jump on the yellow platform, then rotate to see a new visible platform above you. Use that platform to reach the platform with the imagenae on it. Keep rotating until you can jump to the painted block on the left and get its paint. Stay on that block and rotate to easily reach the other painted block. |
|
| Stellar Jade |
x 20 |
▲ Back to Astropolis Central District Top
Astropolis Central District Shiftmation 4
| Astropolis Central District Shiftmation 4 | |
|---|---|
| Rotate counterclockwise and then jump onto the ledge that becomes visible on the side of the building. Keep repeating this until you are able to reach the door. Enter the door and then exit through the other door that's at the top within the locked room. Upon exiting, rotate clockwise until the painted block is near you. Make use of the nearby fan if you run out of rotations. |
|
| Stellar Jade |
x 20 |
▲ Back to Astropolis Central District Top
Lodestar Tower Shiftmations
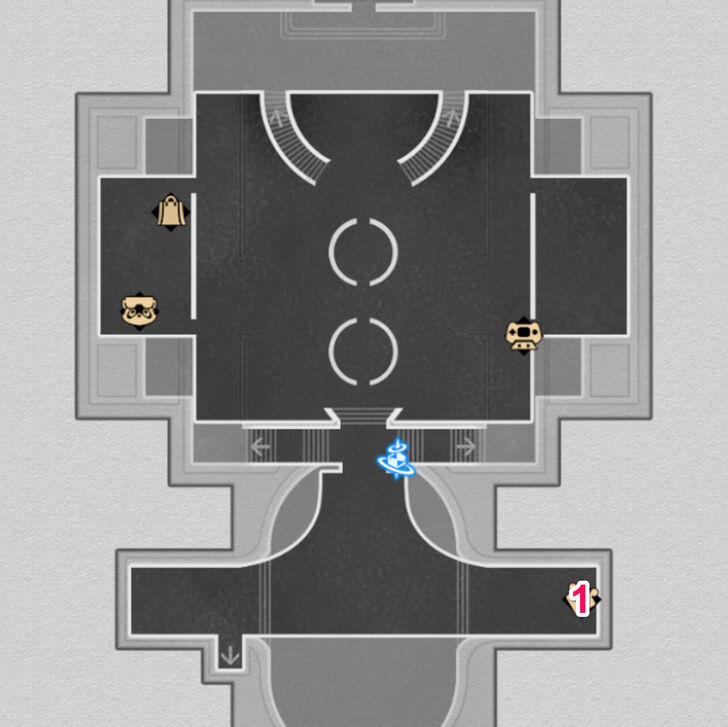
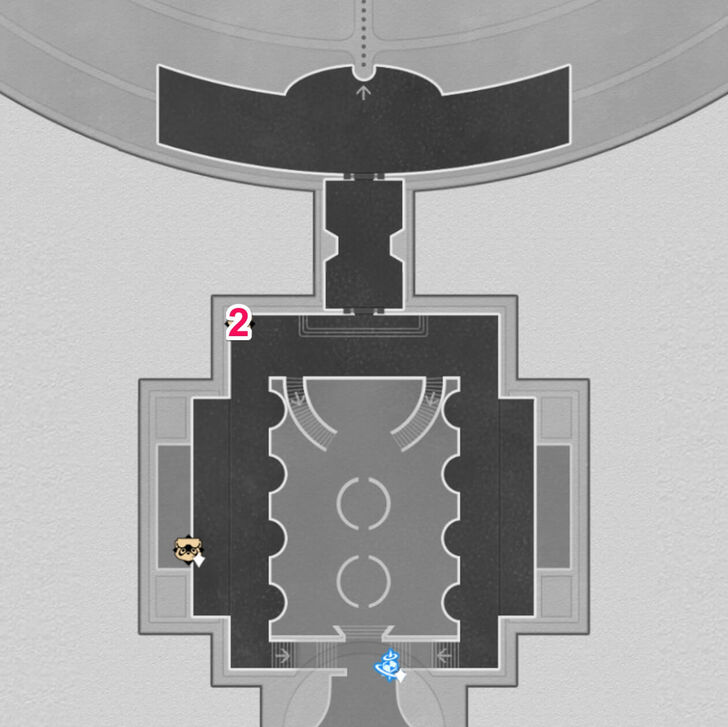
| Lodestar Tower F2 | Lodestar Tower F3 South |
|---|---|
 |
 |
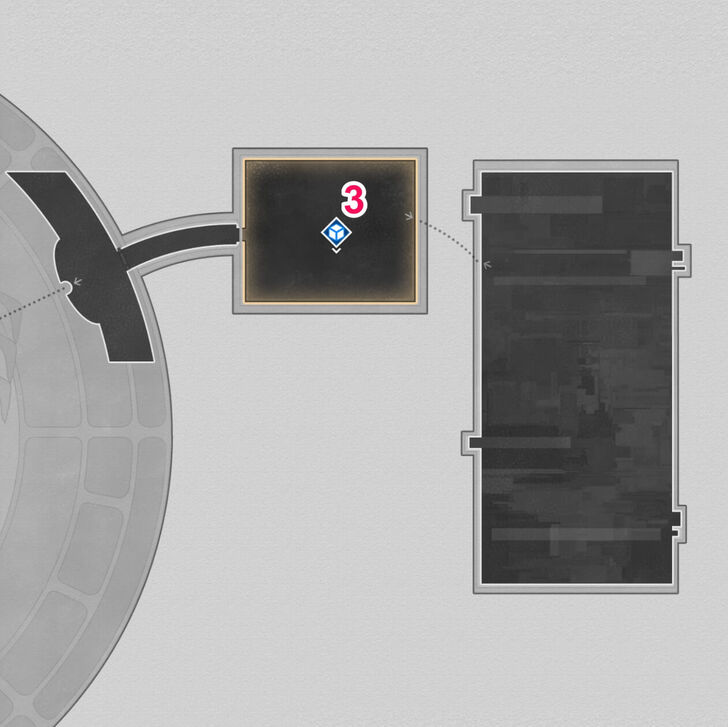
| Lodestar Tower F3 Northeast | |
 |
|
| Lodestar Tower Shiftmation Puzzles | |
| Puzzle 1 | Puzzle 2 |
| Puzzle 3 | - |
There are a total of 3 Shiftmation puzzles in Lodestar Tower. The first Shiftmation puzzle can be found in the elevator hallway on F2. The second one can be found in the northwest corner of the Reception Hall on F3. The last puzzle is located inside the Circular Office 3D puzzle room. You will need to walk up the wall to reach it.
Lodestar Tower Shiftmation 1
| Lodestar Tower Shiftmation 1 | |
|---|---|
| Jump up and enter the door. Use the spring on the side to exit the locked room. Upon exiting, simply jump to the right painted block to reclaim its paint. Keep rotating clockwise until you are able to jump down to the other painted block. |
|
| Stellar Jade |
x 20 |
Lodestar Tower Shiftmation 2
| Lodestar Tower Shiftmation 2 | |
|---|---|
| Go down the platform and rotate twice to enter a door. Once inside the locked room, rotate once, press on the switch, and exit the room. Rotate twice and enter the now accessible room. Use the lever and exit the room. Rotate and jump on the now visible platforms until you reach the top, where the painted block is. |
|
| Stellar Jade |
x 20 |
Lodestar Tower Shiftmation 3
| Lodestar Tower Shiftmation 3 | |
|---|---|
| Jump your way to the top and rotate once to see the levers. Use both levers and enter one of the locked rooms. Once inside the room, jump up and use the third lever. Exit the room via the door at the top. You should be near a painted block upon exiting. Reclaim its paint and enter the locked room again. This time, exit via the door at the bottom left. Again, you should be near a painted block upon exiting. Reclaim its paint and follow the thread connecting the last painted block and the imagenae to get to the last block. |
|
| Stellar Jade |
x 20 |
Version 4.4 Shiftmation Locations
| Version 4.4 Shiftmation Puzzles | |
|---|---|
| Desolate Maw's Demonhold | Fallen Star's Cradle |
Click the links to jump to an area's puzzles!
Desolate Maw's Demonhold Shiftmations
| Desolate Maw's Demonhold | |
|---|---|
 |
 |
| Desolate Maw's Demonhold Shiftmation Puzzle Solutions | |
| Puzzle 1 | Puzzle 2 |
| Puzzle 3 | Puzzle 4 |
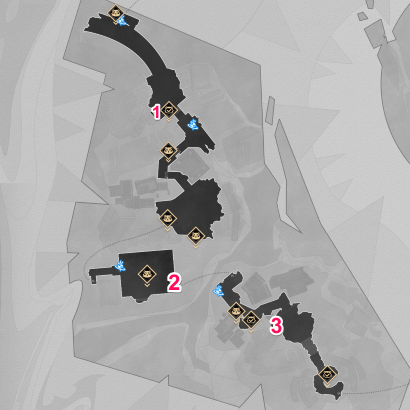
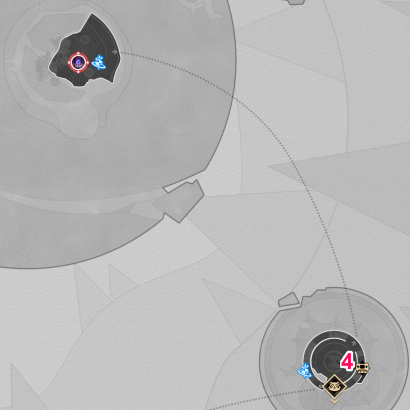
There are a total of 4 Shiftmation puzzles in Desolate Maw's Demonhold. The first puzzle here can be seen in the streets of the second area, located at the western side of the street.
The second puzzle is located in the train station, east of side of the central area right next to a couple of people.
The third one is located in the demolished street and it can be seen at the right side of a mob of enemies, so be careful in case you trigger them.
Lastly, the fourth puzzle can be seen in the Network station and its located at the bottom level area of the rooftop.
Desolate Maw's Demonhold Shiftmation 1
| Desolate Maw's Demonhold Shiftmation 1 | |
|---|---|
| You can immediately reclaim the pain from both sides of the stage. Once you have them, go to the platform where the White Fox is, Press Q twice, then jump to reclaim the last paint. Go back to the now-restored Colored Fox to complete the stage. |
|
| Stellar Jade |
x 20 |
▲ Back to Desolate Maw's Demonhold Top
Desolate Maw's Demonhold Shiftmation 2
| Desolate Maw's Demonhold Shiftmation 2 | |
|---|---|
| Jump to the red platform and Press E to rotate the stage counter-clockwise. Immediately jump to the next red platform, then Press Q and quickly jump to the upper platform. Jump to the upper platform, and you will see both paints on each side. |
|
| Stellar Jade |
x 20 |
▲ Back to Desolate Maw's Demonhold Top
Desolate Maw's Demonhold Shiftmation 3
| Desolate Maw's Demonhold Shiftmation 3 | |
|---|---|
| First, go to the upper platform and trigger the bomb to create a platform. Jump towards it and stand on top of the left pillar. Press Q once and jump further up to reclaim both paints. |
|
| Stellar Jade |
x 20 |
▲ Back to Desolate Maw's Demonhold Top
Desolate Maw's Demonhold Shiftmation 4
| Desolate Maw's Demonhold Shiftmation 4 | |
|---|---|
| First, Press E to reveal the button to create a new platform. Press Q and jump on that platform. You can reclaim the first paint. Jump back on top of the previous Platform, then Press Q to reveal another button and jump on the new platform. Climb up and Press Q again to reveal a new button. Go up and reclaim the second and third paint. |
|
| Stellar Jade |
x 20 |
▲ Back to Desolate Maw's Demonhold Top
Fallen Star's Cradle Shiftmations
| Fallen Star's Cradle | |
|---|---|
 |
 |
| Fallen Star's Cradle Shiftmation Puzzle Solutions | |
| Puzzle 1 | Puzzle 2 |
| Puzzle 3 | - |
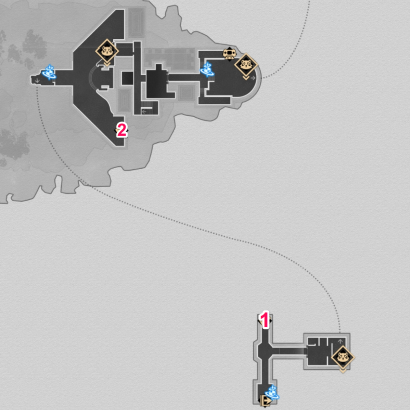
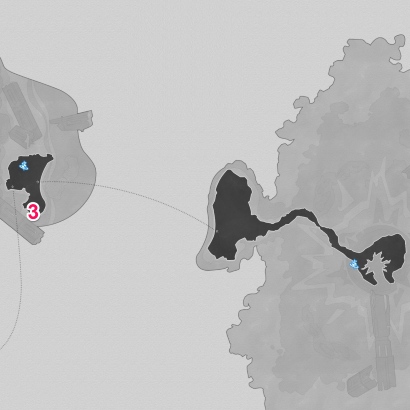
There are a total of 3 Shiftmation puzzles in Fallen Star's Cradle. The first shiftmation puzzle in Fallen Star's Cradle is located in the bottom area of the map, north of the narrow hallway.
The second puzzle is in the southern part of the second area, east side of the sanatorium when you teleport in front of it.
Lastly, the third puzzle is located at the upper refion, right after the second area. It can be found in the southern edge of the beachside.
Fallen Star's Cradle Shiftmation 1
| Fallen Star's Cradle Shiftmation 1 | |
|---|---|
| Interact with the lever to create a platform and reclaim the first paint. Now, go to the other side of the stage, where the rainbow flower is, and Press E once. Climb up towards the yellow platform and Press E twice. The yellow platform should position itself towards the next paint. After reclaiming the second paint, interact with the Fox to complete the stage. |
|
| Stellar Jade |
x 20 |
▲ Back to All Fallen Star's Cradle Puzzles
Fallen Star's Cradle Shiftmation 2
| Fallen Star's Cradle Shiftmation 2 | |
|---|---|
| Jump towards the paint on the right to reclaim it. Trigger the bomb underneath and jump to the upper level. Use the Jump boost to reclaim the last paint. |
|
| Stellar Jade |
x 20 |
▲ Back to All Fallen Star's Cradle Puzzles
Fallen Star's Cradle Shiftmation 3
| Fallen Star's Cradle Shiftmation 3 | |
|---|---|
| Press E once and use the Jump Boost to reclaim the first paint. Jump towards the next paint to reclaim it. Use the second paint as a platform to interact with the Fox to complete the stage. |
|
| Stellar Jade |
x 20 |
▲ Back to All Fallen Star's Cradle Puzzles
Version 4.3 Shiftmation Locations
Inkford Hermitage Shiftmations
| Inkford Hermitage | |
|---|---|
 |
|
| Inkford Hermitage Shiftmation Puzzle Solutions | |
| Puzzle 1 | Puzzle 2 |
| Puzzle 3 | - |
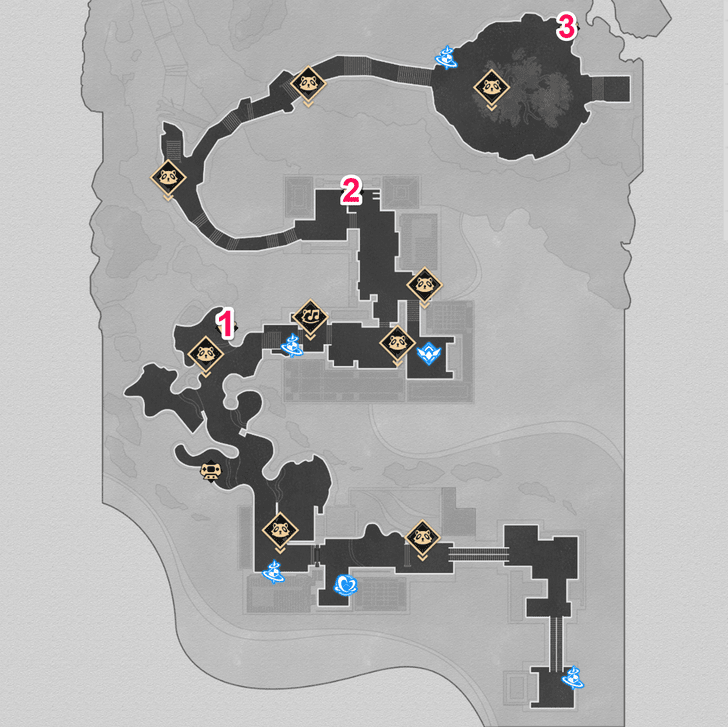
There are a total of 3 Shiftmation puzzles in Inkford Hermitage. The first Shifmation puzzle can be found west of the space anchor in the middle, just atop the Interplanar Jump in the area.
The second one is in the area before the long curved staircase above, specifically on the platform next to the first staircase down.
Finally, the last one is in the final area at the top-right corner, just before the last staircase.
Inkford Hermitage Shiftmation 1
| Inkford Hermitage Shiftmation 1 | |
|---|---|
| First, rotate to the right and climb down to reach the green blocks on the left to reclaim the first paint. Use the free rotation block until the windmill faces left. Go right to reclaim the next paint. Rotate again to the left, and this should bring you to the back of the figure. Jump on top to reach the last reclamation point. |
|
| Stellar Jade |
x 20 |
▲ Back to All Inkford Hermitage Puzzles
Inkford Hermitage Shiftmation 2
| Inkford Hermitage Shiftmation 2 | |
|---|---|
| Rotate left and use the platforms to climb up to the top-left green blocks to reach the first reclamation point. Rotate right and drop down to the castle below, landing on the platform under the window. Rotate left twice to reach the front of the castle, then climb your way to the green blocks on the right to reclaim the last paint. |
|
| Stellar Jade |
x 20 |
▲ Back to All Inkford Hermitage Puzzles
Inkford Hermitage Shiftmation 3
| Inkford Hermitage Shiftmation 3 | |
|---|---|
| Go to the farthest right to reach the first reclamation point. Jump back to the lever after and use it this time to reclaim the last paint. Rotate right and climb up to complete the puzzle. |
|
| Stellar Jade |
x 20 |
▲ Back to All Inkford Hermitage Puzzles
Version 4.2 Shiftmation Locations
| Version 4.2 Shiftmation Puzzles | |
|---|---|
| Seafeld City | Seafeld TV Tower |
Click the links to jump to an area's puzzles!
Seafeld City Shiftmations
| Seafeld City | |
|---|---|
 |
|
| Seafeld City Shiftmation Puzzle Solutions | |
| Puzzle 1 | Puzzle 2 |
| Puzzle 3 | - |
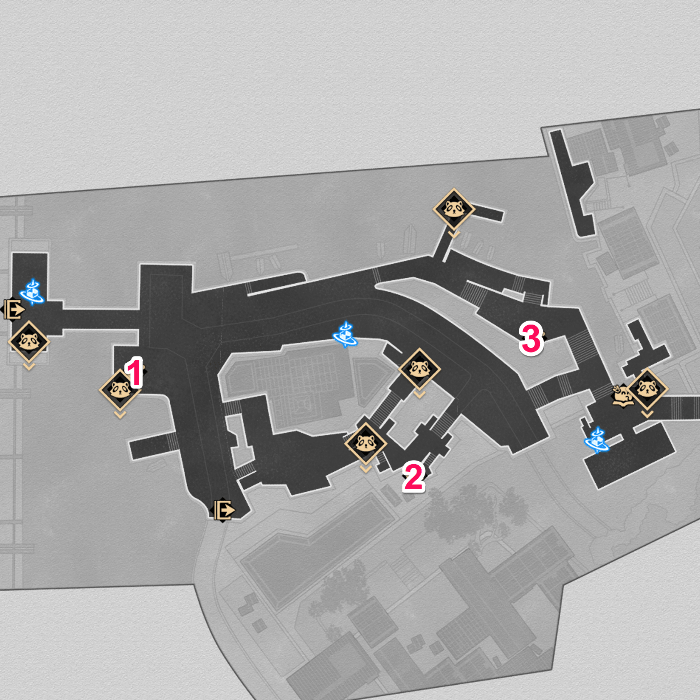
There are a total of 3 Shiftmation puzzles in Seafeld City. The first Shiftmation is just past the bridge and near a wall to the right of the Seafed Station Space Anchor.
The second Shiftmation is located southeast of the Seaside Avenue Space Anchor. Head up the stairs to the right and you'll see the Shiftmation near a traffic cone.
Finally, the third Shiftmation is northwest of the Mayor's Residence Space Anchor. Head to the left and go down the stairs, then you'll see the Shiftmation near some Emoti on a table.
Seafeld City Shiftmation 1
| Seafeld City Shiftmation 1 | |
|---|---|
| First, rotate to the right once. Jump to the lever and then onto the platform on the right side. Next, rotate to the left three times. Use the lever again and jump to the platform on the right. Then, rotate to the right two times. Use the lever one last time and go to the top, then use the pinwheel. Jump over to the paint on the left to claim the paint. |
|
| Stellar Jade |
x 20 |
▲ Back to All Seafeld City Puzzles
Seafeld City Shiftmation 2
| Seafeld City Shiftmation 2 | |
|---|---|
| First, rotate to the left once. Head to the first paint on the left and claim it. Next, rotate to the left again and then head to the pinwheel. Once there, rotate to the left and then head to the right to claim the next paint. After that, rotate to the right once and then go to the pinwheel to reset. Rotate to the left twice and then claim the last paint to finish the puzzle. |
|
| Stellar Jade |
x 20 |
▲ Back to All Seafeld City Puzzles
Seafeld City Shiftmation 3
| Seafeld City Shiftmation 3 | |
|---|---|
| First, use the platforms on the left to jump on the upper level and head to the right to claim the first paint. Then, head to the pinwheel on the left and rotate to the left. Jump to the uppermost level and rotate to the right twice to get the last paint. |
|
| Stellar Jade |
x 20 |
▲ Back to All Seafeld City Puzzles
Seafeld TV Tower Shiftmations
| Seafeld TV Tower F1 | Seafeld TV Tower F2 |
|---|---|
 |
 |
| Seafeld TV Tower F3 | |
 |
|
| Seafeld TV Tower Shiftmation Puzzle Solutions | |
| Puzzle 1 | Puzzle 2 |
| Puzzle 3 | - |
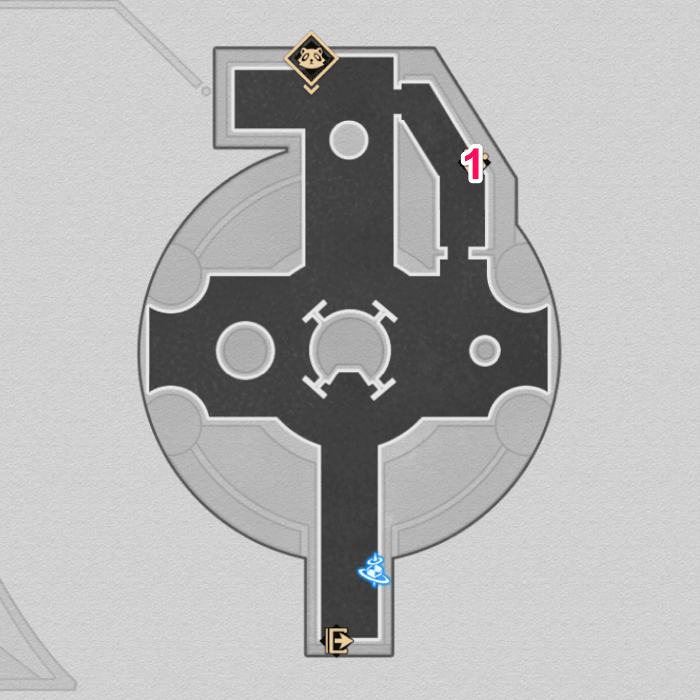
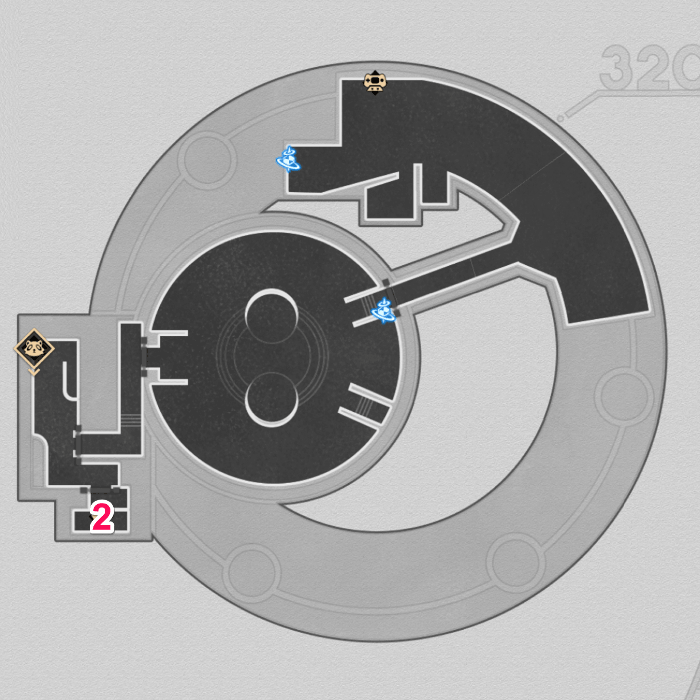
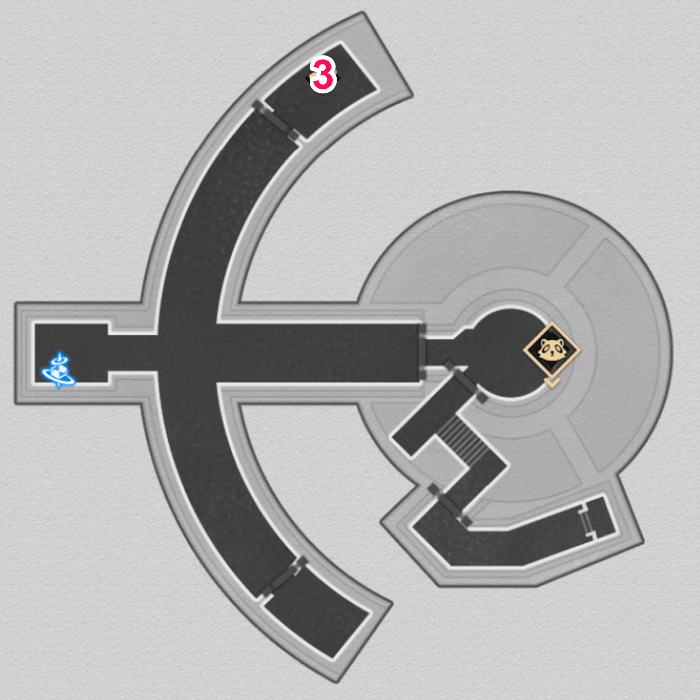
There are a total of 3 Shiftmation puzzles in Seafeld TV Tower. The first Shiftmation is located north of the Reception Hall Space Anchor. Follow the path to the right and enter the store. You'll see it near a television.
The second Shiftmation is located southwest of the Primary Studio Stage Space Anchor. Go past the broken smiley face and follow the path south. Once you reach the last room, you'll see it near some film rolls.
Finally, the third Shiftmation is north of the Production Zone Corridor Space Anchor. Just follow the path north and you'll see it inside the a server room.
Seafeld TV Tower Shiftmation 1
| Seafeld TV Tower Shiftmation 1 | |
|---|---|
| First, jump up on the blue boxes on the left and rotate to the left once. Hop to the right and claim the first paint. Next, jump to the blue boxes on the right side and then rotate to the left once. You can then jump and claim the last paint. |
|
| Stellar Jade |
x 20 |
▲ Back to All Seafeld TV Tower Puzzles
Seafeld TV Tower Shiftmation 2
| Seafeld TV Tower Shiftmation 2 | |
|---|---|
| First, use the moving platform on the right to get the first paint. Next, jump to the top of the platform and rotate to the left once. You can then jump to the right and claim the last paint. Rotate once to the left right after and jump down on the platform to the right to finish the puzzle. |
|
| Stellar Jade |
x 20 |
▲ Back to All Seafeld TV Tower Puzzles
Seafeld TV Tower Shiftmation 3
| Seafeld TV Tower Shiftmation 3 | |
|---|---|
| First, rotate to the left once. Jump up to the lever and use it. Next, jump up to the first paint and claim it. Drop down back to the Imagenae and rotate to the left twice. Jump to the right and claim the last paint. You can then jump to the left to finish the puzzle. |
|
| Stellar Jade |
x 20 |
▲ Back to All Seafeld TV Tower Puzzles
Version 4.1 Shiftmation Locations
| Version 4.1 Shiftmation Puzzles | |
|---|---|
| Pearluxe Tower | Lookout Cloud Station |
Click the links to jump to an area's puzzles!
Pearluxe Tower Shiftmations
| Pearluxe Tower | |
|---|---|
 |
|
| Pearluxe Tower Shiftmation Puzzle Solutions | |
| Puzzle 1 | Puzzle 2 |
| Puzzle 3 | - |
There are a total of 3 Shiftmation puzzles in Pearluxe Tower. The first Shiftmation is located west of the Model Showcase Zone Space Anchor. Head up the stairs to the left and go through the doors, then you'll see the Shiftmation near one of the exhibits.
The second Shiftmation is located east of the Model Showcase Zone Space Anchor. Head up the stairs to the right and you'll see the Shiftmation near some shelves.
Finally, the third Shiftmation is east of the Battle Lobby Space Anchor. Head to the right and go past the stairs, then you'll see the Shiftmation in the corner near some mecha parts.
Pearluxe Tower Shiftmation 1
| Pearluxe Tower Shiftmation 1 | |
|---|---|
| First, rotate the world to the right once. Head to the right and claim the first paint. Next, rotate to the left once and then jump to the top using the platforms on the left. You can then claim the second paint. Lastly, fall to the middle of the big platform and then rotate to the left once. Jump to the top platform and then head to the left where you can claim the last paint. |
|
| Stellar Jade |
x 20 |
▲ Back to All Pearluxe Tower Puzzles
Pearluxe Tower Shiftmation 2
| Pearluxe Tower Shiftmation 2 | |
|---|---|
| Head to the rightmost platform and then rotate to the right once. Use the platforms to get to the painted platforms and claim the paint. You can then climb to the very top and interact with the Imagenae. |
|
| Stellar Jade |
x 20 |
▲ Back to All Pearluxe Tower Puzzles
Pearluxe Tower Shiftmation 3
| Pearluxe Tower Shiftmation 3 | |
|---|---|
| First, go to the left and stand below the gap in the platforms. Rotate to the right once, and then jump to the top using the platforms on the left. Claim the first paint, then fall back to the bottom platform. Head to the very edge on the right and rotate to the left. Go to the left and jump the gap to reset the spin count. Lastly, use the platforms on the right to jump to the top platform and claim the remaining paints. |
|
| Stellar Jade |
x 20 |
▲ Back to All Pearluxe Tower Puzzles
Lookout Cloud Station Shiftmations
| Lookout Cloud Station | |
|---|---|
 |
|
| Lookout Cloud Station Shiftmation Puzzle Solutions | |
| Puzzle 1 | Puzzle 2 |
| Puzzle 3 | Puzzle 4 |
There are a total of 4 Shiftmation puzzles in Lookout Cloud Station. The first Shiftmation is located east of the Qlipoth Boulevard Space Anchor. Head to the alley on the right and at the end, you'll see it near some flowers.
The second Shiftmation is located southeast of the Jubilee Avenue Space Anchor. Head down the long stairs and follow the main path until you come across some tables, where the Shiftmation is near to.
The third Shiftmation is located north of the Foxfolio Lookout Cloud Branch Space Anchor. Use the Space Anchor and you'll see the Shiftmation near some people standing next to the railing.
Lastly, the fourth Shiftmation is located west of the Harmony Station Space Anchor. Go past the SoulGlad part of the train and you'll see the Shiftmation near the railing.
Lookout Cloud Station Shiftmation 1
| Lookout Cloud Station Shiftmation 1 | |
|---|---|
| Head to the right edge of the initial platform and rotate to the right once. Next, jump to the platforms on the right and you'll get to the painted platform. Claim the paint and then rotate to the left once. Lastly, jump to the top platform to get to the Imagenae. |
|
| Stellar Jade |
x 20 |
▲ Back to All Lookout Cloud Station Puzzles
Lookout Cloud Station Shiftmation 2
| Lookout Cloud Station Shiftmation 2 | |
|---|---|
| Jump to the top platform first and stand by the Imagenae. Rotate to the right once and head to the right to claim the first paint. Next, jump to the left and head left to get to the pinwheel. Rotate to the left once and head left, then jump to the edge of the platform. Lastly, rotate to the left once and jump to the right to get to the last paint. Claim it and jump to the right to get back to the Imagenae. |
|
| Stellar Jade |
x 20 |
▲ Back to All Lookout Cloud Station Puzzles
Lookout Cloud Station Shiftmation 3
| Lookout Cloud Station Shiftmation 3 | |
|---|---|
| First, jump to the top and head to the left to get to the pinwheel. Rotate to the left once, then fall to the bottom platform. Jump across to the platform on the left and stand on the edge. Rotate to the left twice, then use the platforms to jump up and claim the paint. Lastly, climb to the top platform and then jump to the right to get to the Imagenae. |
|
| Stellar Jade |
x 20 |
▲ Back to All Lookout Cloud Station Puzzles
Lookout Cloud Station Shiftmation 4
| Lookout Cloud Station Shiftmation 4 | |
|---|---|
| Use the lever to make the yellow platform appear. Stand in the middle and rotate to the right, then head to the right to get to the first paint. Jump to the left and drop down the middle platforms until you get back to the yellow platform from earlier. Rotate to the left once, then jump to the top platform. From here, activate the lever and then jump to the left to get to the second paint. Jump to the right and head to the top platform to get to the Imagenae. |
|
| Stellar Jade |
x 20 |
▲ Back to All Lookout Cloud Station Puzzles
Version 4.0 Shiftmation Locations
| Version 4.0 Shiftmation Puzzles | |
|---|---|
| Duomension City | Graphia Academy |
| Dovebrook District | "World's End" Tavern |
Click the links to jump to an area's puzzles!
Duomension City Shiftmations
| Duomension City East | Duomension City West |
|---|---|
 |
 |
| Duomension City Shiftmation Puzzle Solutions | |
| Puzzle 1 | Puzzle 2 |
| Puzzle 3 | Puzzle 4 |
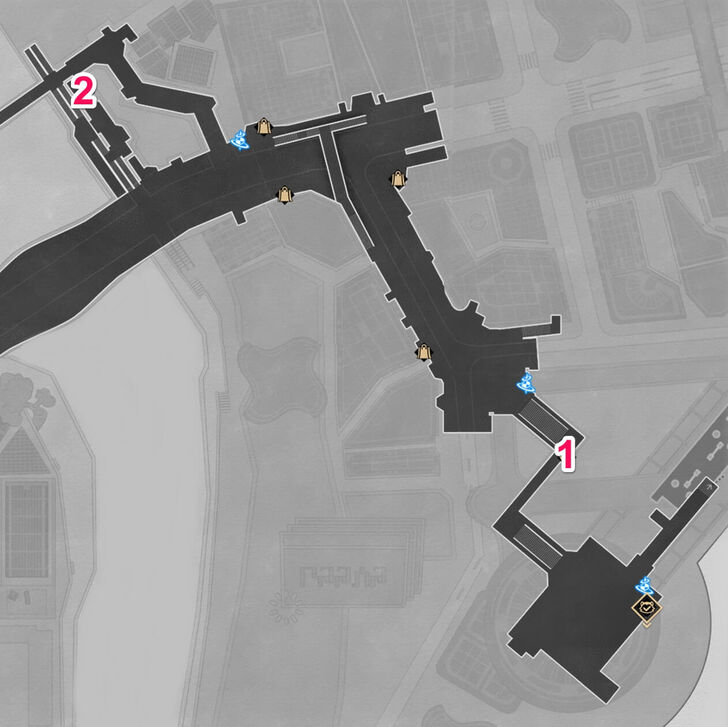
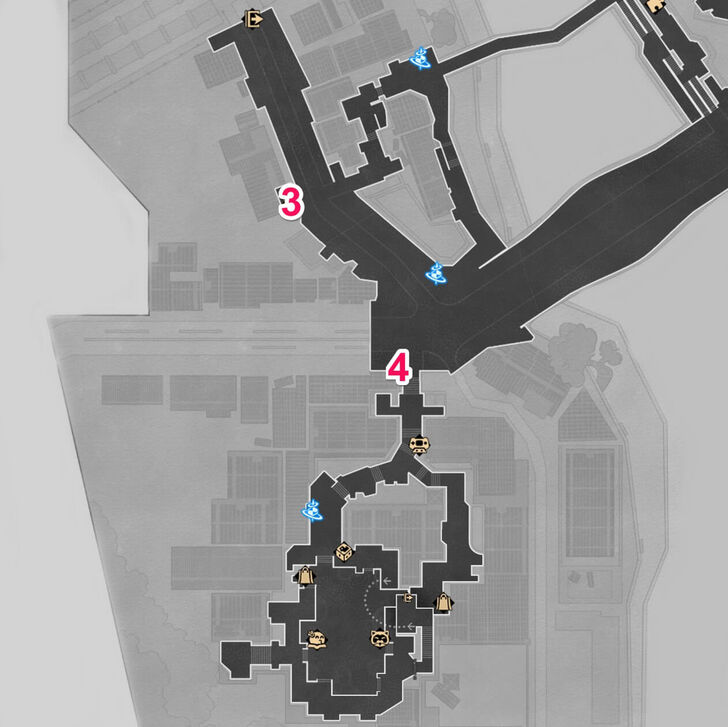
There are a total of 4 Shiftmation puzzles in Duomension City. The first Shiftmation is located in the metro station, but is initially inaccessible until you progress further in the Welcome to Arcadia main mission.
The second Shiftmation is in an alleyway in the middle northern part of Duomension, while the third Shiftmation is near a coffee shop south of the road leading to Graphia Academy.
Finally, the fourth Shiftmation is right in front of the large plaza in the southwestern part of the map.
Duomension City Shiftmation 1
| Duomension City Shiftmation 1 | |
|---|---|
| First, rotate the platform clockwise, then jump on the left side. Climb the platforms by jumping on the blocks, then jump to the right side and claim the first paint. Next, go back to the platform on the left and go all the way to the left edge. Rotate the platform clockwise three times, then go to the right edge and jump below. Make your way to the other side and climb up to the top to get the second paint. Lastly, go back to the imagenae in the middle platform to complete it. |
|
| Stellar Jade |
x 20 |
▲ Back to All Duomension City Puzzles
Duomension City Shiftmation 2
| Duomension City Shiftmation 2 | |
|---|---|
First, rotate the platform clockwise. Jump on the bricks until you reach the first paint and claim it. Next, rotate the platform clockwise once again and just jump on the bricks until you get to the second platform. Go to the imagenae right after to complete the puzzle. |
|
| Stellar Jade |
x 20 |
▲ Back to All Duomension City Puzzles
Duomension City Shiftmation 3
| Duomension City Shiftmation 3 | |
|---|---|
| First, go to the left edge and double jump to get to the first paint and claim it. Next, rotate clockwise once and jump onto the platform. Rotate clockwise three more times until you see the second paint to the right. Claim the paint and head back to the imagenae to complete the puzzle. |
|
| Stellar Jade |
x 20 |
▲ Back to All Duomension City Puzzles
Duomension City Shiftmation 4
| Duomension City Shiftmation 4 | |
|---|---|
Rotate the platform clockwise once, then climb up the stairs to get to the paint. Claim it and head to the left to interact with the completed imagenae to finish the puzzle. |
|
| Stellar Jade |
x 20 |
▲ Back to All Duomension City Puzzles
Graphia Academy Shiftmations
| Graphia Academy F1 | Graphia Academy F2 |
|---|---|
 |
 |
| Graphia Academy Shiftmation Puzzle Solutions | |
| Puzzle 1 | Puzzle 2 |
| Puzzle 3 | Puzzle 4 |
There are a total of 4 Shiftmation puzzles in Graphia Academy of Planarcadia. The first Shiftmation is located in at the end of the right corridor in F1. Use the School Lobby Building Space Anchor and follow the right hallway until the end to see it.
For the second Shiftmation, use the Main Building Corridor Space Anchor then enter the hallway on the right. You'll see it next to a drinks machine on the left.
For the third Shiftmation, use the Main Building Corridor Space Anchor then follow the hallway to the left until the end. Head right and you'll see it at the end of the path.
The last Shiftmation is on F2, so use the School Lobby Building Space Anchor and head up the stairs on the left. You'll see it next to a small bookshelf.
Graphia Academy Shiftmation 1
| Graphia Academy Shiftmation 1 | |
|---|---|
Rotate the stage clockwise once and go down to the jump pad. Use it to get to the platform above, where you can reach the first paint on the left. Next, jump to the right to get to the next paint. Finally, jump up to the imagenae to finish the puzzle. |
|
| Stellar Jade |
x 20 |
▲ Back to All Graphia Academy Puzzles
Graphia Academy Shiftmation 2
| Graphia Academy Shiftmation 2 | |
|---|---|
Climb up the stairs and jump to the right heart to get the first paint. Rotate the stage clockwise once, then you can jump to the left heart to get the second paint. Lastly, climb the stairs to get to the imagenae. |
|
| Stellar Jade |
x 20 |
▲ Back to All Graphia Academy Puzzles
Graphia Academy Shiftmation 3
| Graphia Academy Shiftmation 3 | |
|---|---|
Use the jump pad on the right to get to the first paint on the left platform. Next, rotate the stage counter clockwise once, then you can jump to the second painted platform just above. Lastly, jump to the third painted platform on the right to get it. Go to the top platform to get to the imagenae. |
|
| Stellar Jade |
x 20 |
▲ Back to All Graphia Academy Puzzles
Graphia Academy Shiftmation 4
| Graphia Academy Shiftmation 4 | |
|---|---|
Jump to the flowers on the right, then rotate the stage clockwise once so you can jump on the first painted pillar. Go to the far left and take the painted pillars one by one. After you get them all, you can freely jump to the imagenae above. |
|
| Stellar Jade |
x 20 |
▲ Back to All Graphia Academy Puzzles
Dovebrook District Shiftmations
| Dovebrook District F1 | |
|---|---|
 |
|
| Dovebrook District Shiftmation Puzzle Solutions | |
| Puzzle 1 | Puzzle 2 |
| Puzzle 3 | - |
There are a total of 3 Shiftmation puzzles in Dovebrook District of Planarcadia. The first Shiftmation is located just next to the Calyx in F1.
For the second Shiftmation, use the Furbobo Editorial Space Anchor and head down the stairs. Once you're outside, make a right and then go to the left to see a bridge. Once you see the bridge, go to the left to see the Shiftmation.
For the last Shiftmation, use the Dovebrook Avenue Space Anchor then follow the path forward. Cross the road and to the right, you'll see the Shiftmation.
Dovebrook District Shiftmation 1
| Dovebrook District Shiftmation 1 | |
|---|---|
Climb up to the top of the middle platform then rotate the stage clockwise once. Hop to the left to get to the first painted platform and claim it. Next, rotate the stage counter clockwise once and hop to the right until you reach the last platform. Rotate the stage counter clockwise twice, then jump to the right to get to the second painted platform.Claim it and then go to the imagenae to finish the puzzle. |
|
| Stellar Jade |
x 20 |
▲ Back to All Dovebrook District Puzzles
Dovebrook District Shiftmation 2
| Dovebrook District Shiftmation 2 | |
|---|---|
First, go to the right and jump up the bricks to get to the first painted platform. Next, rotate the stage clockwise once so you can get to a small platform on the left. Use it to jump to the side, which allows you to jump to the very top to reach the remaining painted platforms. Go down to them and use the bricks at the side to get back up to the imagenae to finish the puzzle. |
|
| Stellar Jade |
x 20 |
▲ Back to All Dovebrook District Puzzles
Dovebrook District Shiftmation 3
| Dovebrook District Shiftmation 3 | |
|---|---|
First, jump down to the lower platform and head to the very left. Rotate the stage clockwise twice, and then go down the platform to jump to the other side. Use the blocks to climb up to the painted platform, claim it, then head to the imagenae to finish the puzzle. |
|
| Stellar Jade |
x 20 |
▲ Back to All Dovebrook District Puzzles
World's End Tavern Shiftmations
| World's End Tavern F1 | World's End Tavern F2 |
|---|---|
 |
 |
| World's End Tavern Shiftmation Puzzle Solutions | |
| Puzzle 1 | Puzzle 2 |
| Puzzle 3 | - |
There are a total of 3 Shiftmation puzzles in World's End Tavern of Planarcadia. The first Shiftmation is located just to the right of the Blisstar Space Anchor in F1.
For the second Shiftmation, use the Fatal Joke Space Anchor and head down the hall. Go inside the left room at the end of the hall, and you'll make your way to the theater. At the back of the theater, you'll see the Shiftmation.
For the third Shiftmation, use the Tavern Lobby Space Anchor in F1 then climb up the stairs. If you don't have the stairs unlocked yet, use the Interplanar Jump nearby to get to F2. From here, go to a small room to the left where you'll see the Shiftmation inside.
World's End Tavern Shiftmation 1
| World's End Tavern Shiftmation 1 | |
|---|---|
First, go to the far left and jump on the first painted platform. Take it, then use it to jump to the next one on the far right. After that, take the next painted platform on the left. Finally, jump to the highest platform and head to the last painted platform by dropping down onto it. Climb back up to the imagenae once you're done to finish the puzzle. |
|
| Stellar Jade |
x 20 |
▲ Back to All World's End Tavern Puzzles
World's End Tavern Shiftmation 2
| World's End Tavern Shiftmation 2 | |
|---|---|
First, rotate the stage clockwise twice and climb up the tower. Once you're at the top platform, rotate the stage counter clockwise to get a brick you can hop on. Jump on the brick and head to the first painted platform on the right. After that, jump to the middle platform on the left, then keep jumping until you get to the next painted platform. Next, jump up the moving platforms and just keep rotating until you get to the top. |
|
| Stellar Jade |
x 20 |
▲ Back to All World's End Tavern Puzzles
World's End Tavern Shiftmation 3
| World's End Tavern Shiftmation 3 | |
|---|---|
First, head all the way to the left until you reach the last platform. Next, rotate the stage counter clockwise once. Hop on the jump pad to get to the painted platform and take it. Finally, jump to the imagenae on the right to complete the puzzle. |
|
| Stellar Jade |
x 20 |
▲ Back to All World's End Tavern Puzzles
Shiftmation Total Rewards
All Shiftmation Rewards
| Shiftmation | Rewards |
|---|---|
| Duomension City Shiftmation 1 |
 Stellar Jade
x20 |
| Duomension City Shiftmation 2 |
Stellar Jade
x20
|
| Duomension City Shiftmation 3 |
Stellar Jade
x20
|
| Duomension City Shiftmation 4 |
Stellar Jade
x20
|
| Graphia Academy Shiftmation 1 |
Stellar Jade
x20
|
| Graphia Academy Shiftmation 2 |
Stellar Jade
x20
|
| Graphia Academy Shiftmation 3 |
Stellar Jade
x20
|
| Graphia Academy Shiftmation 4 |
Stellar Jade
x20
|
| Dovebrook District Shiftmation 1 |
Stellar Jade
x20
|
| Dovebrook District Shiftmation 2 |
Stellar Jade
x20
|
| Dovebrook District Shiftmation 3 |
Stellar Jade
x20
|
| World's End Tavern Shiftmation 1 |
Stellar Jade
x20
|
| World's End Tavern Shiftmation 2 |
Stellar Jade
x20
|
| World's End Tavern Shiftmation 3 |
Stellar Jade
x20
|
| Pearluxe Tower Shiftmation 1 |
Stellar Jade
x20
|
| Pearluxe Tower Shiftmation 2 |
Stellar Jade
x20
|
| Pearluxe Tower Shiftmation 3 |
Stellar Jade
x20
|
| Lookout Cloud Station Shiftmation 1 |
Stellar Jade
x20
|
| Lookout Cloud Station Shiftmation 2 |
Stellar Jade
x20
|
| Lookout Cloud Station Shiftmation 3 |
Stellar Jade
x20
|
| Lookout Cloud Station Shiftmation 4 |
Stellar Jade
x20
|
| Seafeld City Shiftmation 1 |
Stellar Jade
x20
|
| Seafeld City Shiftmation 2 |
Stellar Jade
x20
|
| Seafeld City Shiftmation 3 |
Stellar Jade
x20
|
| Seafeld TV Tower Shiftmation 1 |
Stellar Jade
x20
|
| Seafeld TV Tower Shiftmation 2 |
Stellar Jade
x20
|
| Seafeld TV Tower Shiftmation 3 |
Stellar Jade
x20
|
| Inkford Hermitage Shiftmation 1 |
Stellar Jade
x20
|
| Inkford Hermitage Shiftmation 2 |
Stellar Jade
x20
|
| Inkford Hermitage Shiftmation 3 |
Stellar Jade
x20
|
| Desolate Maw's Demonhold Shiftmation 1 |
Stellar Jade
x20
|
| Desolate Maw's Demonhold Shiftmation 2 |
Stellar Jade
x20
|
| Desolate Maw's Demonhold Shiftmation 3 |
Stellar Jade
x20
|
| Fallen Star's Cradle Shiftmation 1 |
Stellar Jade
x20
|
| Fallen Star's Cradle Shiftmation 2 |
Stellar Jade
x20
|
| Fallen Star's Cradle Shiftmation 3 |
Stellar Jade
x20
|
| Astropolis Central District Shiftmation 1 |
Stellar Jade
x20
|
| Astropolis Central District Shiftmation 2 |
Stellar Jade
x20
|
| Astropolis Central District Shiftmation 3 |
Stellar Jade
x20
|
| Astropolis Central District Shiftmation 4 |
Stellar Jade
x20
|
| Lodestar Tower Shiftmation 1 |
Stellar Jade
x20
|
| Lodestar Tower Shiftmation 2 |
Stellar Jade
x20
|
| Lodestar Tower Shiftmation 3 |
Stellar Jade
x20
|
Currently, you can obtain up to 860 Stellar Jades by completing Shiftmation puzzles in Version 4.5.
4.5 Banners, Events, and Release Date
Shiftmation Information
Rotate Your Point of View to Solve the Puzzle

In Shiftmation, you'll need to rotate your point of view to access new areas in each stage and help the imagenae restore their color.
Honkai: Star Rail Related Guides

All Tips and Tricks Guides



Author

Shiftmation Puzzle Solutions and Locations

Premium Articles



Rankings
- We could not find the message board you were looking for.
Gaming News





Popular Games

Genshin Impact Walkthrough & Guides Wiki
Fire Emblem: Fortune's Weave (FEFW) Walkthrough & Guides Wiki
Aniimo Walkthrough & Guides Wiki
Wuthering Waves Walkthrough & Guides Wiki
Dragon's Dogma 2 (DD2) Dark Arisen Walkthrough & Guides Wiki
Umamusume: Pretty Derby Walkthrough & Guides Wiki
Honkai: Star Rail Walkthrough & Guides Wiki
Zenless Zone Zero Walkthrough & Guides Wiki
Pokemon TCG Pocket (PTCGP) Strategies & Guides Wiki
AION 2 Walkthrough & Guides Wiki









Recommended Games
Fire Emblem Heroes (FEH) Walkthrough & Guides Wiki
Where Winds Meet Walkthrough & Guides Wiki
Diablo 4: Lord of Hatred Walkthrough & Guides Wiki
Super Smash Bros. Ultimate Walkthrough & Guides Wiki
Persona 3 Reload Walkthrough & Guides Wiki
The Legend of Zelda: Tears of the Kingdom Walkthrough & Guides Wiki
Elden Ring Walkthrough & Guides Wiki
Pokemon Brilliant Diamond and Shining Pearl (BDSP) Walkthrough & Guides Wiki
Cyberpunk 2077: Ultimate Edition Walkthrough & Guides Wiki
Monster Hunter World Walkthrough & Guides Wiki










All rights reserved
Copyright © 2024 HoYoverse, COGNOSPHERE. All Rights Reserved.
The copyrights of videos of games used in our content and other intellectual property rights belong to the provider of the game.
The contents we provide on this site were created personally by members of the Game8 editorial department.
We refuse the right to reuse or repost content taken without our permission such as data or images to other sites.
I can't enter the door in 4.5 Shiftmation 2. My character is grey and doesn't interact with the door.