
All Nameless Wispae Locations and Rewards
★ Please participate in Game8's Version 4.6 Survey!
♦ Latest: 4.6 Banners and Events and 4.6 Redeem Codes
♦ 4.6 Phase 2: Pearl and Mortenax Blade
♦ Fate Collab Part 2: Rin Tohsaka and Gilgamesh

Here are all the Nameless Wispae locations in Honkai: Star Rail's Planarcadia and Astropolis areas. See where to find all Nameless Wispae and all the rewards you can get from them in this guide!
All Nameless Wispae Locations in Planarcadia
Nameless Wispae Locations Per Planarcadia Area
| Planarcadia Nameless Wispae Per Map | |
|---|---|
| Duomension City | Graphia Academy |
| Dovebrook District | World's End Tavern |
| Pearluxe Tower | Lookout Cloud Station |
| Seafeld City | Seafeld TV Tower |
| Inkford Hermitage | Desolate Maw's Demonhold |
| Fallen Star's Cradle | - |
Duomension City
| Duomension City Map | |||||||
|---|---|---|---|---|---|---|---|
 B1 Full Image |
 F1 East Full Image |
||||||
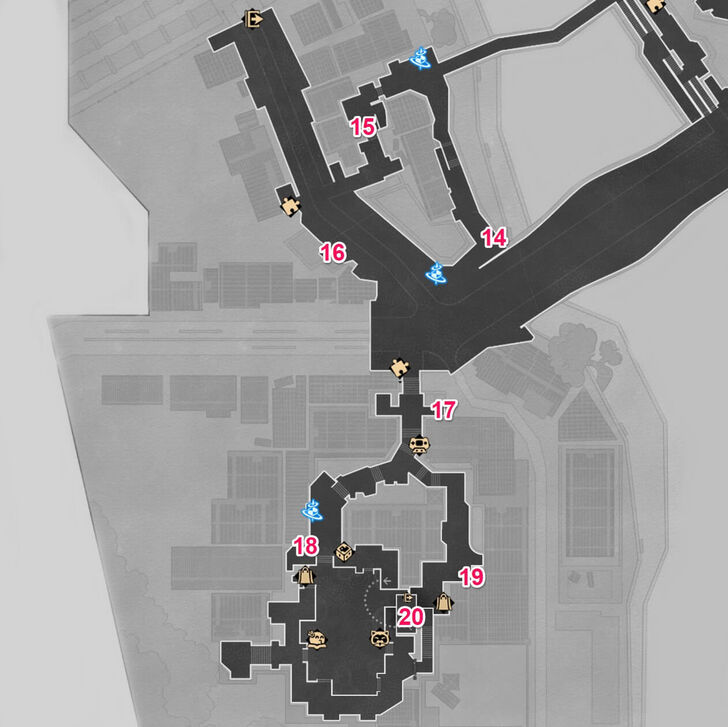 F1 West Full Image |
|||||||
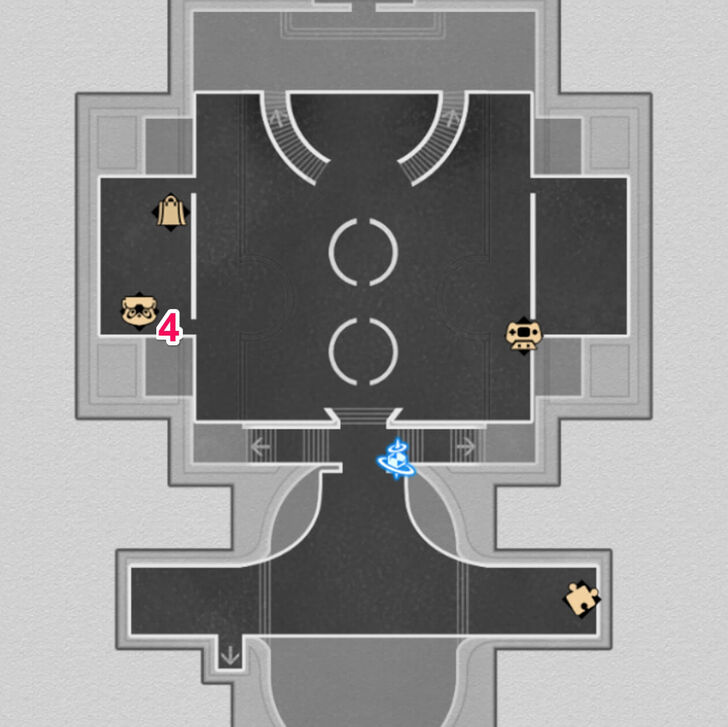
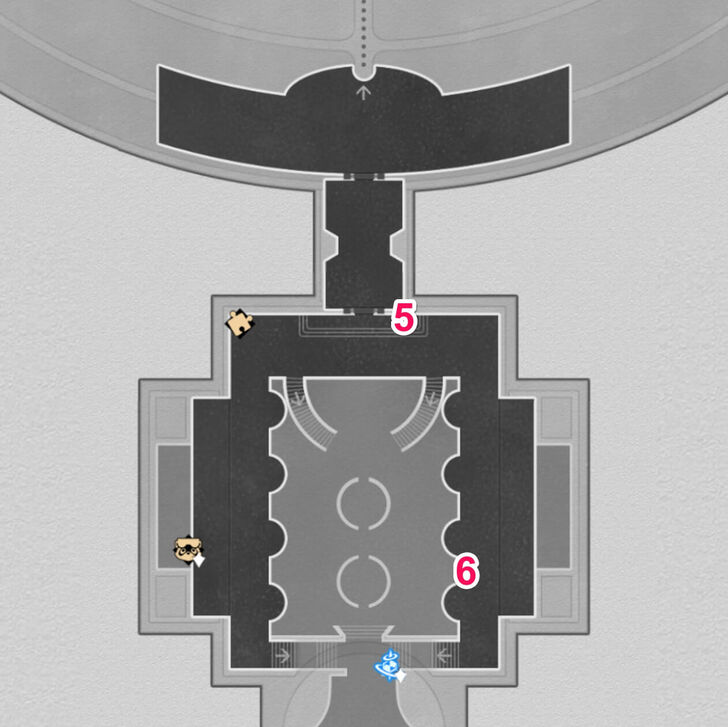
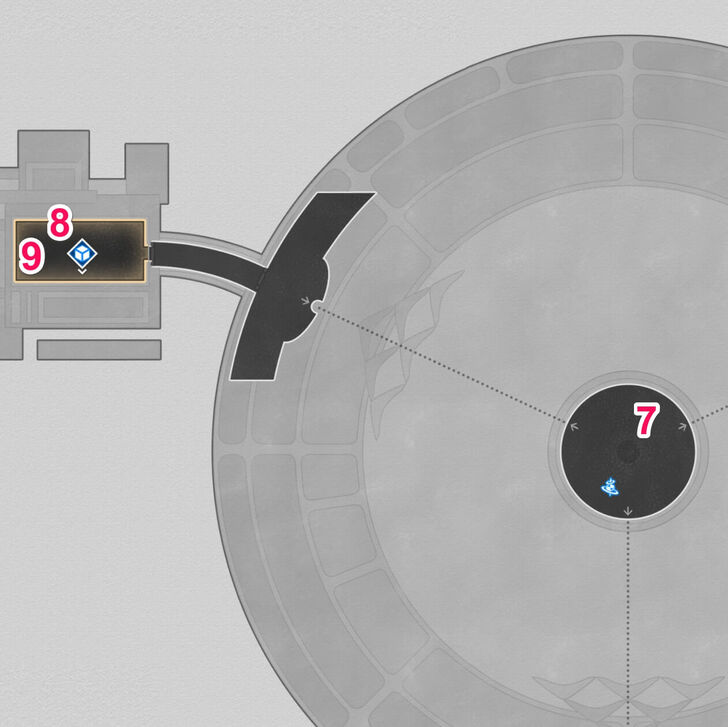
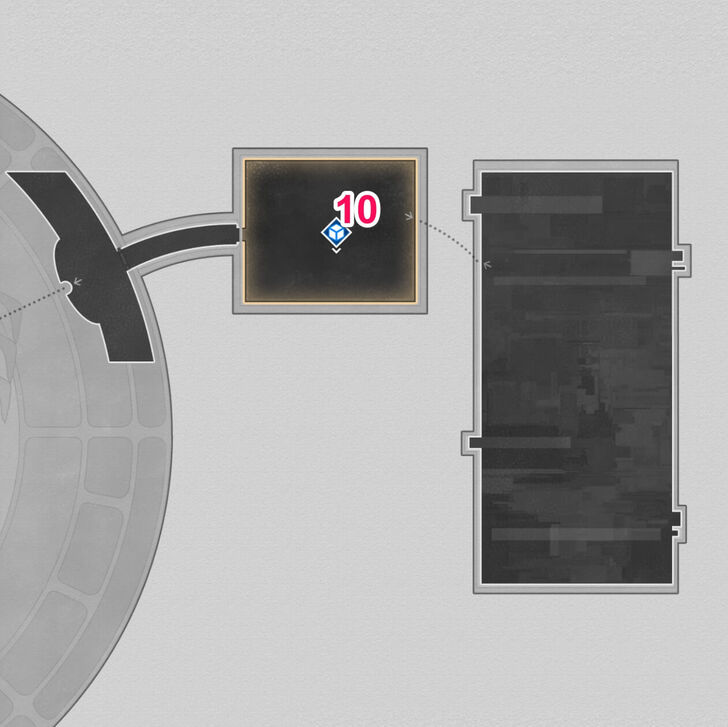
There are a total of 20 Nameless Wispae to collect in Duomension City.
Duomension City Nameless Wispae Locations
| No. | Image | How to Find |
|---|---|---|
| 1 |  |
Head southwest from the Perdido Station Railway Platform Space Anchor in Duomension City B1. The Nameless Wispae is on a bench next to two npcs. |
| 2 |  |
Head south from the Perdido Station Waiting Hall Space Anchor. The Nameless Wispae is on the screen of one of the ticket machines. |
| 3 |  |
Head west from the Interplanar Jump. The Nameless Wispae is on a transit map right next to the Black Cat Instacam. |
| 4 |  |
Head west from the Perdido Station Plaza Space Anchor. The Nameless Wispae is on a star decal right next to npcs Aquan and Terrane. |
| 5 |  |
Head northeast from the Perdido Station Plaza Space Anchor. The Nameless Wispae is on a wall on the dead end that you can reach by going down some stairs. |
| 6 |  |
Head north of the ∞-Eleven store and enter the Interplanar Jump. The Nameless Wispae is near the stage's exit which requires you to do a jump puzzle to reach. |
| 7 |  |
Head southwest of the BOOK-ON! store and enter the Interplanar Jump. The Nameless Wispae is on a bunch of red blocks near the end of the stage. You can get the Wisp after the stage rotates and heading up the top platform near the end of the stage. |
| 8 |  |
Head slightly northeast of the BOOK-On! store and enter the Interplanar Jump. The Nameless Wispae is in a hidden alcove just past the exit. |
| 9 |  |
Follow the alleyway north of the Yum Yum Alley Space Anchor. The Nameless Wisp is on the glass window next to some chairs and a table. |
| 10 |  |
Follow the alleyway north of the Yum Yum Alley Space Anchor and enter the Interplanar Jump. The Nameless Wisp is in a hidden alcove just past the green block imagenae. |
| 11 |  |
Follow the alleyway north of the Yum Yum Alley Space Anchor until you reach the very end. The Nameless Wispae is on the side of a wall near a vending machine. |
| 12 |  |
Head slightly southeast from the Yum Yum Alley Space Anchor. The Nameless Wispae is on the door of the RECORDS store. |
| 13 |  |
Follow the bridge southwest of the Yum Yum Alley Space Anchor. The Nameless Wispae is on a railing on the southern part of the bridge. |
| 14 |  |
Follow the alleyway slightly northeast of the "@Gate" Space Anchor and enter the Interplanar Jump. The Nameless Wispae is on a platform next to a group of Pixcoins. |
| 15 |  |
Follow the alleyway southwest of the Nameless Bridge Space Anchor and enter the Interplanar Jump. The Nameless Wispae is near the very end of the stage next to the exit. |
| 16 |  |
Follow the road slightly northwest of the "@Gate" Space Anchor. The Nameless Wispae is on a wall next to an ATM with a cat face on the screen. |
| 17 |  |
Head south from the "@Gate" Space Anchor and enter the Interplanar Jump. The Nameless Wispae is on one of the rotating platforms. |
| 18 |  |
Head north from the Oiiaiooo cat NPC that's spinning around. The Nameless Wispae is on a magazine rack. |
| 19 |  |
Head into the alley northeast of the ∞-Eleven store. The Nameless Wispae is on the hood of a parked car. |
| 20 |  |
Head east from the Oiiaiooo cat NPC that's spinning around and enter the Interplanar Jump. The Nameless Wispae is on a sofa which you can access once you reach once you exit the stage. Note: If you can't access the Interplanar Jump, you may need to progress the Trailblaze story further. |
Graphia Academy
| Graphia Academy Map | |||||||
|---|---|---|---|---|---|---|---|
 F1 Full Image |
 F2 Full Image |
||||||
 F3 Full Image |
|||||||
There are a total of 20 Nameless Wispae to collect in Graphia Academy.
Graphia Academy Nameless Wispae Locations
| No. | Image | How to Find |
|---|---|---|
| 1 |  |
Head a few steps north from the Main Building Foyer Space Anchor. The Nameless Wispae is on some boxes next to a locker. |
| 2 |  |
Follow the hallway northwest of the Main Building Foyer Space Anchor and enter the black and white classroom. You need to enter the nearby Interplanar Jump and complete the puzzle at the end to make the Nameless Wispae appear on the chalkboard. |
| 3 |  |
Head to the courtyard west of the Main Building Corridor Space Anchor and enter the Interplanar Jump on the south side of the basketball stand. The Nameless Wisp is in a spot accessible through a hidden ladder. Note: This Interplanar Jump is accessed during the story. If you completed the the stage before getting the Wisp, you'll need to defeat SparxiConOfficial and complete the current Trailblaze Mission. |
| 4 |  |
After beating SparxiConOfficial and completing the current Trailblaze Mission, head back to the basketball hoop and activate the switch to raise it so you can enter the northern Interplanar Jump. The Nameless Wisp is near the end of the stage above a platform with spikes and a bomb switch on the bottom. |
| 5 |  |
Head inside the archive room north of the Main Building Corridor Space Anchor and enter the Interplanar Jump. The Nameless Wispae is on the last stage on a ledge to the left the portal you just came in. |
| 6 |  |
Fast travel to the Cavern of Corrosion: Path of Possession and head south. The Nameless Wispae is on the middle mirror right next to ghost Angela. |
| 7 |  |
Head west from the Cavern of Corrosion: Path of Possession and enter the first classroom. The Nameless Wispae is on the monitor of a computer. |
| 8 |  |
Head inside the classroom to the left of the School Building Lobby Space Anchor and enter the Interplanar Jump. The Nameless Wispae is in a small alcove on the western side of the stage below the painting with a smiley face. |
| 9 |  |
Head inside the classroom northeast of the courtyard and enter the Interplanar Jump.The Nameless Wispae is on the platform shaped like the number four. |
| 10 |  |
The Nameless Wispae is in the same Interplanar Jump as the 9th one. Instead of jumping to the exit, continue riding the moving block to the top to reach it. |
| 11 |  |
Head inside the Interplanar Jump southeast of the Academy Atrium Space Anchor.The Nameless Wispae is on the right side of the stage accessed by riding the moving platforms to the top. |
| 12 |  |
The Nameless Wispae is in the same Interplanar Jump as the 11th one. Go to the left side of the level and you'll find the Wispae on top of the exit. |
| 13 |  |
Head inside the art classroom just above the space anchor. The Nameless Wispae is located under the chair in the right side of the room. |
| 14 |  |
Head down the hallway southeast of the Student Dining Area Space Anchor and enter the Interplanar Jump. The first Nameless Wispae is above some blocks under the double up arrow signs. |
| 15 |  |
In the same Interplanar Jump as the 14th one, make your way up the top most platform above the double arrow signs and head left to reach the Wispae. |
| 16 |  |
Head inside the library east of the Student Dining Area Space Anchor and enter the Interplanar Jump. The Nameless Wispae is on the first level on the opposite side of the teleporter. |
| 17 |  |
In the same Interplanar Jump as the 16th one, make your way to the second level in the area between the moving platforms. Triple jump up from the opening to reach the Wispae. |
| 18 |  |
Head inside the classroom next to the Calyx (Golden): Bud of Memories and get the Nameless Wispae from the chalkboard. |
| 19 |  |
Head inside the Interplanar Jump on the rooftop. The Nameless Wispae is found on the the rightmost ledge of the second level. Note: While the Interplanar Jump is located in F3, the rooftop is only accessible by fast traveling to the Art Classroom Space Anchor on F1 and climbing up the stairs south of the space anchor. |
| 20 |  |
Inside the same Interplanar Jump as the 19th one, progress until the third level and grab the Nameless Wispae above the exit pipe. |
Dovebrook District
| Dovebrook District Map | |||||||
|---|---|---|---|---|---|---|---|
 F1 Full Image |
 F2 Center Full Image |
||||||
 F3 Full Image |
 F2 North Full Image |
||||||
There are a total of 10 Nameless Wispae to collect in Dovebrook District.
Dovebrook District Nameless Wispae Locations
| No. | Image | How to Find |
|---|---|---|
| 1 |  |
Enter the Interplanar Jump on the back of the gold cat. The Nameless Wispae is above the teleporter that leads to the second level. |
| 2 |  |
The Nameless Wispae is on the graffiti in an alleyway behind the Furbobo Weekly Editorial Headquarters building. |
| 3 |  |
Head inside the Interplanar Jump next to the Furbobo Weekly Editorial Headquarters building. The Nameless Wispae is found in the hidden area at the top of the stage's starting area, which you can access by going through the green block sitting on top of the entrance pipe. |
| 4 |  |
This Nameless Wispae is on the freezer in Ashveil's office on the second floor of the Furbobo Weekly Editorial Headquarters. |
| 5 |  |
Head inside the Interplanar Jump next to the Calyx (Golden): Bud of Aether. Go through the hidden pathway underneath the exploding red blocks at the end of the hedgehogae puzzle to get the Nameless Wispae. |
| 6 |  |
Head to the Interplanar Jump east of the Dovebrook Riverside Path Space Anchor.The Nameless Wispae is in the hidden area in the first level underneath the entrance pipe. |
| 7 |  |
Head to the Interplanar Jump north of the Dovebrook Riverside Path Space Anchor.The Nameless Wispae is in a hidden area next to the teleporter leading back to the first level. |
| 8 |  |
Fast travel to theSynwish Sundicate Boss's Office Space Anchor and enter the Interplanar Jump. The Nameless Wispae is on one of the aesthetic window modules at the top of the stage. Use the nearby control pnale to move the Wispae down so you can reach it. |
| 9 |  |
Head to the alleyway northwest of the Synwish Tower Space Anchor. The Nameless Wispae is on an orange vending machine. |
| 10 |  |
Enter the Interplanar Jump northeast of the Stagnant Shadow: Shape of Soundburstto reach the rooftop in F2, then enter the Interplanar Jump there. The Nameless Wispae is in a hidden area underneath the teleporter and exit pipe on the second level. |
World's End Tavern
| World's End Tavern Map | |||||||
|---|---|---|---|---|---|---|---|
 F1 Full Image |
 F2 Full Image |
||||||
 F3 Full Image |
|||||||
There are a total of 10 Nameless Wispae to collect in World's End Tavern.
World's End Tavern Nameless Wispae Locations
| No. | Image | How to Find |
|---|---|---|
| 1 |  |
Located in the Interplanar Jump south of the Tavern Lobby Space Anchor. The Nameless Wispae is on a ledge above the first teleporter. |
| 2 |  |
Head up the stairs from the Tavern Lobby Space Anchor. The Nameless Wispae is on a painting in the east room. |
| 3 |  |
Head into the Interplanar Jump in the hidden room south of the Blisstar Space Anchor. The Nameless Wispae is right next to the Pixcoins shaped like a note. |
| 4 |  |
The Nameless Wispae is located on the Golden Toilet in the middle of the Confessional area. |
| 5 |  |
Found in the southernmost Interplanar Jump south of the Golden Confessional Space Anchor. The Nameless Wispae in the area before the drop leading to the exit. |
| 6 |  |
Found in the Interplanar Jump north of the Fatal Joke Space Anchor. The Nameless Wispae is on the second stage next to the teleporter leading to the next stage. |
| 7 |  |
Head into the theater room northeast of the Fatal Joke Space Anchor. The Nameless Wispae is on the back of one of the seats. |
| 8 |  |
Head into the Interplanar Jump in the Grand Treasury. The Nameless Wispae is in the third level in an area accessible by shooting the lever at the upper right corner with an arrow. |
| 9 |  |
Head up to F3 in the Grand Treasury accessible from the previous Interplanar Jump and enter the topmost Interplanar Jump. The Nameless Wispae is on a painting with a blinking cube. |
| 10 |  |
This Nameless Wispae is in the same Interplanar Jump as the 9th one, located at the third stage at the top area surrounded by Pixcoins. You can access this area by going to the top teleporter leading to the stage with balloons. |
Pearluxe Tower
| Pearluxe Tower Map |
|---|
 Full Image |
There are a total of 10 Nameless Wispae to collect in Pearluxe Tower.
Pearluxe Tower Nameless Wispae Locations
| No. | Image | How to Find |
|---|---|---|
| 1 |  |
Teleport to the Model Showcase Zone Space Anchor by the entrance and head to the left area. You can find the Nameless Wispae on the yellow plastic frame. |
| 2 |  |
The Nameless Wispae here is located on the Sam statue. |
| 3 | Head into the Interplanar Jump in the lower right area of the Model Showcase Zone. When you're at the second lever, press the buttons until you have two green symbols. Pull the lever afterwards to make the Nameless Wispae emerge. | |
| 4 |  |
Teleport to the Battle Lobby Space Anchor and go to the billboard with the mecha Pom-Pom to find the Nameless Wispae. |
| 5 | For Nameless Wispaes 5 to 8, teleport to the Mechatron Design Studio Space Anchor and talk to Aste, the Mechatron Assembly Instructor, to enter the stage. There is a hidden wall you can go into to collect the Nameless Wispae after talking to the Orange Imagenae that says to "Tap and hold "Down" and "Jump"... |
|
| 6 | After going up using the conveyor belt, there is a hidden passage on top. Shoot an arrow through to push the lever and gain access to the Nameless Wispae riding along with the Pixcoins. | |
| 7 | After pressing the button to acquire the mecha arm, enter the hidden passage on the upper right and get the Nameless Wispae. | |
| 8 |  |
As a mecha, head to the upper left corner of the map to find the Nameless Wispae on the movie set light. |
| 9 |  |
Enter the Interplanar Jump and go to the end of the level to get the Nameless Wispae. |
| 10 | In the Interplanar Jump area, you will find a Nameless Wispae trapped inside a box. Use the buttons to switch the Imagenaes to the color Blue to access the Nameless Wispae. |
Lookout Cloud Station
| Lookout Cloud Station Map | |||
|---|---|---|---|
 Full Image |
|||
There are a total of 20 Nameless Wispae to collect in Lookout Cloud Station.
Lookout Cloud Station Nameless Wispae Locations
| No. | Image | How to Find |
|---|---|---|
| 1 |  |
Found on a Pom-Pom photo booth standee just north of Lookout Cloud Station Platform. |
| 2 |  |
Enter the Interplanar Jump Difficulty III puzzle in the same area as Nameless Wispae 1. Before entering the door to the second level, shoot the lever to the right so you can walk to the Nameless Wispae. |
| 3 |  |
Enter the Interplanar Jump Difficulty III puzzle to the east of Qlipoth Boulevard. In the third level, defeat Cocolia by jumping and hitting the yellow button. Once you complete the challenge, you can jump on the upper platform where the Nameless Wispae is. |
| 4 |  |
Enter the Interplanar Jump Difficulty III puzzle to the west of Qlipoth Boulevard. Use the spring in front of the missile launchers and then jump towards the Nameless Wispae that's in the middle of the level. |
| 5 |  |
Found on the railing near Pom-Pom's Mini Express, north of Qlipoth Boulevard. |
| 6 |  |
Found on one of the screens near the doors in Reignbow Alley. |
| 7 |  |
Found on a painting behind the seats on the lower floor of the Xianzhou Luofu exhibition area. |
| 8 |  |
Enter the Interplanar Jump Difficulty III in the middle of the Xianzhou Luofu exhibition area. Go to the sixth level and activate the switch under the mobile platform so it starts moving again. Ride one of the platforms over to the seventh level, where the Nameless Wispae is. |
| 9 |  |
Enter the Interplanar Jump Difficulty II on the second floor of the Xianzhou Luofu exhibition area. Use the platform with the door to the next level to jump to the upper left platform, where the Nameless Wispae is. |
| 10 |  |
Found on a stand near an Alloy Pommy in the area south of Jubilee Avenue. |
| 11 |  |
Found on a food stall in the area south east of Jubilee Avenue. |
| 12 |  |
Enter the Interplanar Jump Difficulty III puzzle south of Jubilee Avenue. Make your way to the second level and switch the aesthetic windows around until the destructible blocks are gone. Make your way to the top, where the Nameless Wispae is. |
| 13 |  |
Enter the Interplanar Jump Difficulty V puzzle near the Harmony Station Space Anchor. The Nameless Wispae can be found near Clockie in the second level. |
| 14 |  |
This Nameless Wispae is on a SoulGlad machine in Harmony Station. |
| 15 |  |
Found on a SoulGlad bottle neck in the east side of Harmony Station. |
| 16 |  |
Found on top of the doors to the west of the Astral Plaza Space Anchor. |
| 17 |  |
Found on the floor in the Astral Plaza. |
| 18 |  |
Found on a Lygus photo booth standee in Foxfolio Lookout Cloud Branch. |
| 19 |  |
Found on a Fluffy Across the Blue poster in the bookstore in Foxfolio Lookout Cloud Branch. |
| 20 |  |
Enter the Interplanar Jump Difficulty I puzzle in Foxfolio Lookout Cloud Branch. Make your way to the first level by riding the moving platform to its peak and then triple jumping to the pipe on the upper right. The Nameless Wispae can be found on the third row of missile launchers on the second level. |
Seafeld City
| Seafeld City Map | |||||||
|---|---|---|---|---|---|---|---|
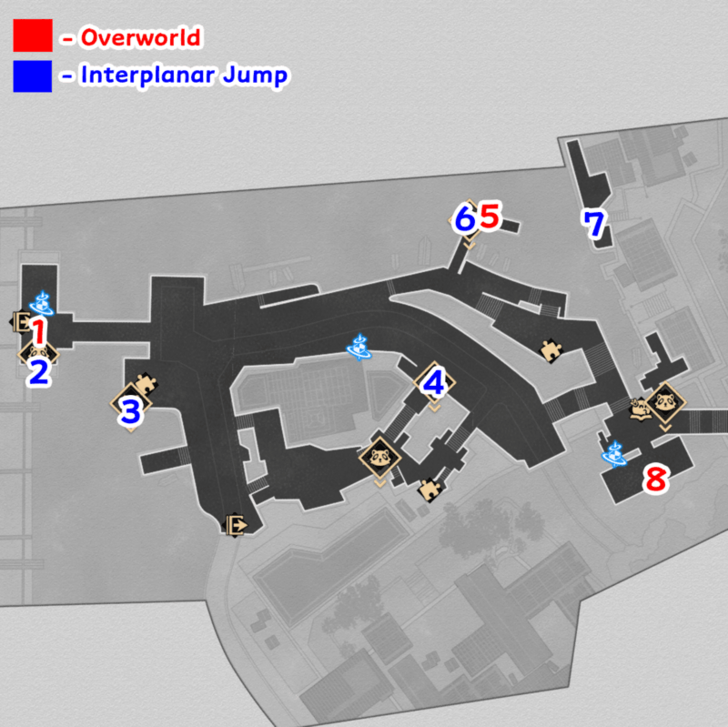 West Full Image |
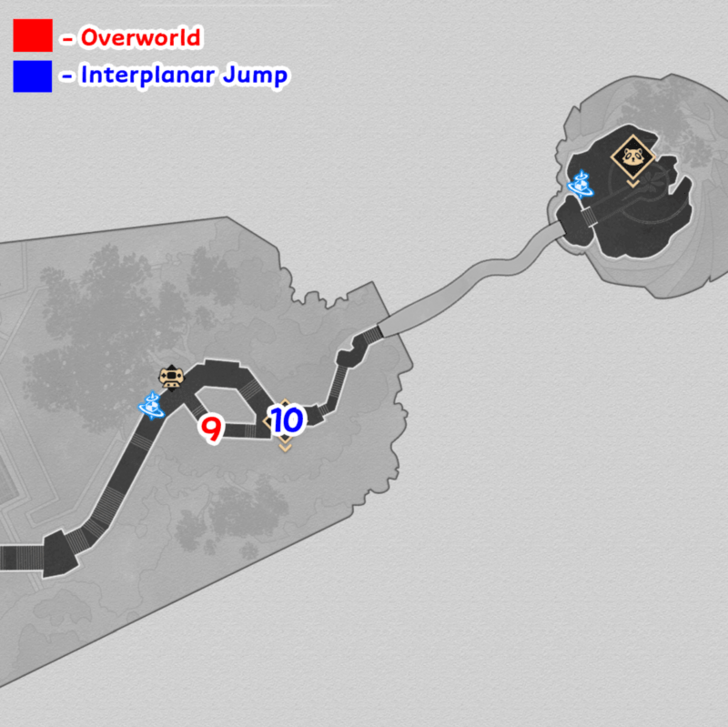 East Full Image |
||||||
There are a total of 10 Nameless Wispae to collect in Seafeld City.
Seafeld City Nameless Wispae Locations
| No. | Image | How to Find |
|---|---|---|
| 1 | 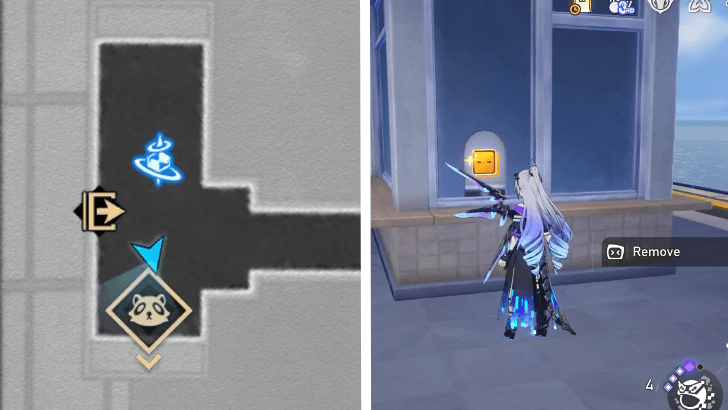 |
Teleport to the Seafeld Station Space Anchor and go to the booth nearby to find the Wispae hanging on the window. |
| 2 | You can find the Wispae in the Interplanar Jump near the first Nameless Wispae. After the turn and once you see a big whale, drop down to find the Nameless Wispae. | |
| 3 | During the conveyor belt area in the Interplanar Jump puzzle, jump and press the Summon button while facing the left direction to access the Nameless Wispae. | |
| 4 | After entering the first portal, go to the very top to find the Nameless Wispae. Use the two Trailblazemon and have them push the buttons at the same time to enter the locked area. | |
| 5 | 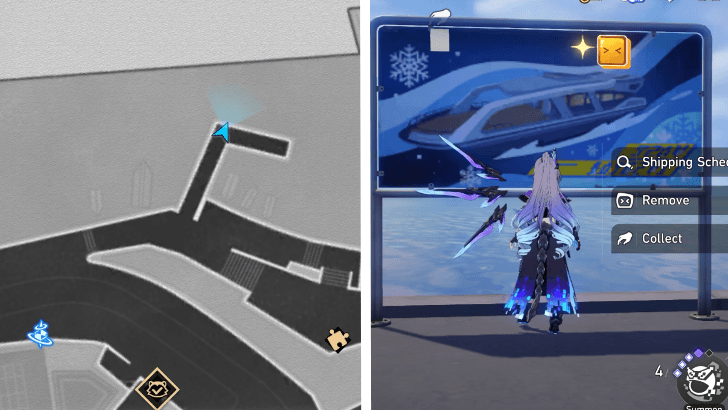 |
Go to the pier to find the Wispae on the billboard near the Interplanar Jump puzzle. |
| 6 | 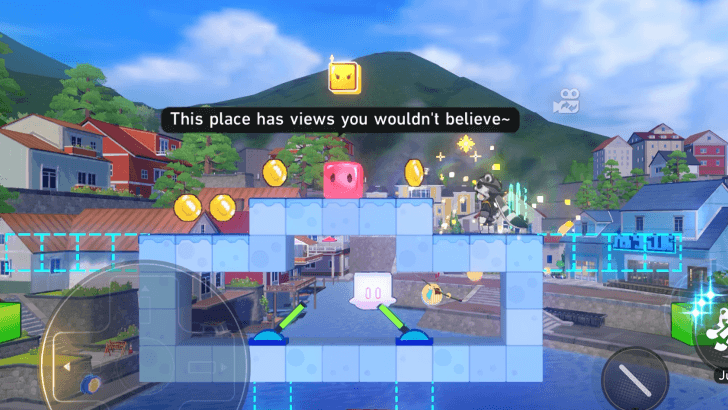 |
After entering the Interplanar Jump, climb up to the very top to find the Nameless Wispae. Go to the end of the Interplanar Jump Puzzle to access the 7th Wispae. |
| 7 | 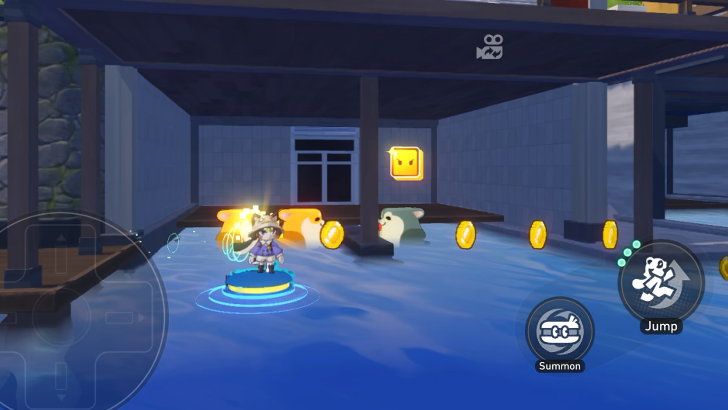 |
Enter the Interplanar Jump on the secluded island, which can be accessed after completing the Interplanar Jump with Wispae No. 6. Keep going right, and you will find the Nameless Wispae floating on water. |
| 8 | 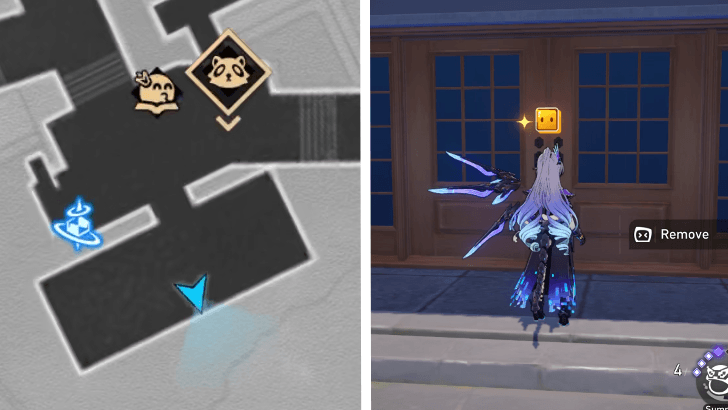 |
Teleport to the Mayor's Residence Space Anchor and go to the Mayor's Residence. You will find the Wispae on the front door. |
| 9 | 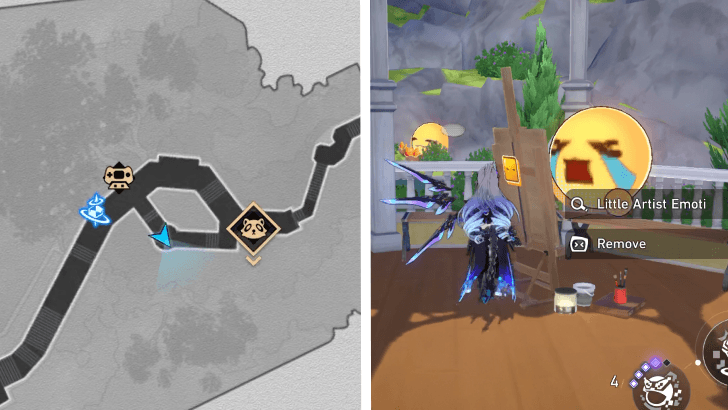 |
Teleport to the Seafeld Park Space Anchor and approach the Little Artist Emoji to find the Wispae behind the canvas. |
| 10 | After using the conveyor belt in the Interplanar Jump puzzle, jump towards the right to find the Nameless Wispae. Be careful of the spikes. |
Seafeld TV Tower
| Seafeld TV Tower Map | |
|---|---|
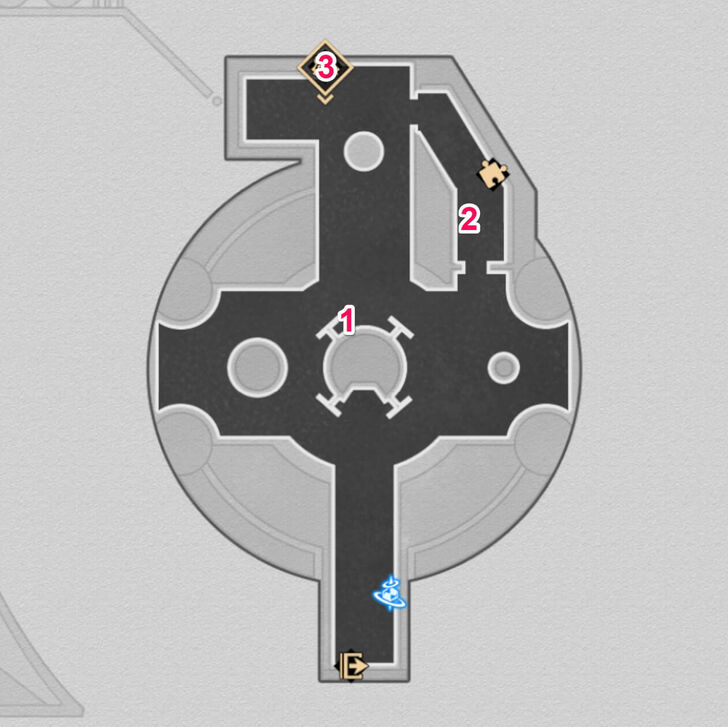 F1 Full Image |
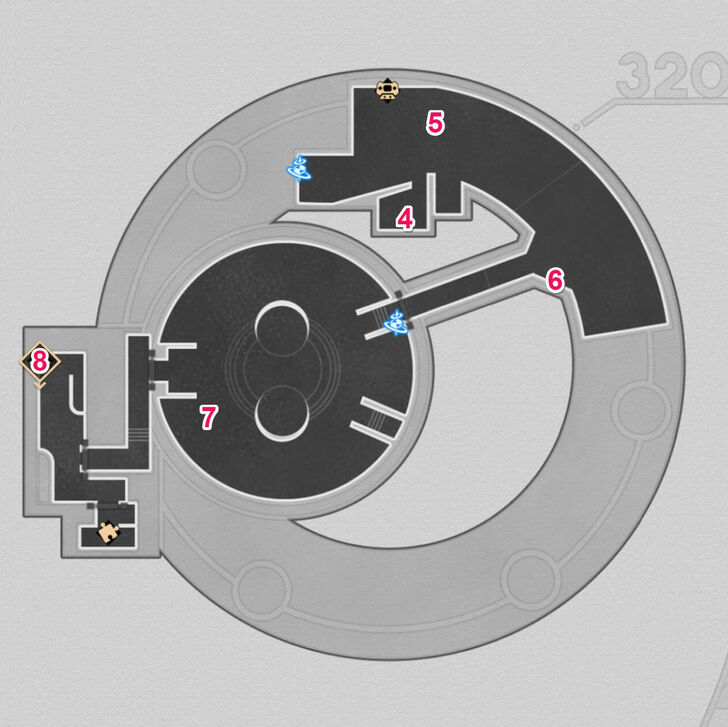 F2 Full Image |
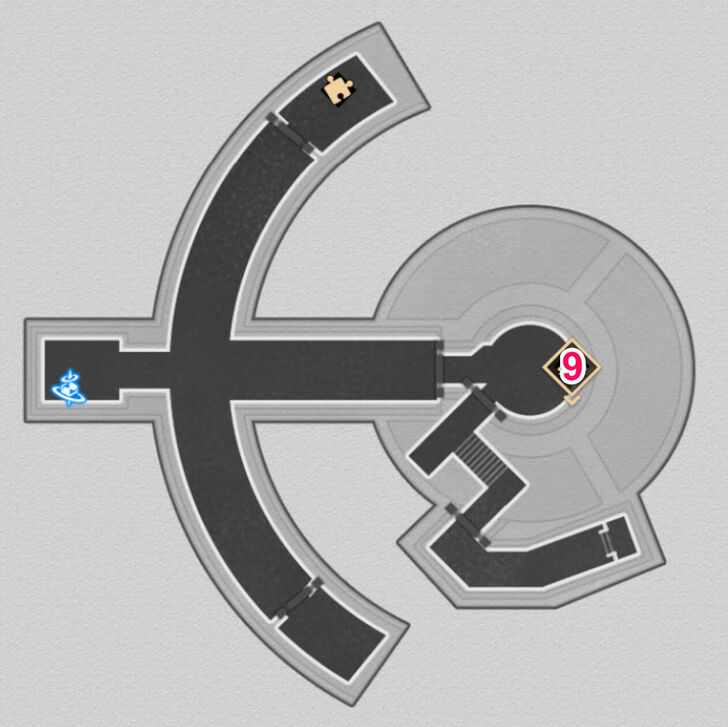 F3 Full Image |
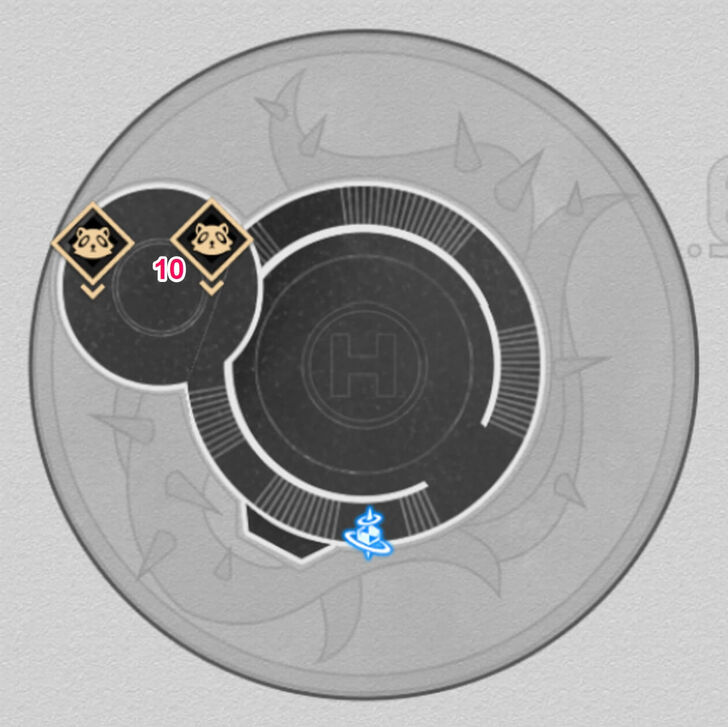 F4 Full Image |
There are a total of 10 Nameless Wispae to collect in Seafeld TV Tower.
Seafeld TV Tower Nameless Wispae Locations
| No. | Image | How to Find |
|---|---|---|
| 1 | 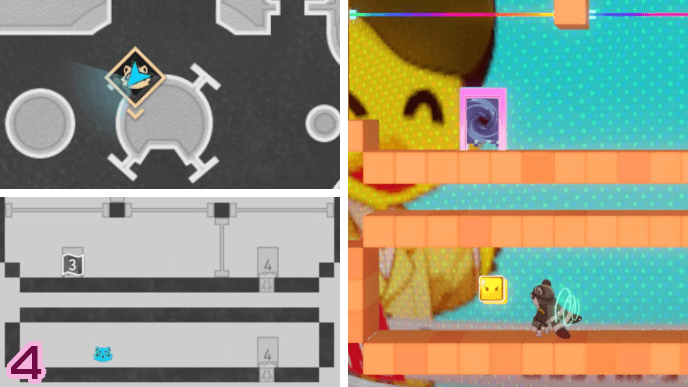 |
Enter the Interplanar Jump Difficulty V puzzle in the Reception Hall. Make your way to Level 4 and go through the door with the yellow triangle to be transported to the area with the Nameless Wispae. |
| 2 | 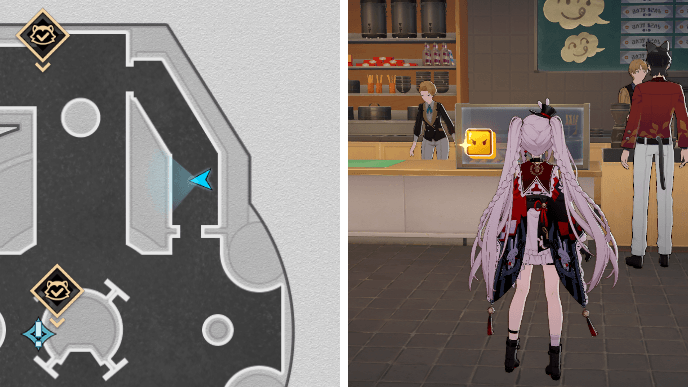 |
Found at the cafeteria on the northeast side of F1. |
| 3 | 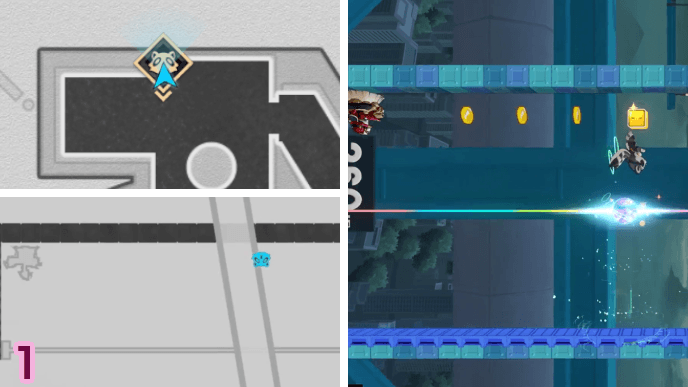 |
Enter the Interplanar Jump Difficulty I puzzle north of the Reception Hall. Proceed through Level 1 until you reach the area where Alloy Pommy is shooting missiles. The Nameless Wispae can be found along the line of Pixcoins. |
| 4 | 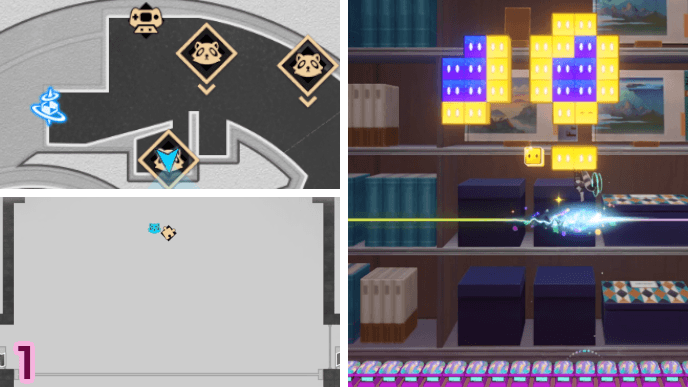 |
Enter the Interplanar Jump Difficulty IV puzzle in the merch store near the Studio Entrance Space Anchor. Play the Slice of Arcadian Life minigame in Level 1 and clear all the orange blocks to spawn the Nameless Wispae. |
| 5 | 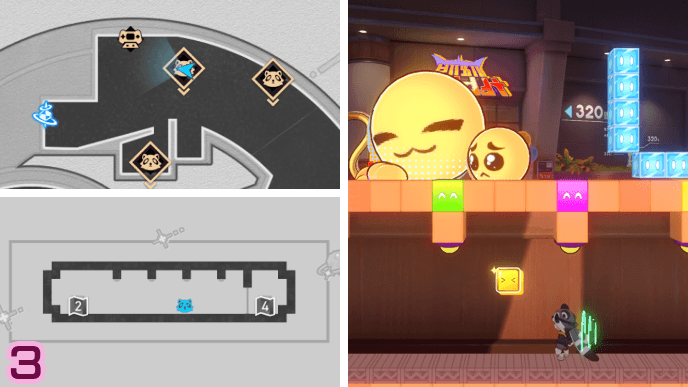 |
Enter the Interplanar Jump Difficulty III on the bar in F2. Correctly serve all the drinks in Level 3 and then press the yellow button 3 times to spawn the Nameless Wispae. |
| 6 | 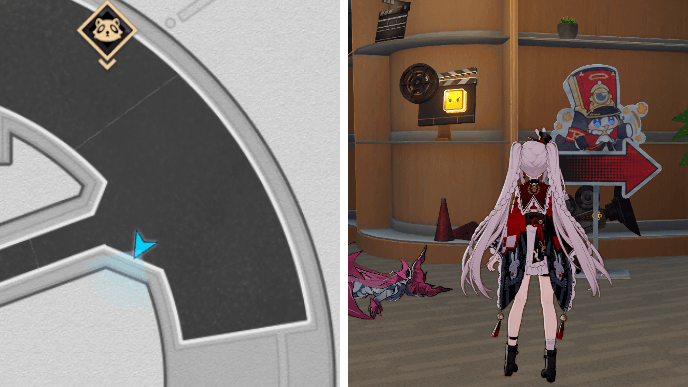 |
Found at the bookshelves before entering the Primary Studio Stage. |
| 7 | 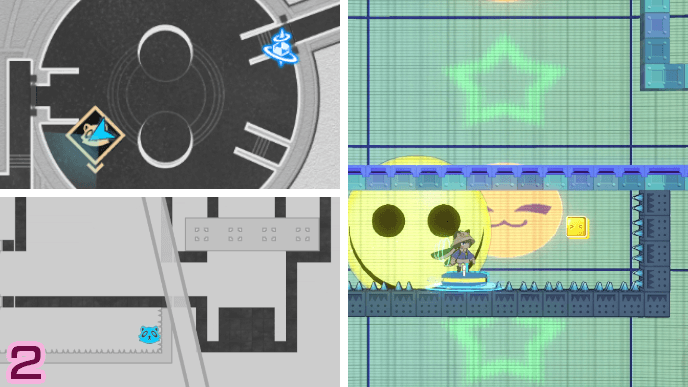 |
Talk to Chongwan in the Primary Studio Stage in F2 to enter the Interplanar Jump Difficulty V puzzle. Make your way to Level 2. Instead of turning left towards the button and the elevator, summon a HelpBot to cross to the right side, where the Nameless Wispae is. |
| 8 | 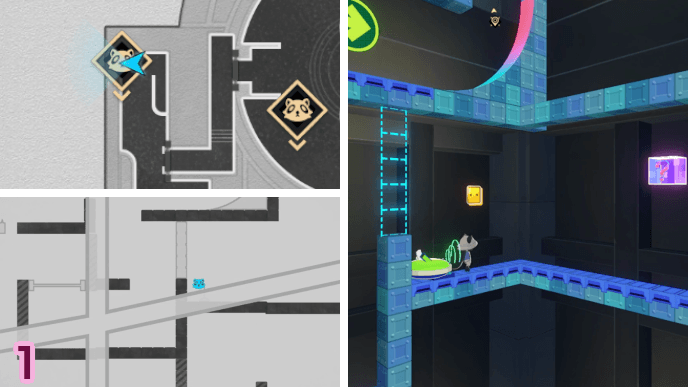 |
Enter the Interplanar Jump Difficulty III in the elevator shaft in F2. Found in Level 1 near a lever after crossing a row of spikes with a HelpBot. |
| 9 | 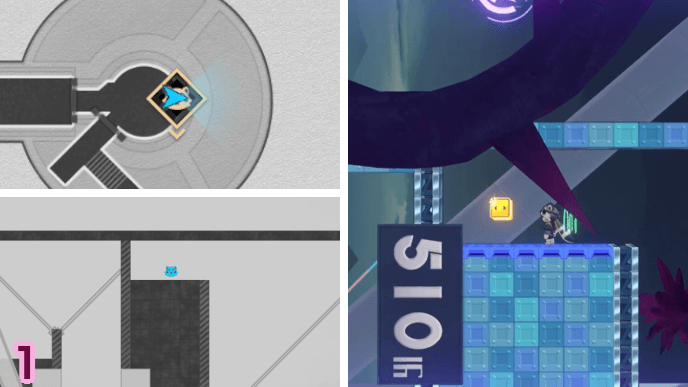 |
Enter the Interplanar Jump (Green Decrypted Edition) or Difficulty X in F3. Proceed to the area with a long diagonal Gravity Line in Level 1. Use the Gravity Line and jump until you reach the top left area to get the Nameless Wispae. |
| 10 | 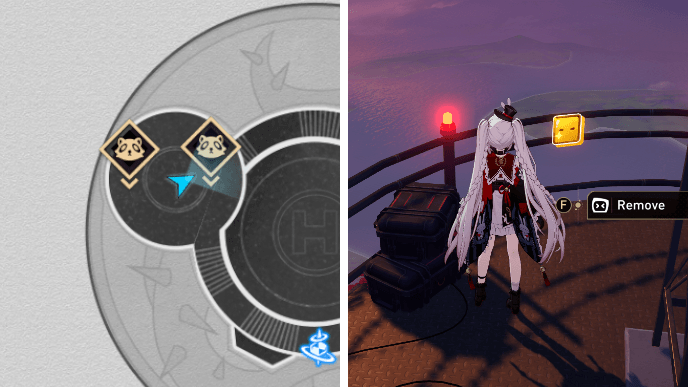 |
Enter and clear the Interplanar Jump Difficulty V puzzle in F4 to arrive at the top of the TV Tower. This Nameless Wispae can be found on the railings. |
Inkford Hermitage
| Inkford Hermitage Southwest Map |
|---|
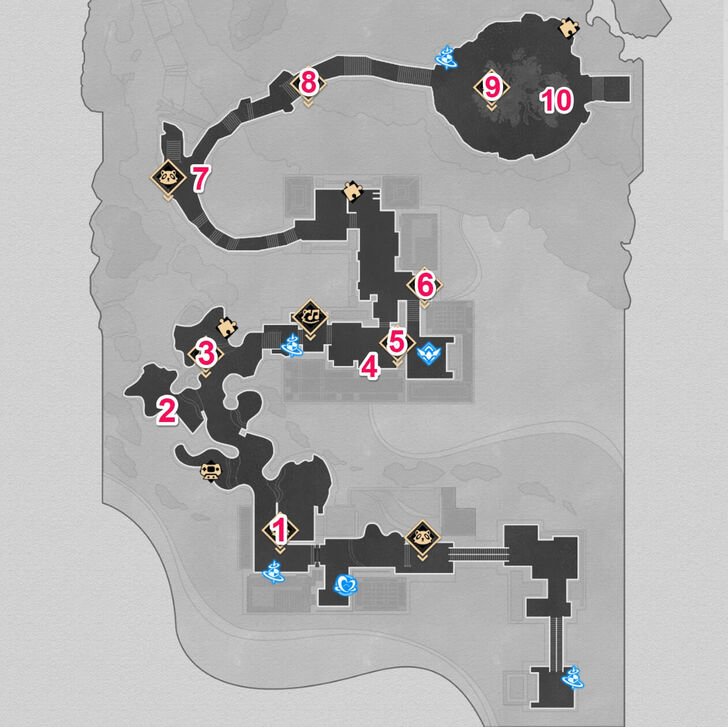 Full Image |
There are a total of 10 Nameless Wispae to collect in Inkford Hermitage.
Inkford Hermitage Nameless Wispae Locations
| No. | Image | How to Find |
|---|---|---|
| 1 | 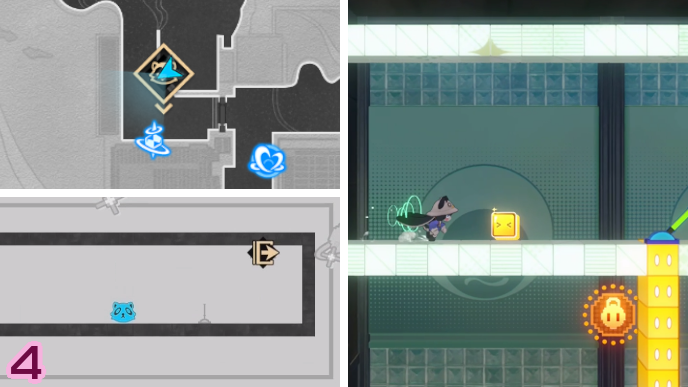 |
Enter the Interplanar Jump Difficulty V puzzle in the hot spring with the giant emoti. This Nameless Wispae can be found near the puzzle's exit. |
| 2 | 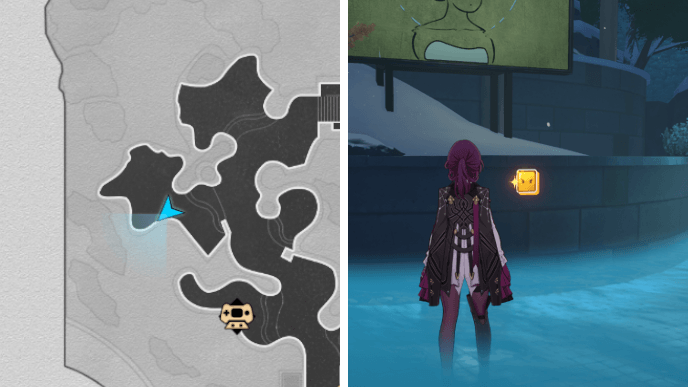 |
Found on a wall near the hot springs. |
| 3 | 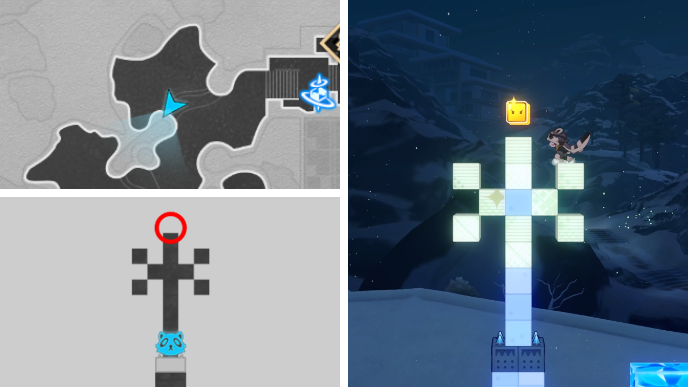 |
Enter the Interplanar Jump Difficulty III puzzle near the mechatron. This Nameless Wispae can be found above the exit. |
| 4 | 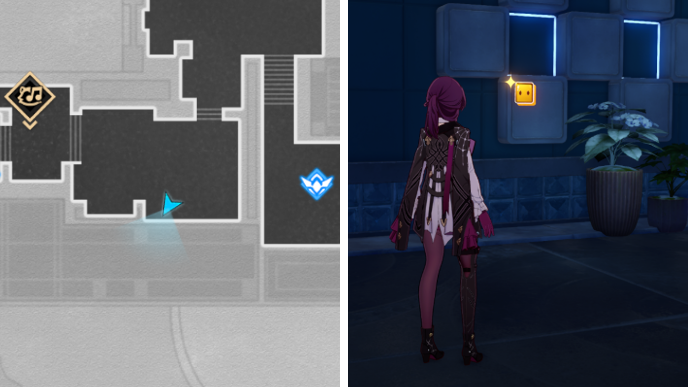 |
Found on a white tile on the wall near a potted plant. |
| 5 | 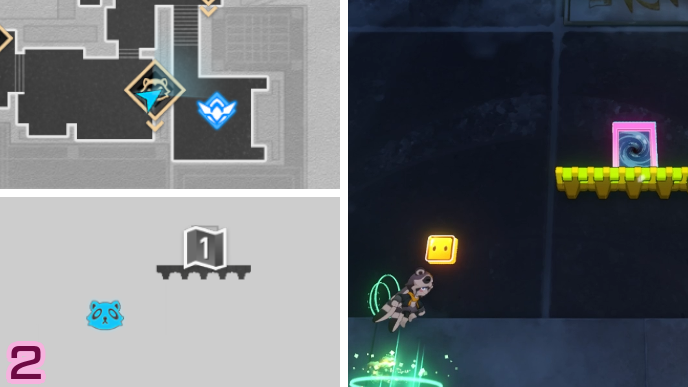 |
Kick the pile of snow and enter the Interplanar Jump Difficulty II puzzle hidden under it. Proceed to F2 where you can find the Nameless Wispae. |
| 6 | 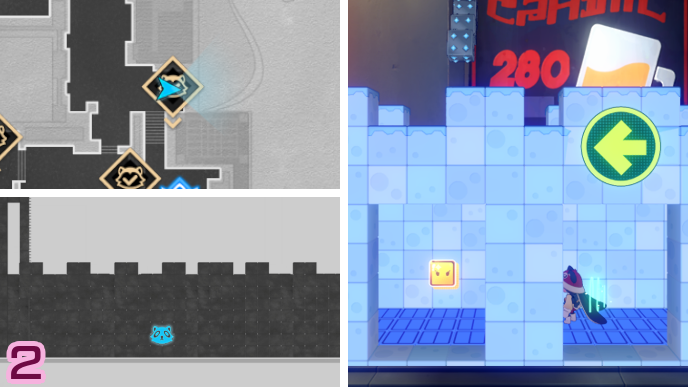 |
Enter the Interplanar Jump Difficulty III puzzle near the vending machines. Proceed to F2 and enter the hidden lower platform by breaking the ice on the platform right before the swinging anchors. This Nameless Wispae can be found in the hidden corridor. |
| 7 | 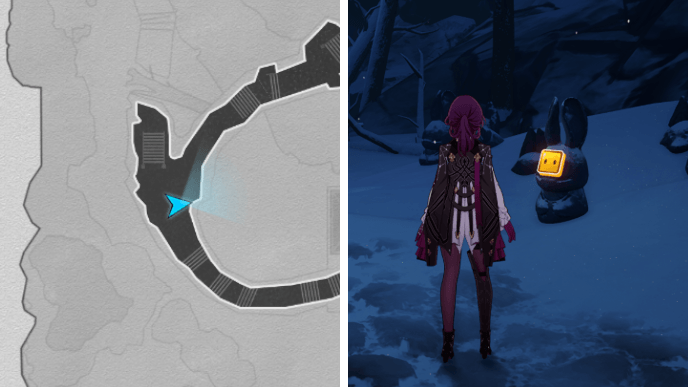 |
Found on a statue near the Interplanar Jump Difficulty IV puzzle. |
| 8 | 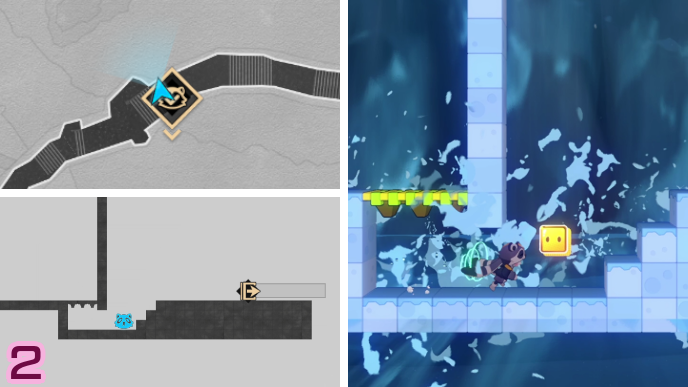 |
Enter the Interplanar Jump Difficulty IV puzzle near the waterfall. Proceed to F2 and catch the Shapeshifting Furbo to find the Nameless Wispae near the exit. |
| 9 | 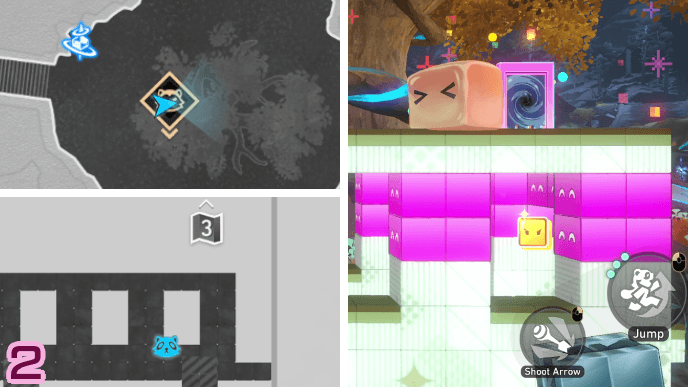 |
Enter the Interplanar Jump Difficulty I puzzle in front of the tree. This Nameless Wispae can be found in the train car under the door to the 3rd level. |
| 10 | 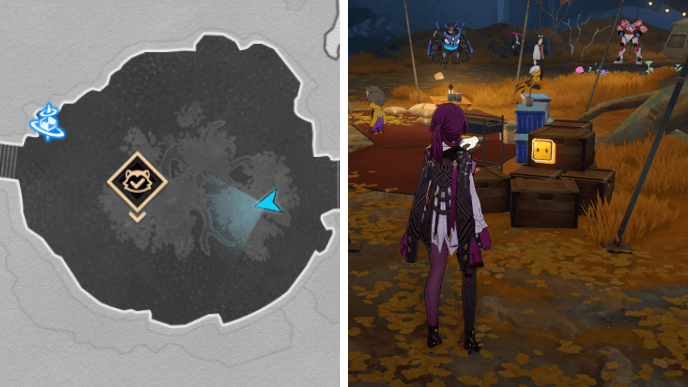 |
Found on a stack of crates behind the tree. |
Desolate Maw's Demonhold
| Desolate Maw's Demonhold Map | |
|---|---|
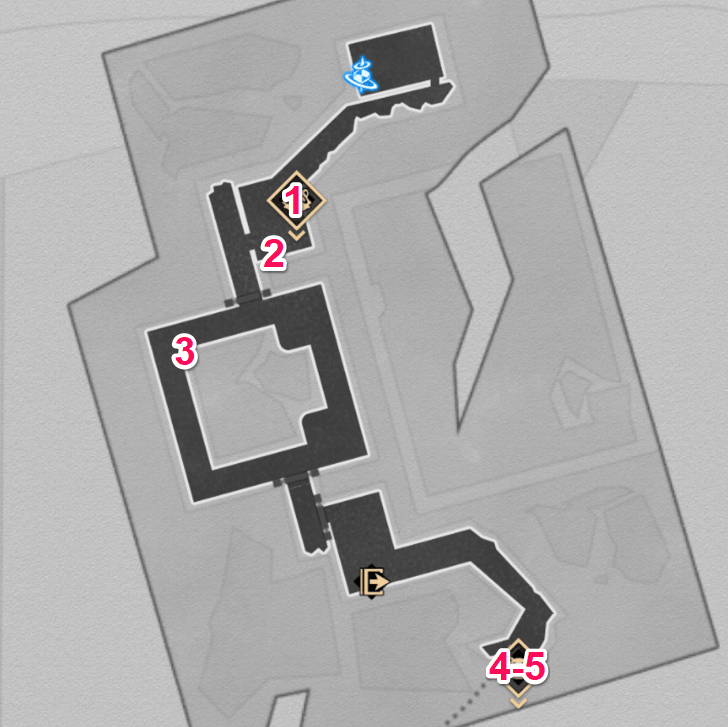 North Full Image |
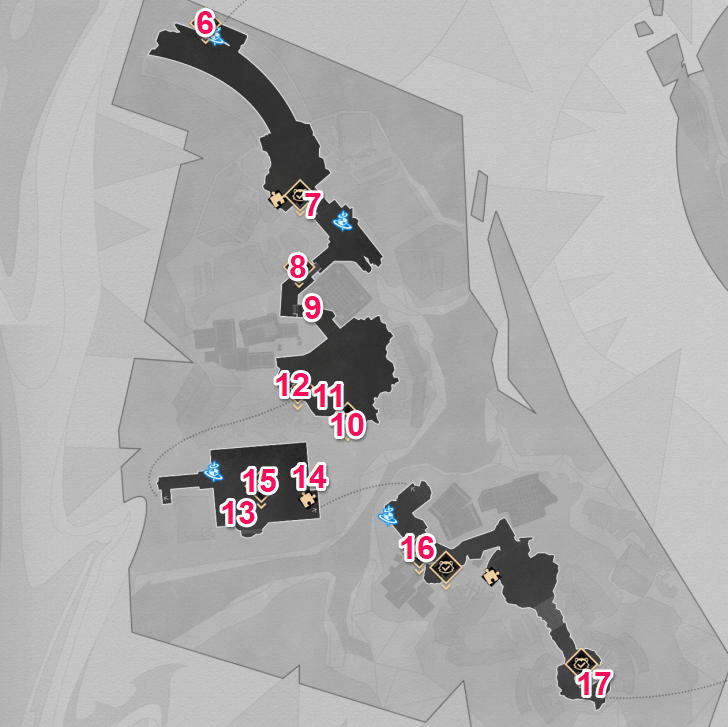 West Full Image |
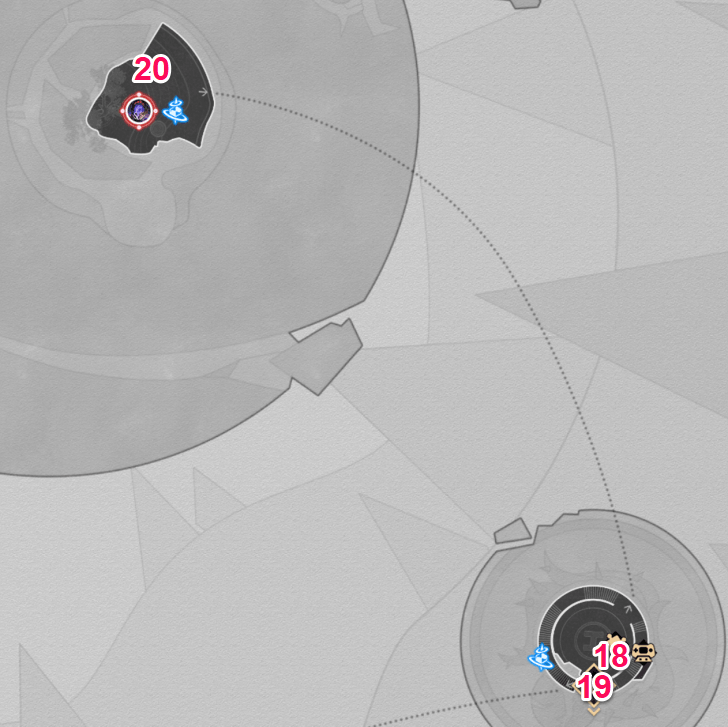 East Full Image |
|
There are a total of 20 Nameless Wispae to collect in Desolate Maw's Demonhold.
Desolate Maw's Demonhold Nameless Wispae Locations
| No. | Image | How to Find |
|---|---|---|
| 1 | 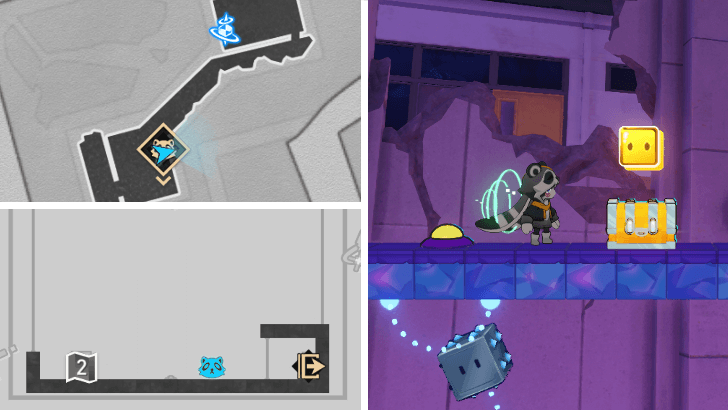 |
In the Interplanar Jump Difficulty II stage at the Crumbling Academy. On Level 3, press the button when the claw's angle aligns with the caged wispae below. Once it's brought back up, you can collect it. |
| 2 | 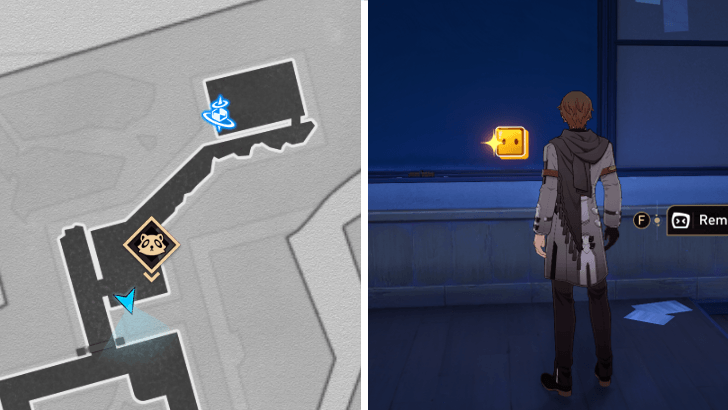 |
Found on the corner of the chalkboard in the classroom southwest of the Crumbling Academy Space Anchor. |
| 3 | 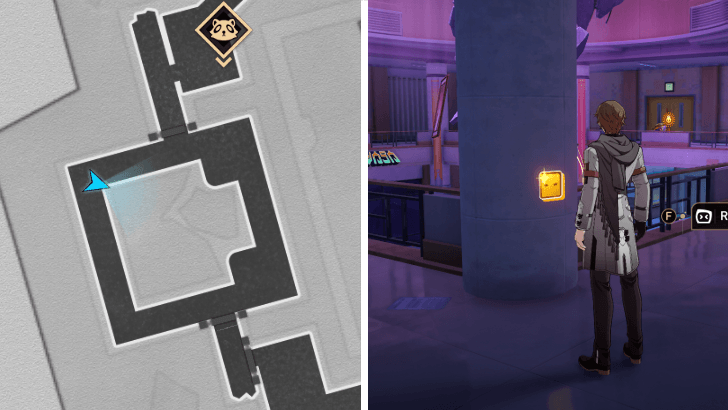 |
Head into the square walkway at the Crumbling Academy. The wispae is stuck onto the column at the northwestern corner of the area. |
| 4 | 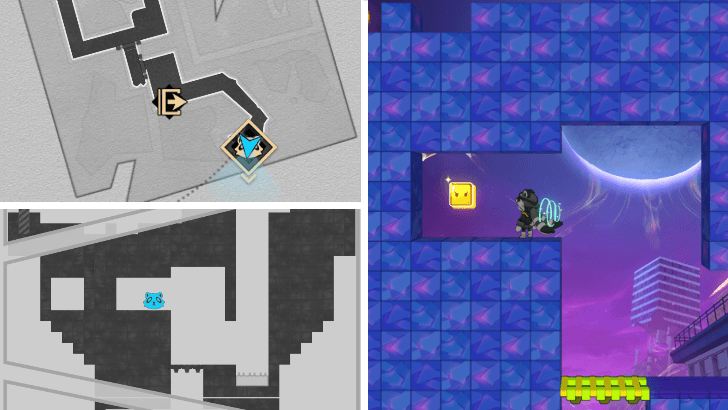 |
In the Interplanar Jump Difficulty III stage at the Crumbling Academy. It's tucked into a small space in the middle layer of the stage. |
| 5 | 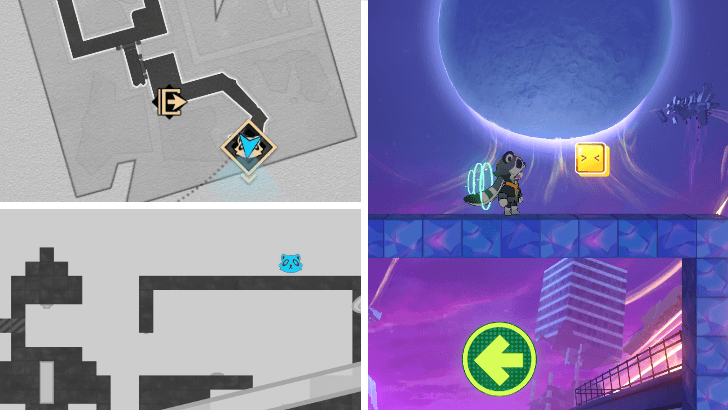 |
In the Interplanar Jump Difficulty III stage at the Crumbling Academy. Jump onto the uppermost platform on the right side of the rocket to get the wispae. |
| 6 | 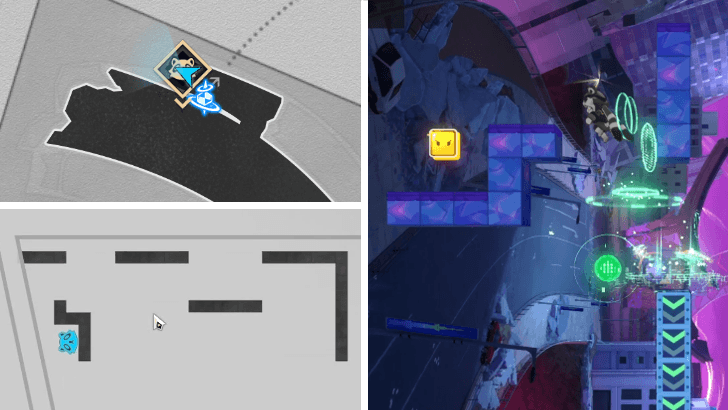 |
In the Interplanar Jump Difficulty III stage at the Malevolent Metropolis. Pull the lever on the upper right side of the strolling belt to reach the conveyor belts at the top of the stage. They will lead to the S-shaped platform where the wispae will be. |
| 7 | 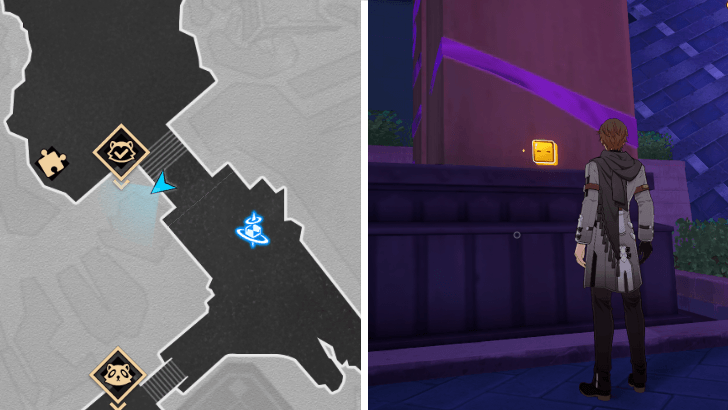 |
Found by the base of the giant archway northwest of the Decaying Streets Space Anchor. |
| 8 | 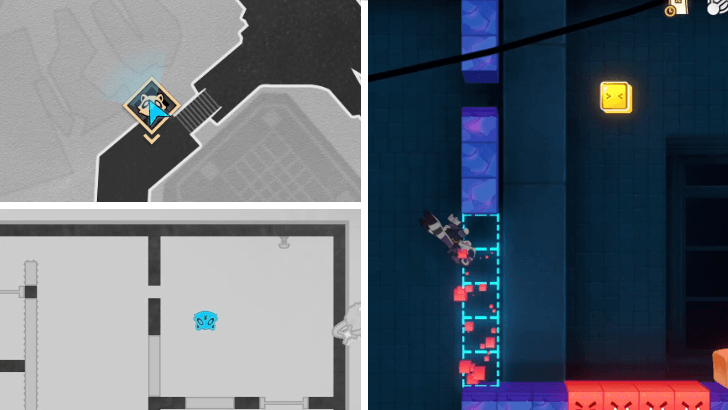 |
In the Interplanar Jump Difficulty V stage at the Decaying Streets. Use the gravity line from Level 2 to get onto the ceiling, then keep going right. You'll reach the upper platforms back on Level 1. After capturing the Furbo Journalist here, you can grab the wispae past the collapsible wall. |
| 9 | 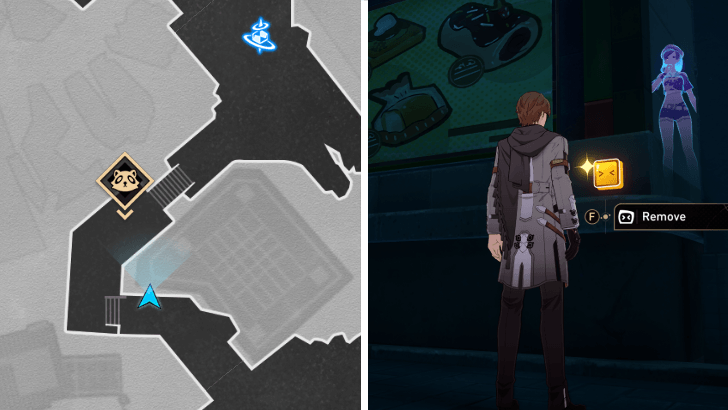 |
Found by a pastry signboard located southeast of the Interplanar Jump Difficulty V stage at the Decaying Streets. |
| 10 | 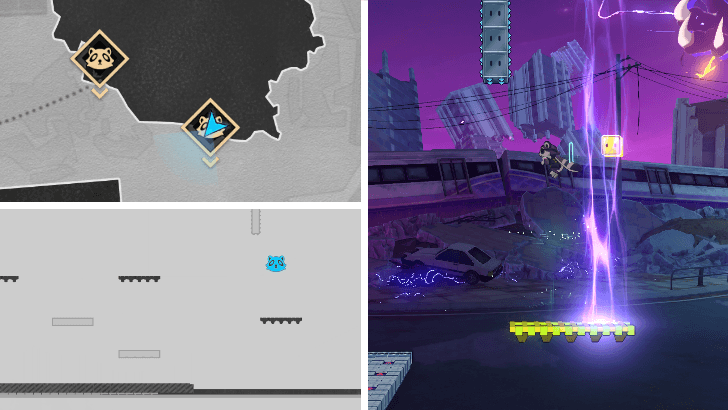 |
In the Interplanar Jump Difficulty I stage at the Decaying Streets. It's floating above the platform where the helicopter and tank stop during the race challenge. |
| 11 | 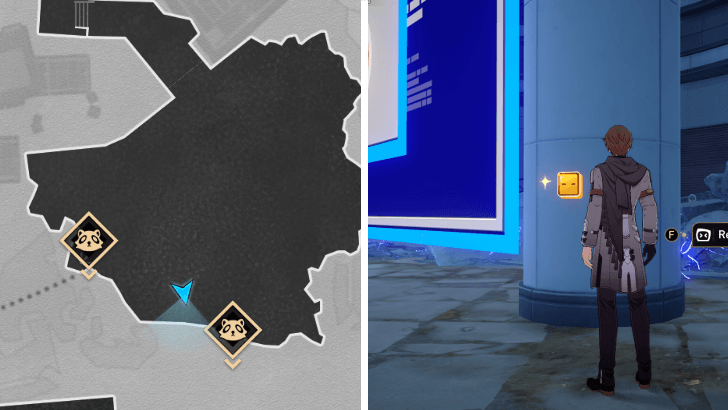 |
Found on a column next to the giant error pop-up window by the Interplanar Jump Difficulty I stage at the Decaying Streets. |
| 12 | 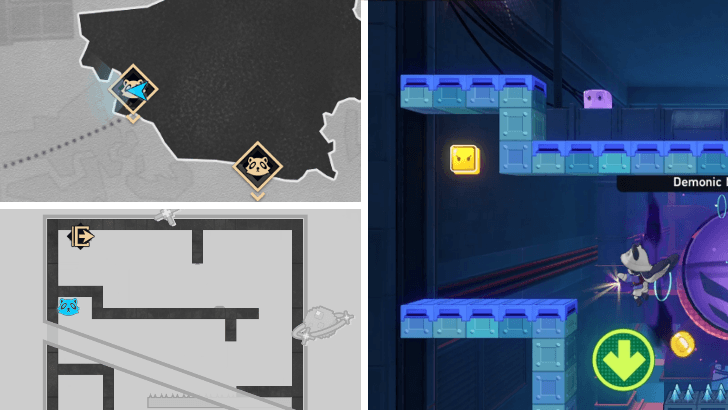 |
In the Interplanar Jump Difficulty III stage at the Decaying Streets. The wispae is floating below the platform directly under the stage's entrance pipe. |
| 13 | 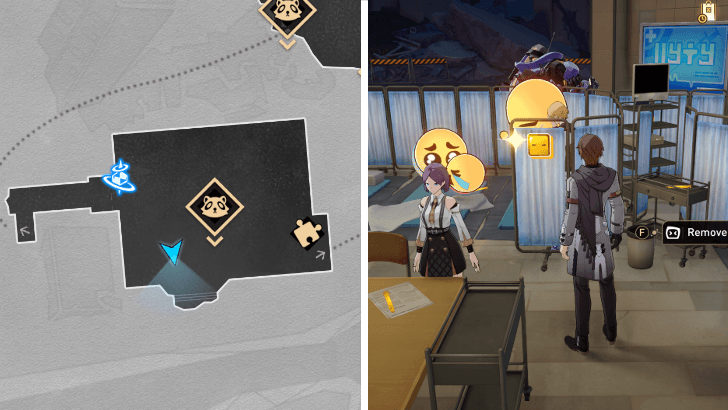 |
Found on a curtain surrounding the first aid station in the Shelter. |
| 14 | 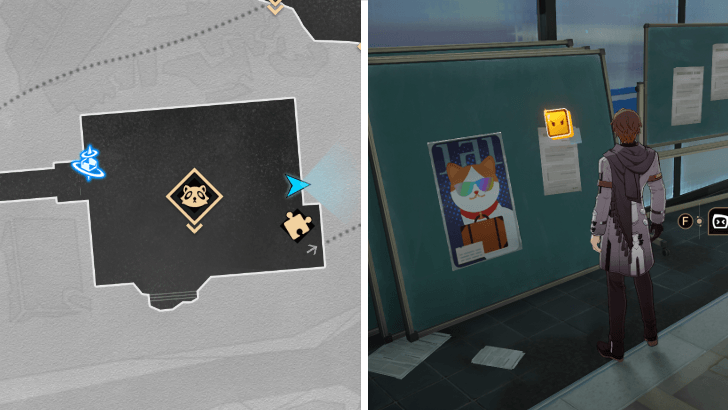 |
Found on a chalkboard with a cat poster at the east side of the Shelter. |
| 15 | 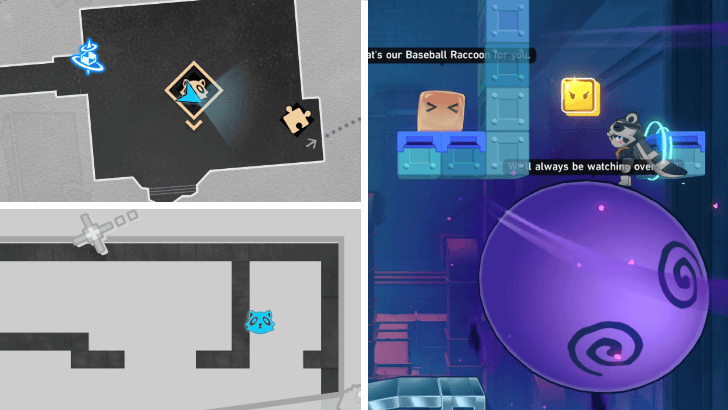 |
In the Interplanar Jump Difficulty III stage at the Shelter. Jump on the trampoline across from the entrance to ride a purple moon up to the top right corner of the stage. |
| 16 | 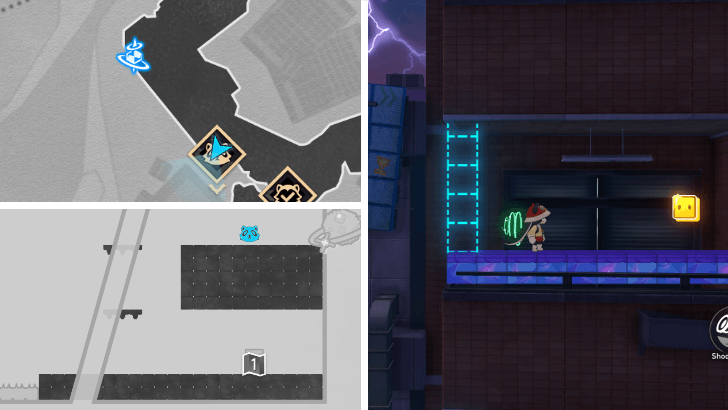 |
In the Interplanar Jump Difficulty II stage nearest to the Howling Ramp Space Anchor. Climb up to the area above the teleporter in Level 2. Shoot arrows at the large cloudae until it reveals the wispae. |
| 17 | 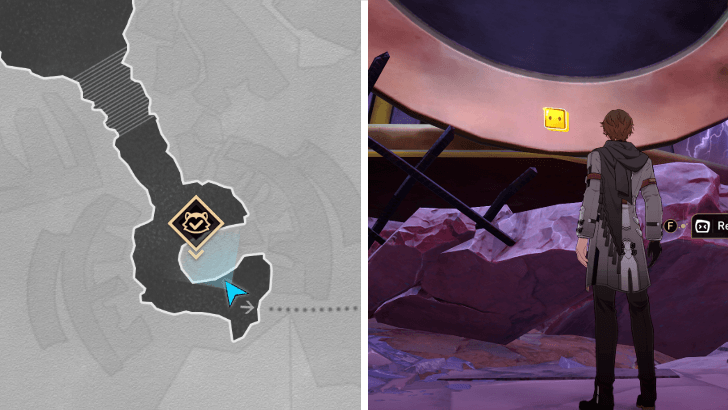 |
Go into the area behind the Interplanar Jump Difficulty X stage at the Howling Ramp. The wispae will be stuck onto the giant wishpower collection device. |
| 18 | 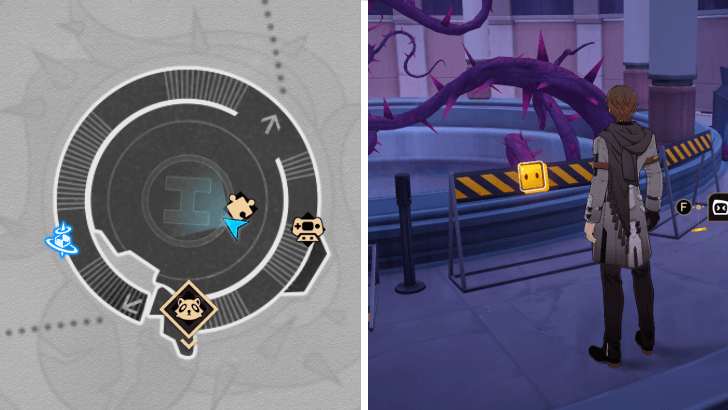 |
From the Mocking Spire Space Anchor, go down the stairs to reach the lower floor. The wispae will be on a striped barrier near a Shiftmation puzzle. |
| 19 | 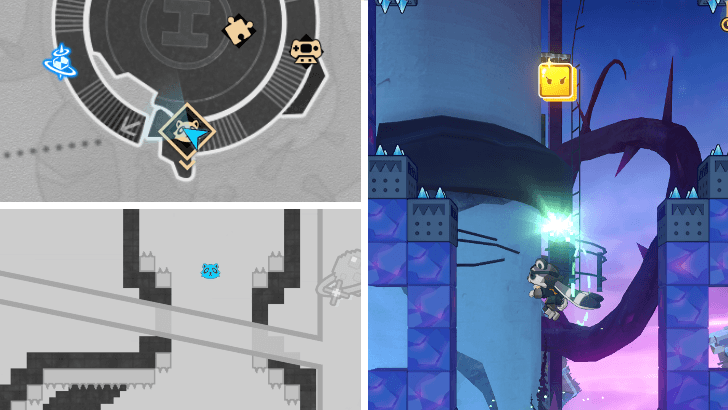 |
In the Interplanar Jump Difficulty IV stage at the Mocking Spire. Keep jumping straight through the energy orbs on Level 2 to reach the wispae floating at the upper area. |
| 20 | 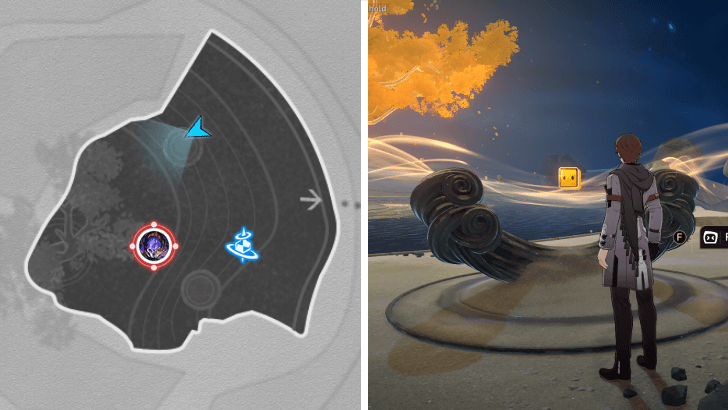 |
Found floating above a curved pedestal a few steps northwest of the Desolate Demonic Moon Space Anchor. |
Fallen Star's Cradle
| Fallen Star's Cradle Map | |
|---|---|
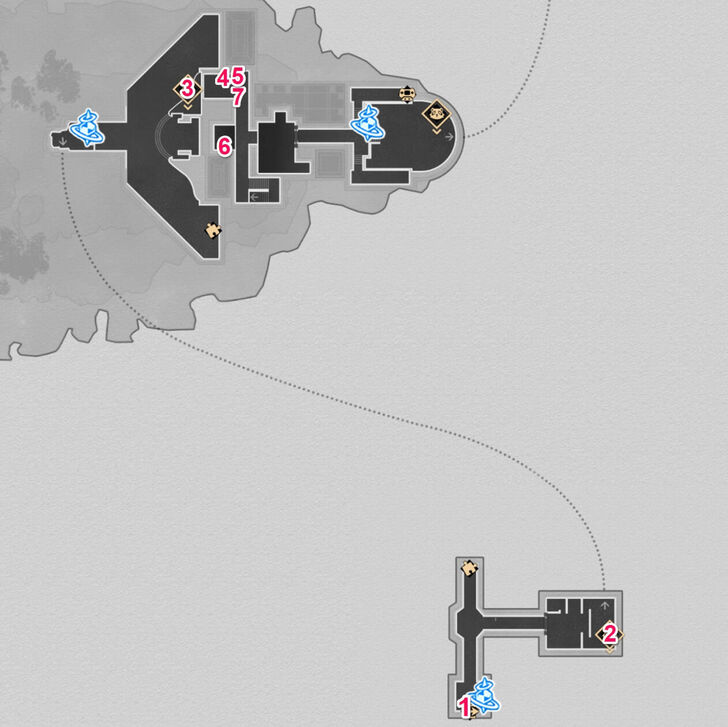 Southwest Full Image |
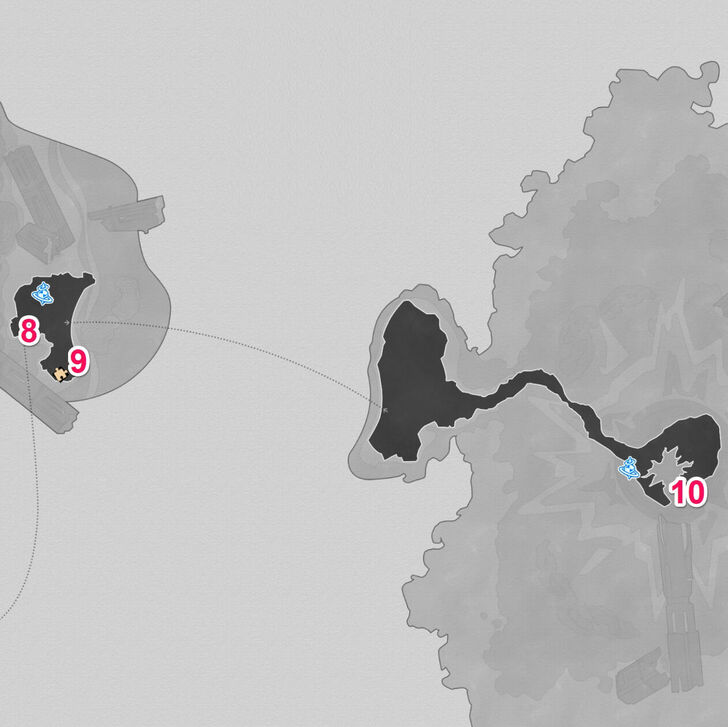 Northeast Full Image |
There are a total of 10 Nameless Wispae to collect in Fallen Star's Cradle.
Fallen Star's Cradle Nameless Wispae Locations
| No. | Image | How to Find |
|---|---|---|
| 1 | 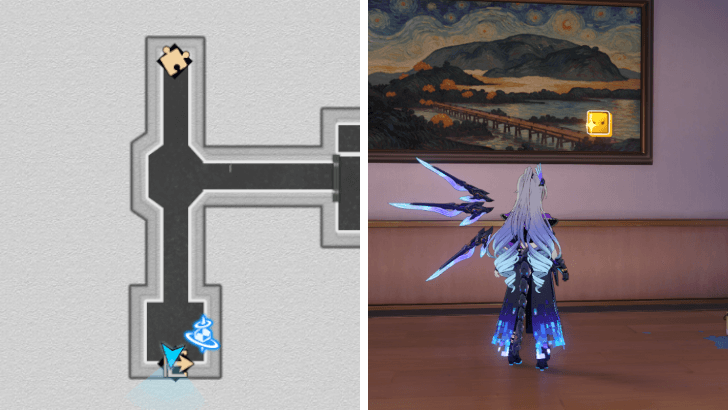 |
Teleport to the Memory of the Past Space Anchor and face south to find the Nameless Wispae on the painting. |
| 2 | 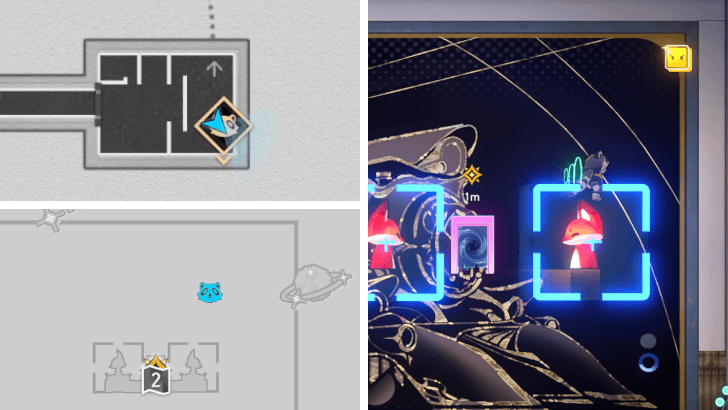 |
Enter the Interplanar Jump Difficulty I that can be found east of the Memory of the Past Space Anchor. Use the hidden platforms to jump on top of the fox, before jumping to the Nameless Wispae in the upper right area. |
| 3 | 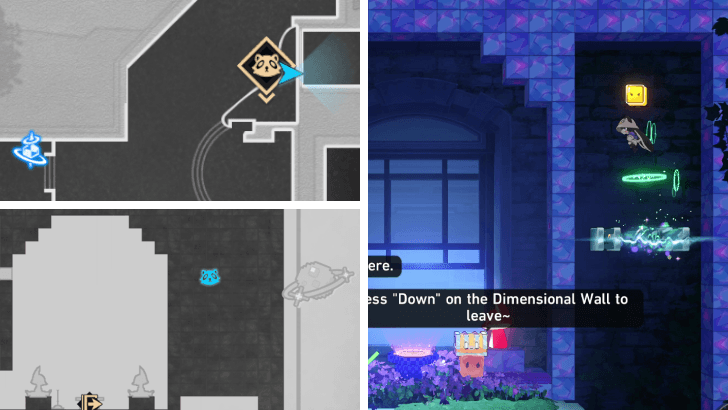 |
Teleport to The Buried Yesterdays Space Anchor and enter the Interplanar Jump Difficulty IV puzzle. Summon a HelpBot in the lower left area of the room to press a hidden switch that will activate the gravity line. Use the gravity line to navigate to the upper right area of the room, where there is a hidden area with the Nameless Wispae in it. |
| 4 | 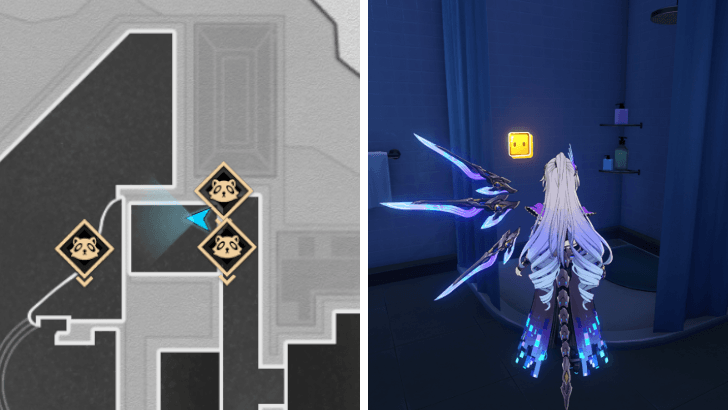 |
This Nameless Wispae can be found inside the shower stall in Himeko's room in the nursing home. |
| 5 | 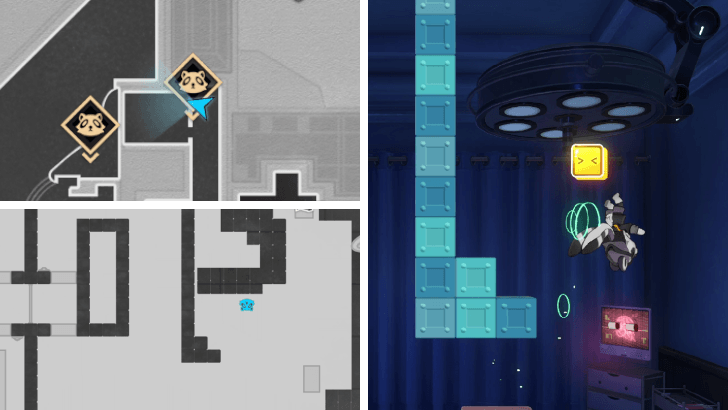 |
Enter the Interplanar Jump Difficulty III puzzle at the end of the northern corridor inside the nursing home. Use a gravity line to run upside down and return to the puzzle's entrance to enter the door to the second level. After the Shapeshifting Furbo encounter, proceed to the right side, where you will find the Nameless Wispae on an operating room light. |
| 6 | 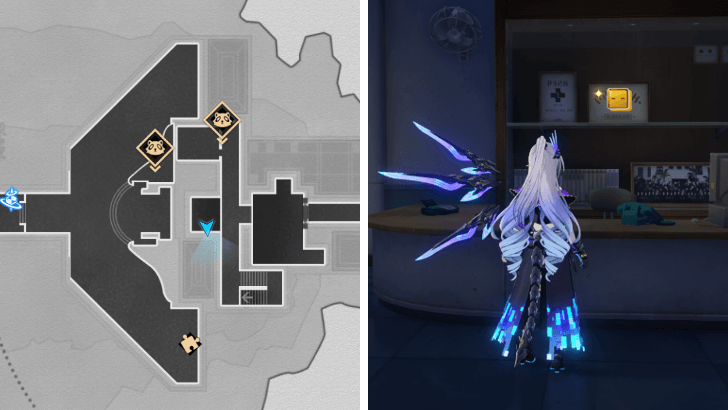 |
Teleport to the Outpost unto the Stars Space Anchor and head west until you reach the reception area. This nameless wispae is on the showcase behind the reception desk. |
| 7 | 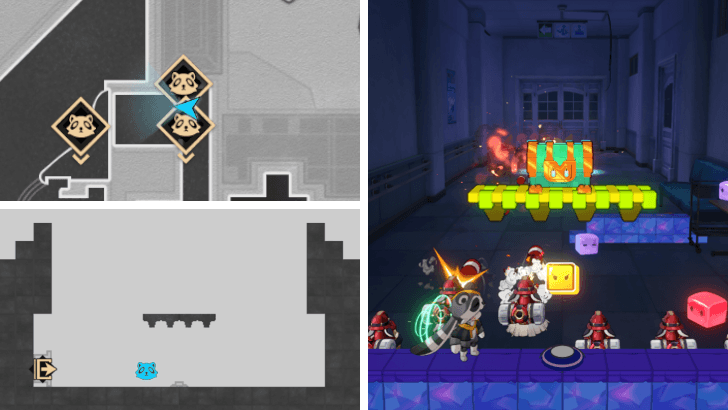 |
From the reception area, head north and enter the Interplanar Jump Difficulty IV puzzle. Defeat the ghosts by using the Alloy Poms, and this Nameless Wispae will appear below the chest at the end of the challenge. |
| 8 | 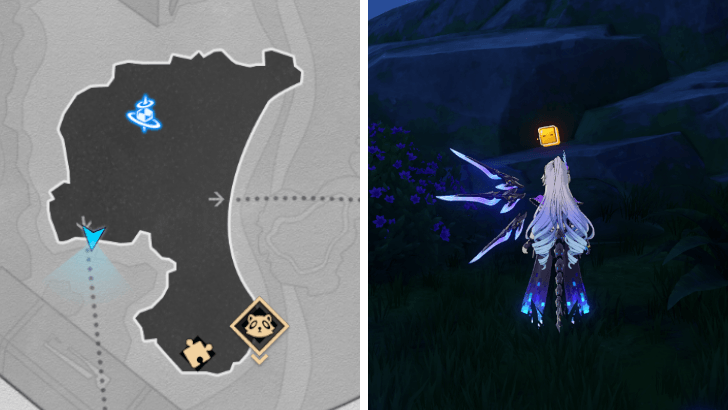 |
Teleport to The Sea Where the Tower of Infinity Slumbers Space Anchor, and head southwest to find the Nameless Wispae on some rocks. |
| 9 | 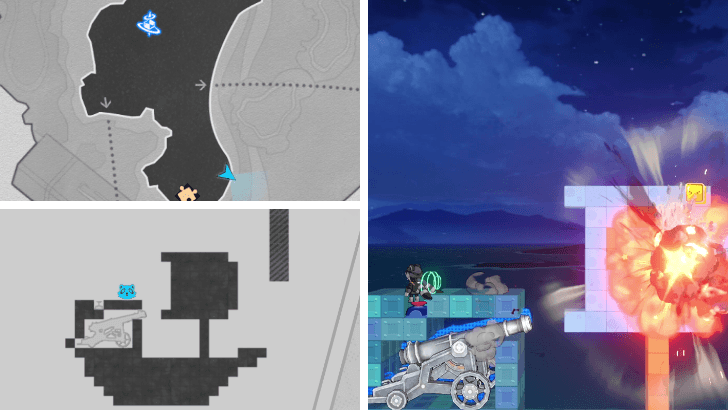 |
Enter the Interplanar Jump Difficulty IV puzzle southeast of The Sea Where the Tower of Infinity Slumbers Space Anchor. Proceed through the challenge until you are able to use a cannon. Shoot the second skull to reveal the Nameless Wispae. |
| 10 | 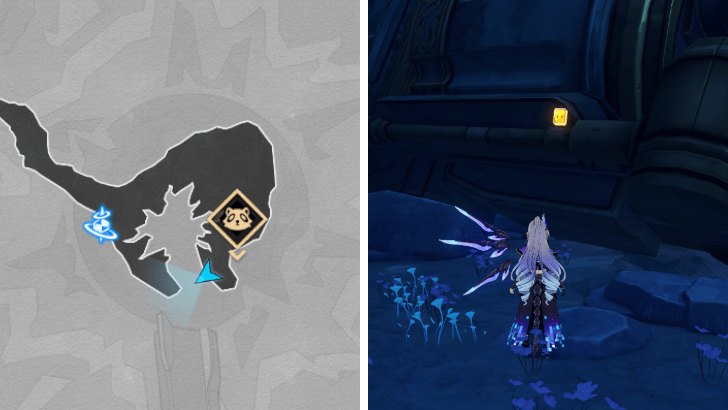 |
Teleport to the Starting Point of the Stars Space Anchor and head east to find this Nameless Wispae on the train car. |
All Nameless Wispae Locations in Astropolis
Nameless Wispae Locations Per Astropolis Area
| Astropolis Nameless Wispae Per Map | |
|---|---|
| Astropolis Central District | Lodestar Tower |
| Life Sciences Institute | - |
Astropolis Central District
| Astropolis Central District Map | |
|---|---|
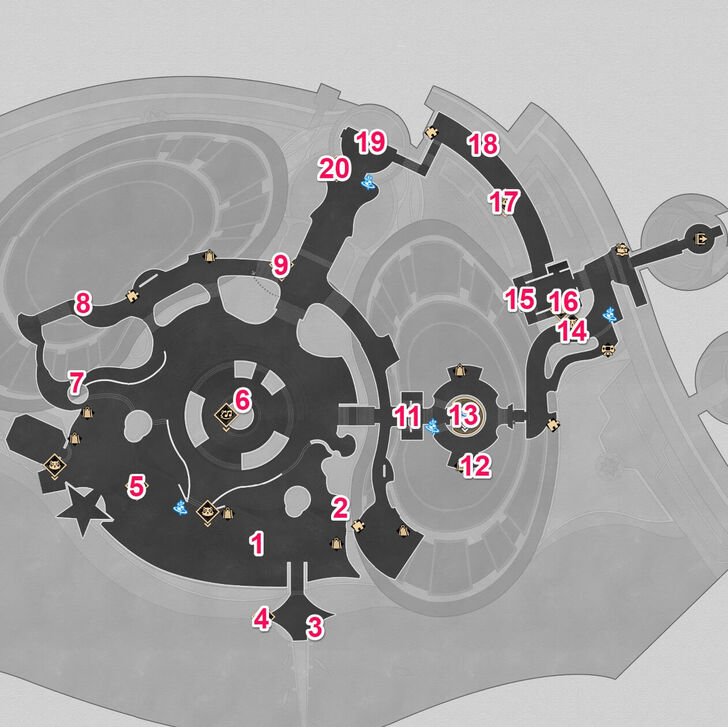 F1 Full Image |
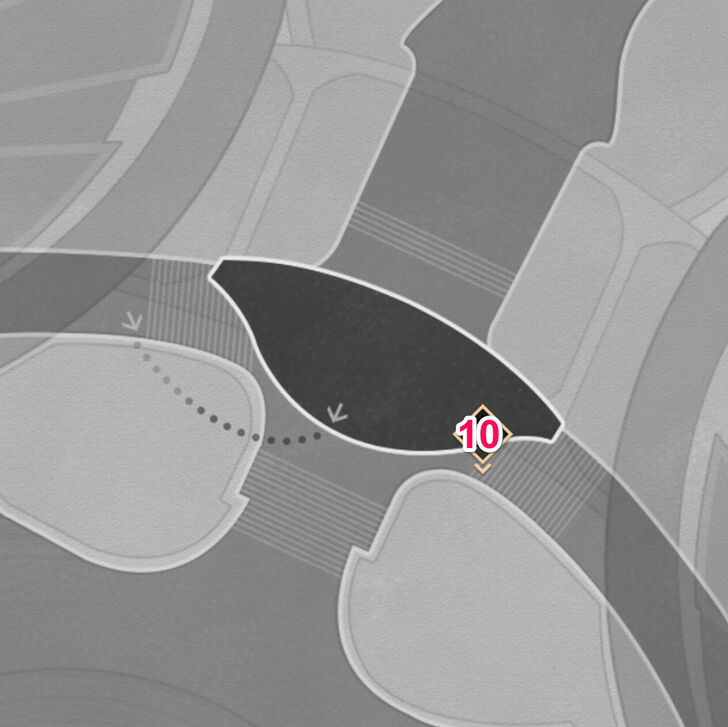 F2 Full Image |
There are a total of 20 Nameless Wispae to collect in Astropolis Central District.
Astropolis Central District Nameless Wispae Locations
| No. | Image | How to Find |
|---|---|---|
| 1 | 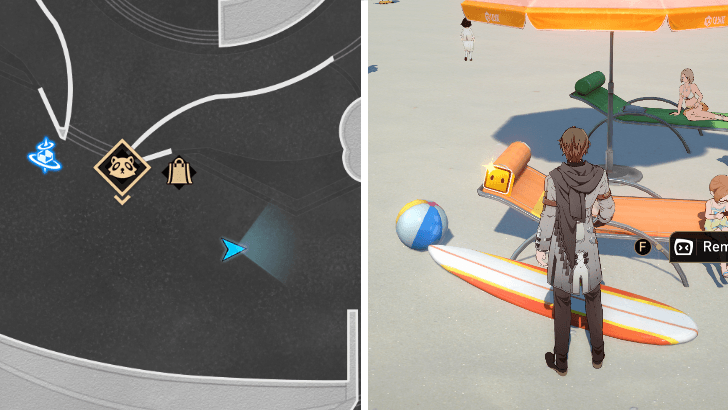 |
Found on the headrest of a lounge chair a few steps southeast of the Seaside Park Space Anchor. |
| 2 | 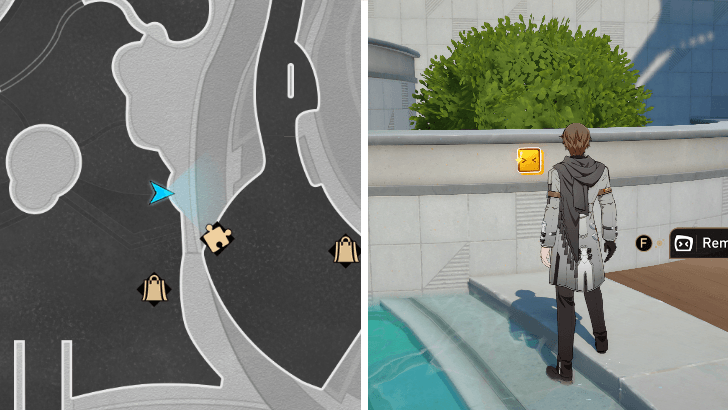 |
Head north from the Mobile Cooling Station on the west side of the beach to find the wispae on a wall, just before the pool. |
| 3 | 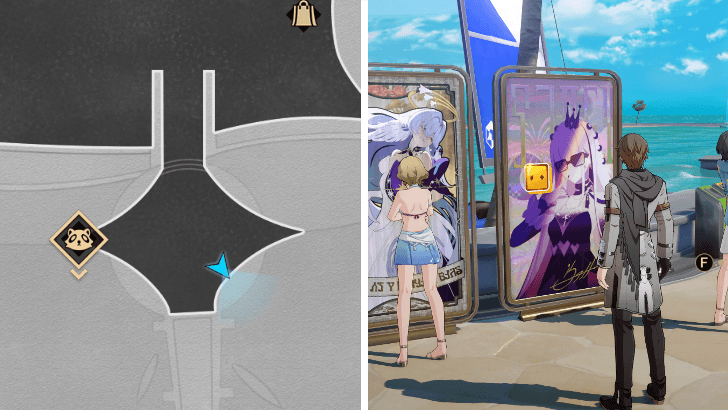 |
Found on a poster of Nihilux at the southern port area in Seaside Park. |
| 4 | 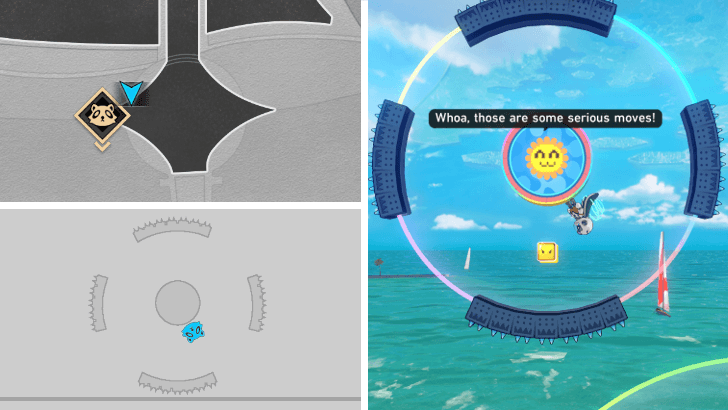 |
Enter the Interplanar Jump Difficulty III stage at the southern port area in Seaside Park. Sprint across the moving Gravity Rings to reach the wispae at the ring surrounded with spikes. |
| 5 | 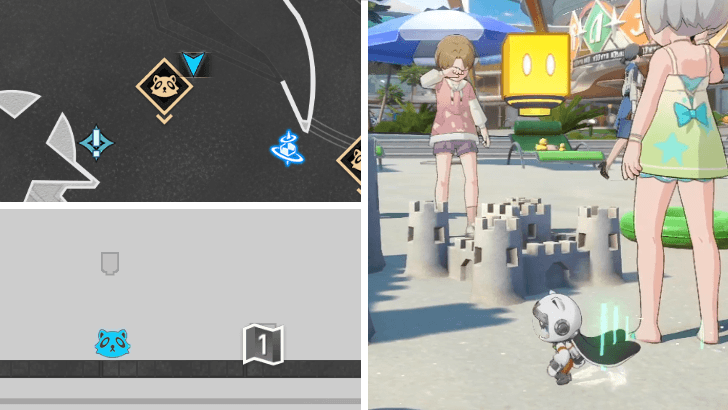 |
Found in Level 2 of the Interplanar Jump Difficulty I stage west of the Seaside Park Space Anchor. Press the button under the block to reveal the wispae. |
| 6 | 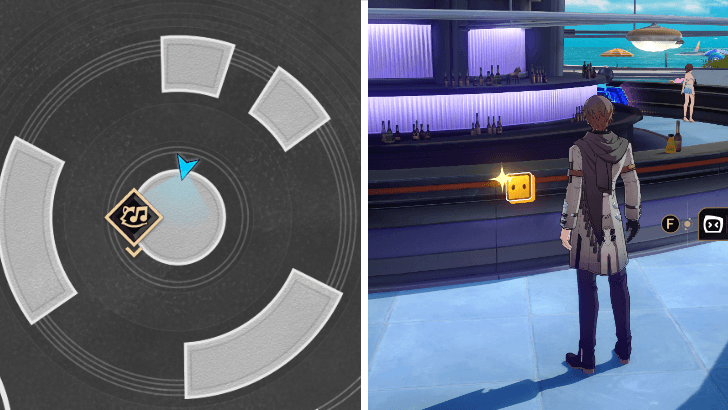 |
Stuck onto the northern side of the circular bar counter at Seaside Park. |
| 7 | 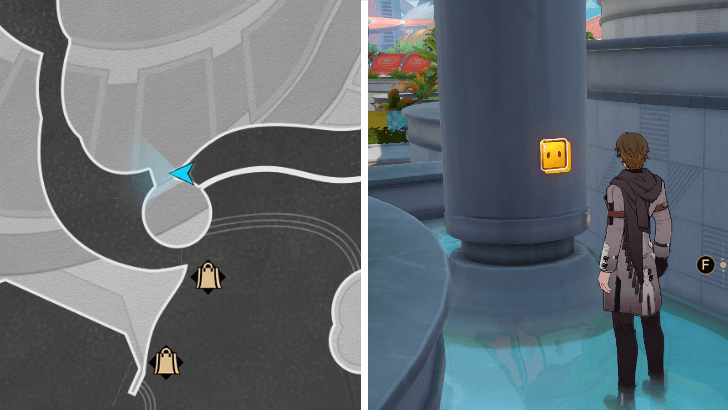 |
Found on a column at the west end of the small pool northwest of the Seaside Park Space Anchor. |
| 8 | 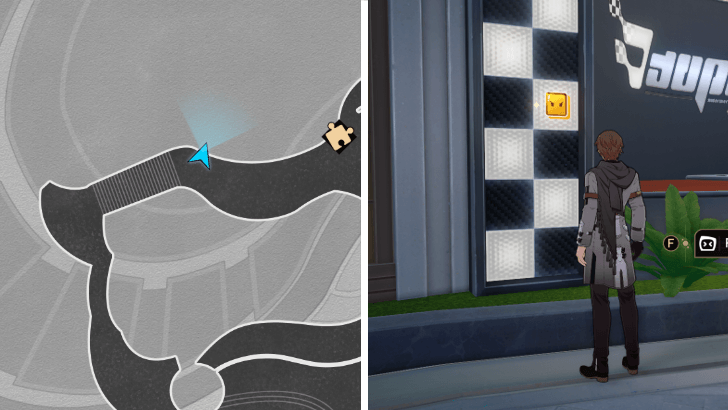 |
Head to the car display southwest of the Say Ah! Extra Sodium Sausage Shop. The wispae will be on the checkered lights at the left side of the display platform. |
| 9 | 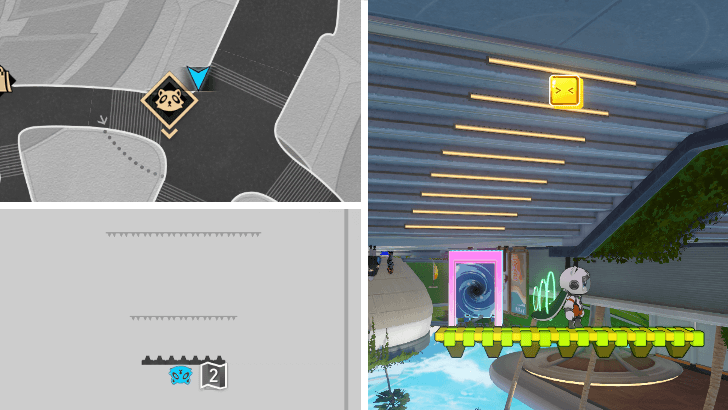 |
Found in Level 1 of the Interplanar Jump Difficulty III stage east of the Say Ah! Extra Sodium Sausage Shop. The wispae will be floating above the Teleporter leading to Level 2. |
| 10 | 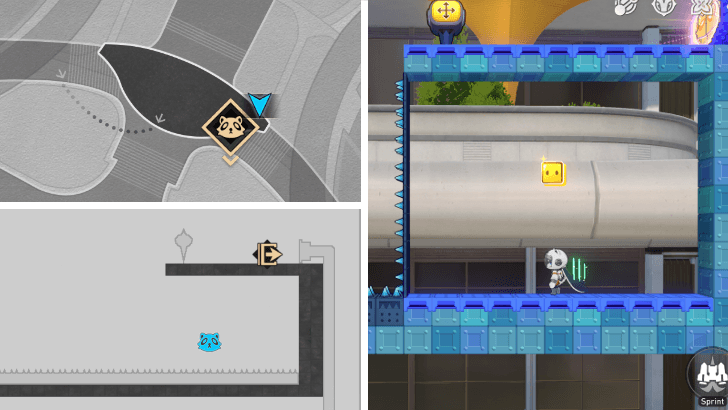 |
Enter the Interplanar Jump Difficulty III stage on F2. Use the Aesthetic Window to move the Sprint Ball facing downwards to the bottom row. Wait for the red Enhanced Sprint Ball to point towards the right so you can sprint through the spikes and reach the wispae. |
| 11 | 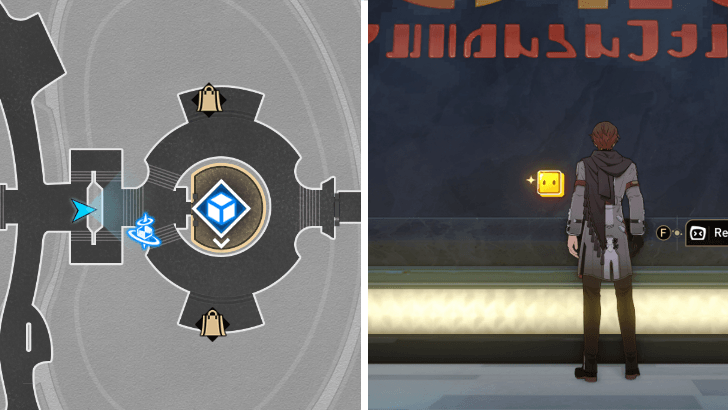 |
Found on the wall fountain at the entrance to the Kenneth Shopping Center. |
| 12 | 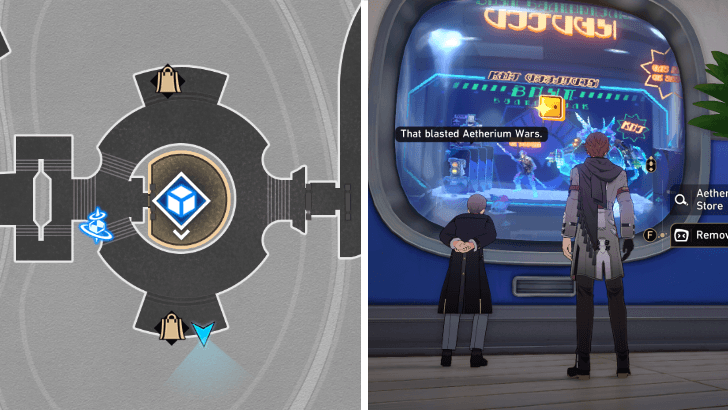 |
On the display window by Hook's Frontline at the Kenneth Shopping Center. |
| 13 | 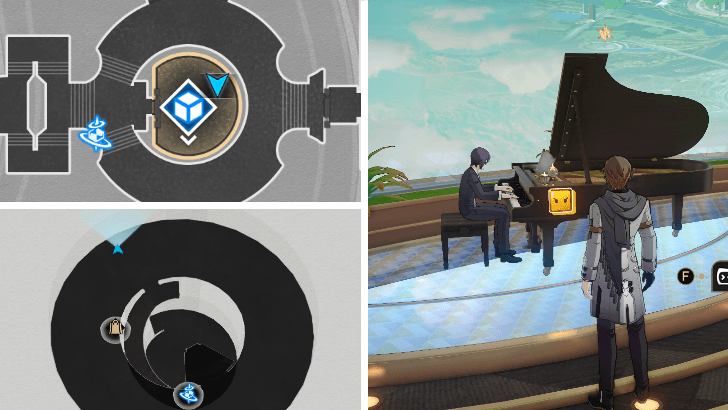 |
On the piano at the upper floor of the Upside-Down Restaurant. |
| 14 | 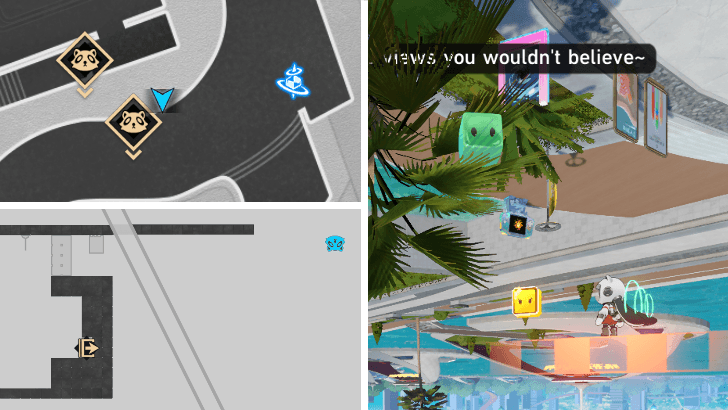 |
Enter the Interplanar Jump Difficulty IV stage west of the Ferry Station Space Anchor. Use the Strolling Belt on the west side of Level 1 to get onto the ceiling. Keep going west until you find the wispae floating at the far end. |
| 15 | 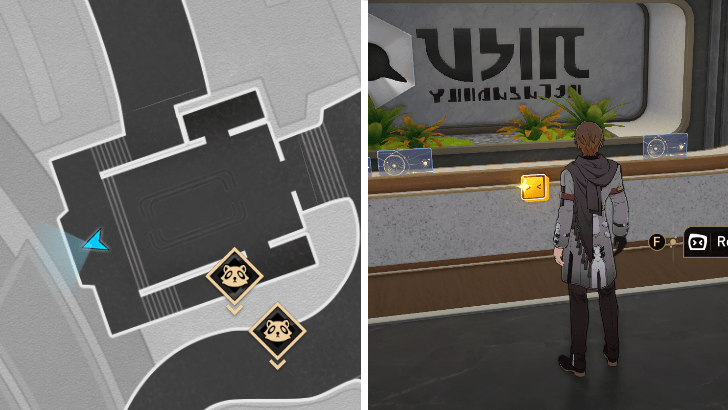 |
Stuck onto the front desk at the Ferry Station waiting lounge. |
| 16 | 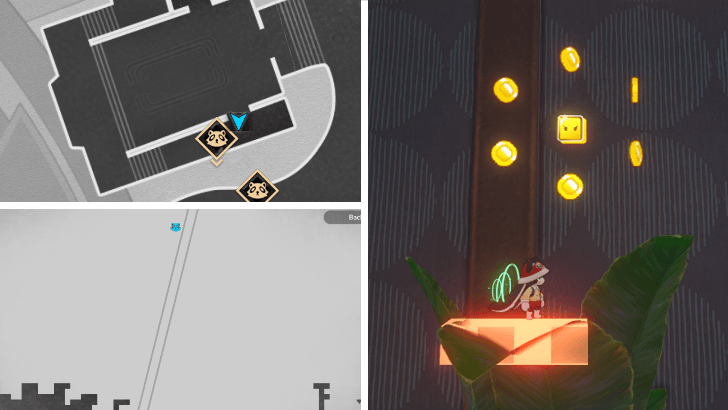 |
Found in Level 1 of the Interplanar Jump Difficulty IV stage in the Ferry Station waiting lounge. Head west until you see a giant Pixcoin frozen in ice. Look for the transparent platforms nearby and follow them upward to reach the wispae floating above. |
| 17 | 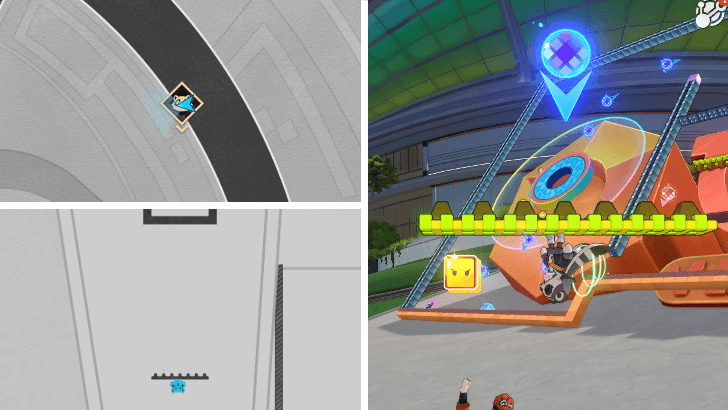 |
Found in Level 3 of the Interplanar Jump Difficulty IV stage east of the Lighthouse Plaza Space Anchor. Jump from the ceiling at the center of the level to go through the Sprint Balls and reach the wispae floating below. |
| 18 | 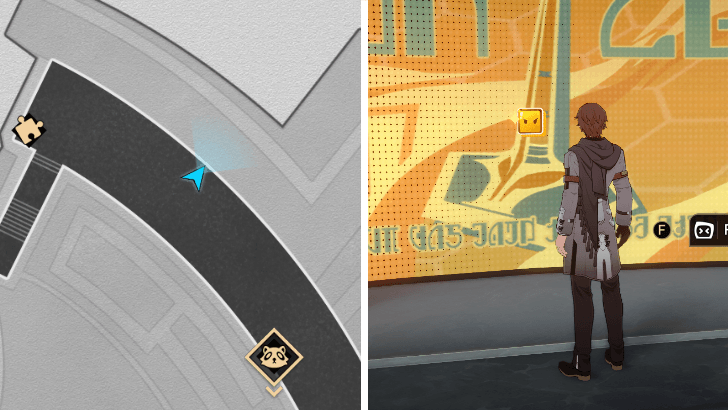 |
On the large electric signboard in the long walkway east of the Lighthouse Plaza Space Anchor. |
| 19 | 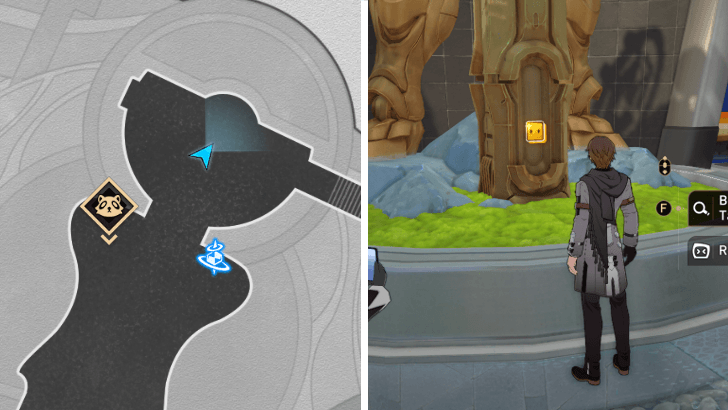 |
Stuck onto the sword of the giant Lighthouse statue in Lighthouse Plaza. |
| 20 | 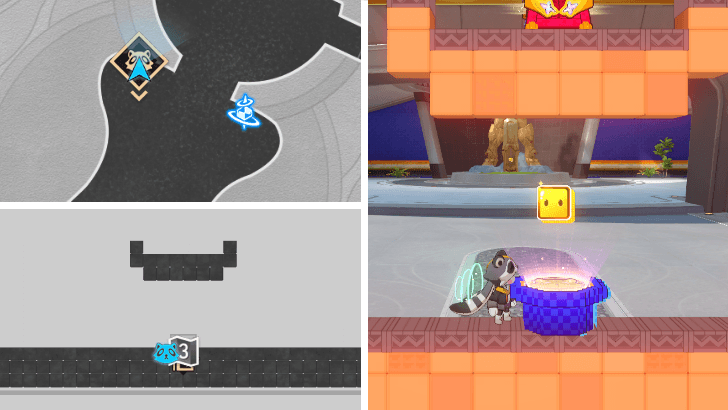 |
Found in the Interplanar Jump Difficulty I stage west of the Lighthouse Plaza Space Anchor. Complete the Astropolis Aerobatics Grand Prix challenge to gain access to the wispae. |
Lodestar Tower
| Lodestar Tower Map | |
|---|---|
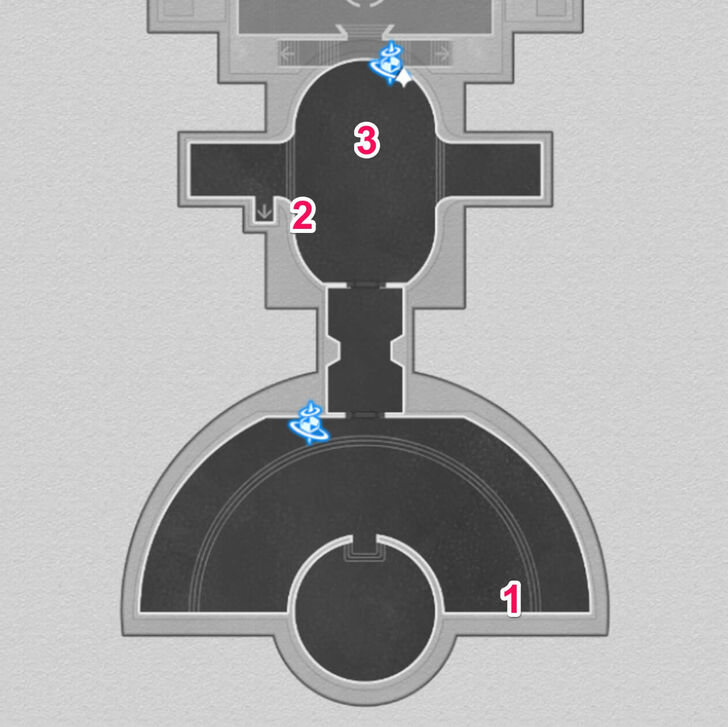 F1 Full Image |
 F2 Full Image |
 F3 South Full Image |
 F3 Northwest Full Image |
 F3 Northeast Full Image |
|
There are a total of 10 Nameless Wispae to collect in Lodestar Tower.
Lodestar Tower Nameless Wispae Locations
| No. | Image | How to Find |
|---|---|---|
| 1 | Enter the Interplanar Jump Difficulty III puzzle on the southeast area of F1. In the second level, press the first button once and pull all the levers so the platforms are colored green, pink, and pink from right to left to gain access to the exit area. Then change the pink blocks into green blocks by pulling their corresponding levers. Create a path connecting them in the middle by pressing the needed buttons. Summoning the HelpBot will make it go into a hidden area, allowing you to jump at the top of the stage where the Nameless Wispae is. |
|
| 2 | 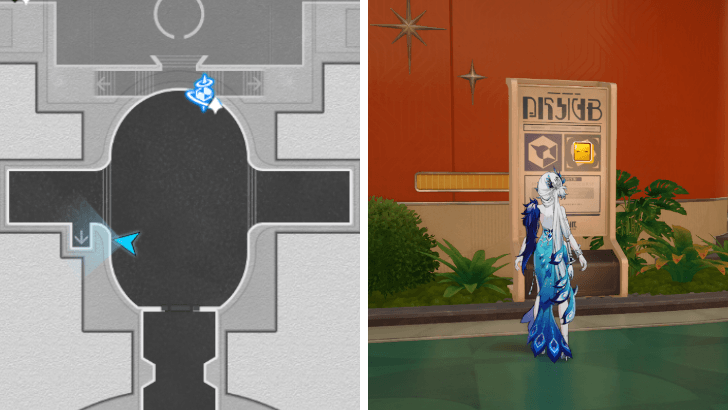 |
Found on a display on the west side of the room above the Security Check Area Space Anchor. |
| 3 | 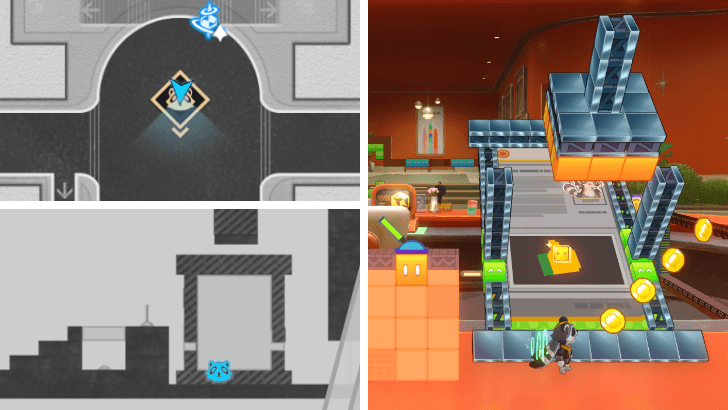 |
Enter the Interplanar Jump Difficulty II puzzle on the north side of the reception desk. Swap the frames to put in the baseball raccoon in the first set, the form with the baseball raccoon in the second set, and the launcher and missiles on the third set. Press on the button thrice or until the side beams are aligned with the green cubes before pulling the lever to stamp the document. The Nameless Wispae will appear on the stamped document. |
| 4 | 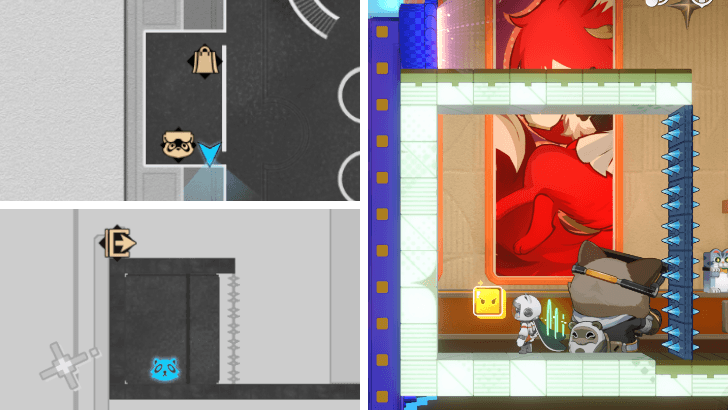 |
Enter the Interplanar Jump Difficulty III puzzle in the Furbobocom office. Get the Sprint upgrade and return to the starting area. Use Sprint to get into the hidden area behind the spikes below the starting pipe to find the Nameless Wispae. |
| 5 | 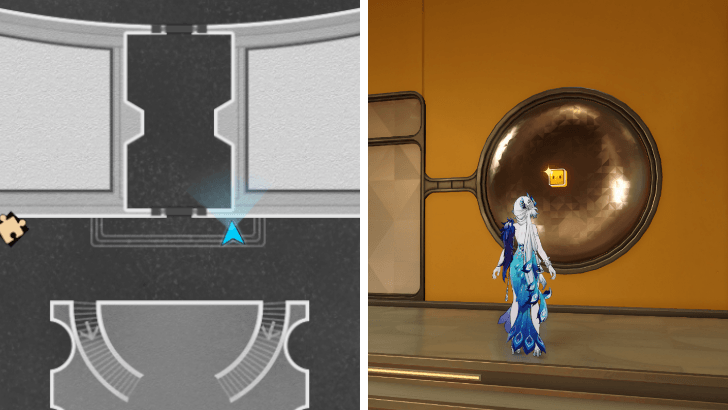 |
This Nameless Wispae can be found near the doors in F3 of the Reception Hall. |
| 6 | 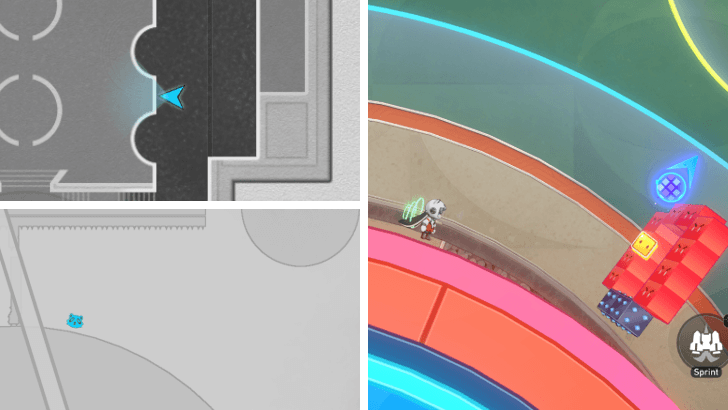 |
Enter the Interplanar Jump Difficulty V puzzle on the east side of the Reception Hall in F3. This Nameless Wispae can be found on one of the moving rings in the big gravitational circle area. |
| 7 | 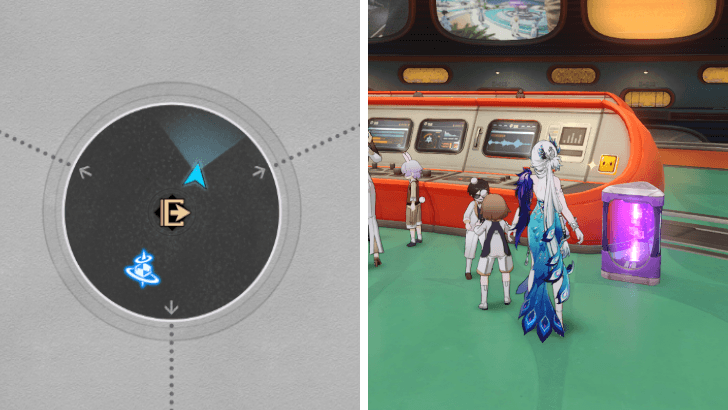 |
Found on one of the control panels in the Panorama Hall. |
| 8 | 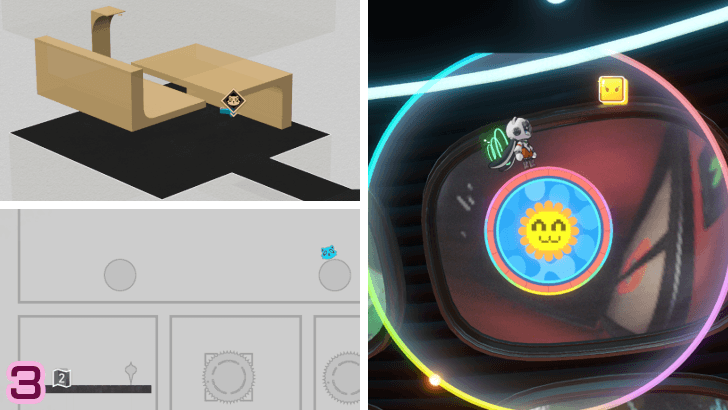 |
Head to the Studio inside the 3D puzzle room on the west side of F3. Switch to the Keeping Up With Star Rail studio and enter the Interplanar Jump Difficulty II puzzle in it. On the third level, jump onto the middle frame. Then jump upwards before Sprinting towards the upper right corner, where there's a hidden gravitational circle hidden behind blocks. The Nameless Wispae can be found in this hidden area. |
| 9 | 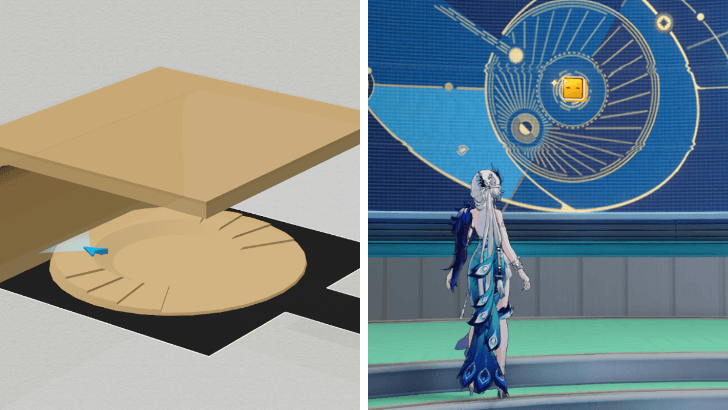 |
In the Studio 3D puzzle room, switch to the Interastral Peace Broadcast studio. This Nameless Wispae can be found on the screen. |
| 10 | 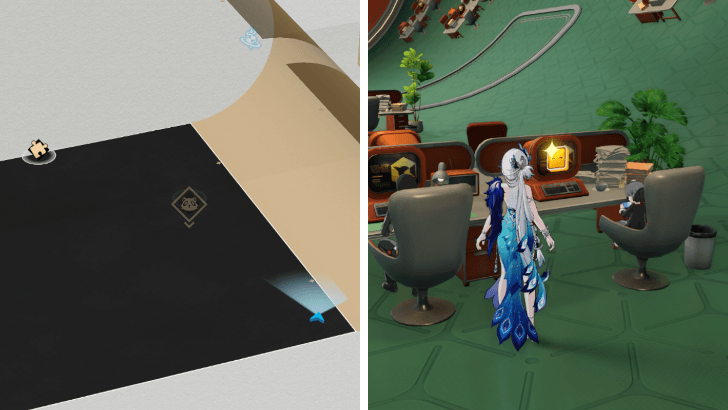 |
Head to the Circular Office 3D puzzle room on the east side of 3F. Go up the Dream Gravitation wall. The Nameless Wispae can be found on a monitor near the corner of the room. |
Life Sciences Institute
| Life Sciences Institute Map | |
|---|---|
 F1 South Full Image |
 F1 North Full Image |
 B1 Full Image |
|
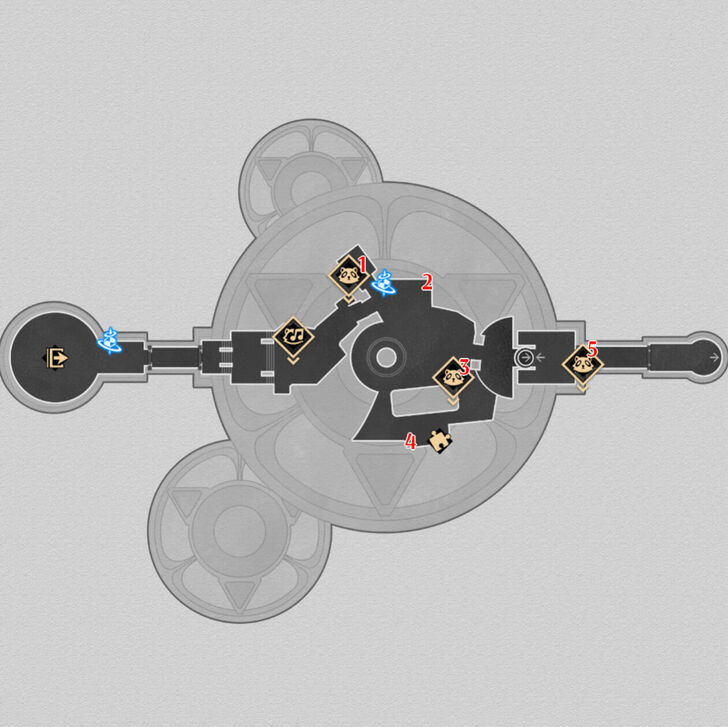
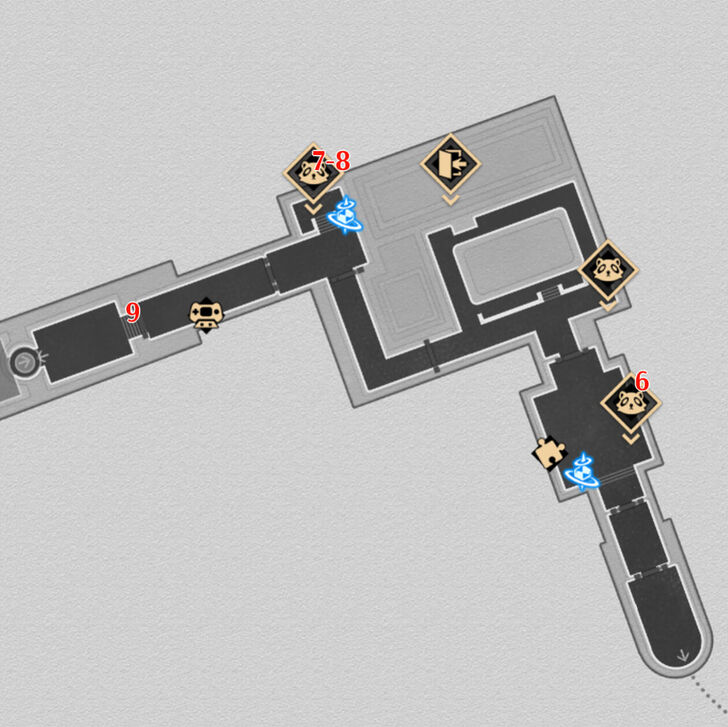
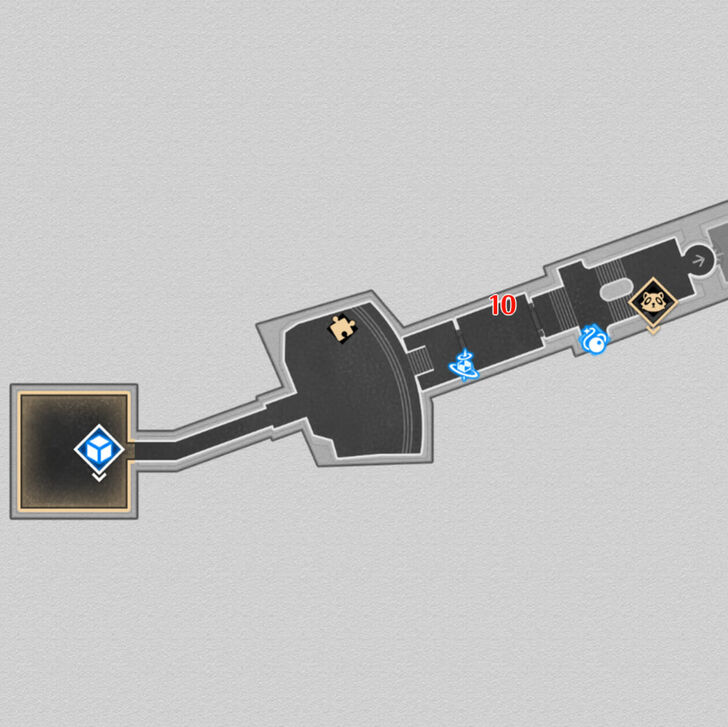
There are a total of 10 Nameless Wispae to collect in Life Sciences Institute.
Life Sciences Institute Nameless Wispae Locations
| No. | Image | How to Find |
|---|---|---|
| 1 | 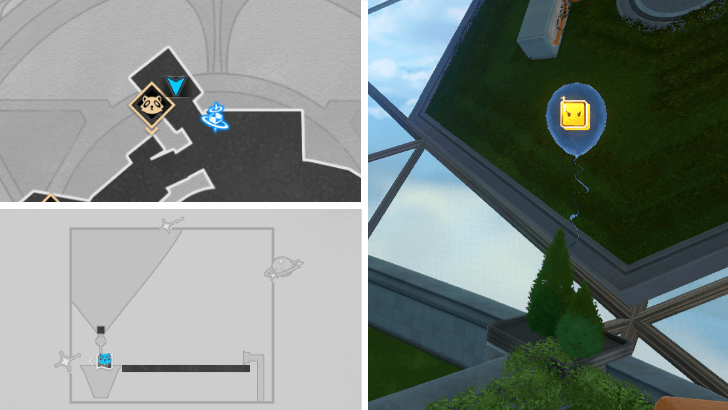 |
Found in Level 2 of the Interplanar Jump Difficulty III stage, near the Wispae Eco-Park Space Anchor. During the hot air balloon ride, shoot an arrow at the balloon with the Nameless Wispae to obtain it. |
| 2 | 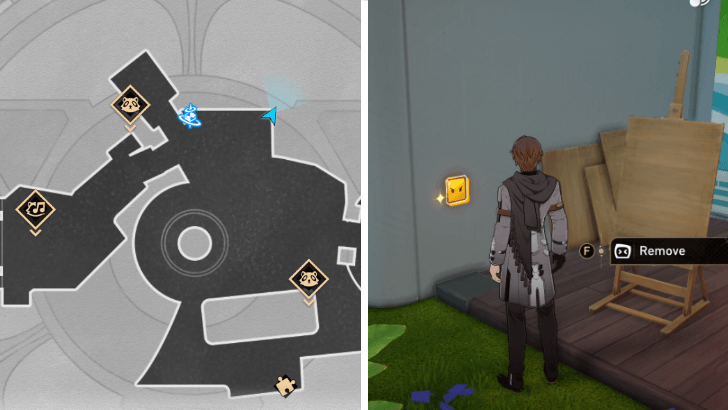 |
Found on the wall near an easel a few steps east of the Wispae Eco-Park Space Anchor. |
| 3 | 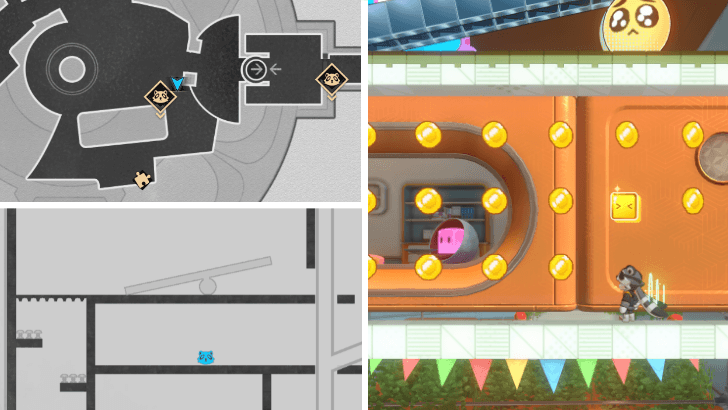 |
Found in the Interplanar Jump Difficulty II stage, southeast of the Wispae Eco-Park Space Anchor. After passing the giant seesaw, drop down to the area below and head left through the blocks to access a hidden area where the Nameless Wispae is. |
| 4 | 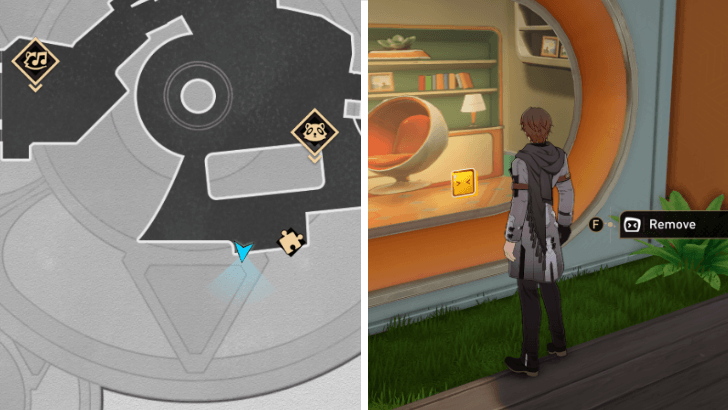 |
Can be found on a window in the food stall area, south of the Wispae Eco-Park Space Anchor. |
| 5 | 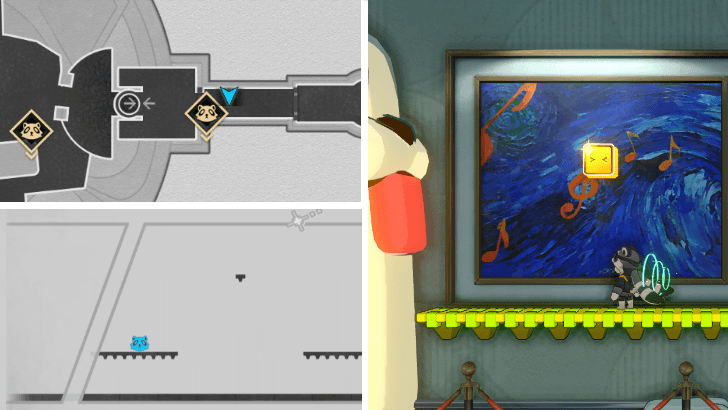 |
Found in Level 1 of the Interplanar Jump Difficulty X stage of F1. Level 1 will loop multiple times and you need to check for aberrations or weird anomalies that make it look different. From loops 0 and 1, you can pass through normally via the pipe at the far left end. On loops 2 and 3, you need to turn back and go down the pipe at the start of the level. The Nameless Wispae will appear on the music note painting during the 4th loop. |
| 6 | 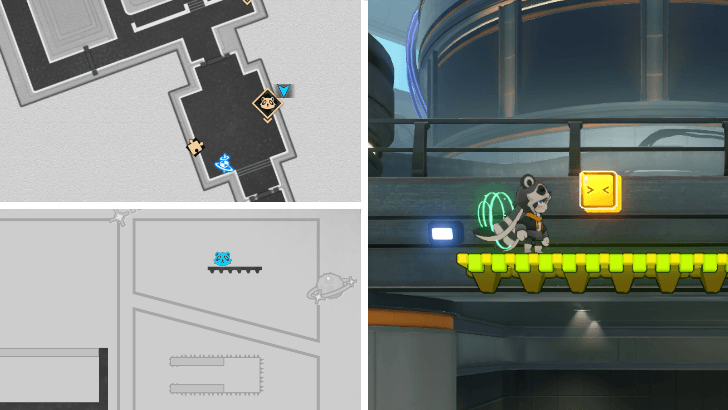 |
Found in Level 3 of the Interplanar Jump Difficulty III stage near the Factory Main Gate Space Anchor. Wait until the rotating Sprint Ball surrounded by spikes faces upwards and pull the lever. Once the Sprint Ball's positioned is fixed, you can jump through the Sprint Ball above the lever to reach the Nameless Wispae at the platform above. |
| 7 | 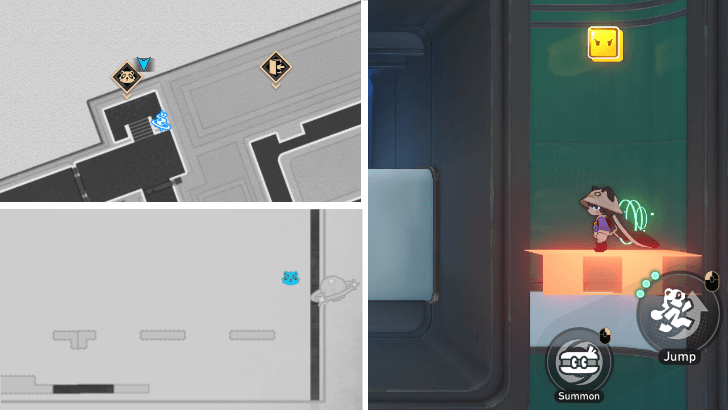 |
Found in Level 1 of the Interplanar Jump Difficulty II stage near the Production Workshop Space Anchor. Make your way onto one of the purple platforms circling around at the right end of the Level. Once the platform reaches the top right corner of the path it's following, jump onto the transparent platforms above to reach the Nameless Wispae. |
| 8 | 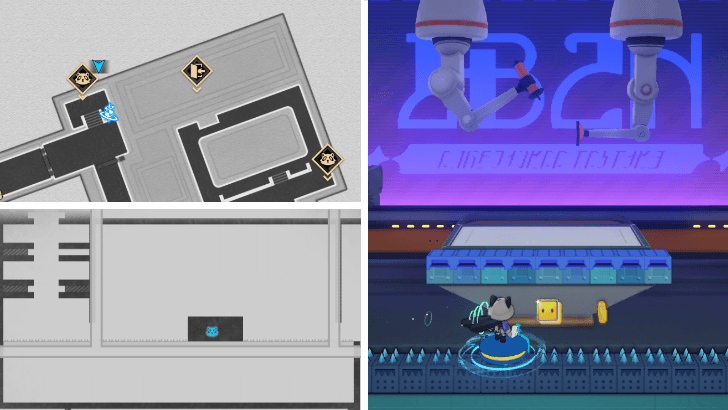 |
Found in Level 2 of the Interplanar Jump Difficulty II stage, near the Production Workshop Space Anchor. Upon reaching the middle layer of Level 2, summon and ride a HelpBot through the spikes to reach the Nameless Wispae hidden within the platform. |
| 9 | 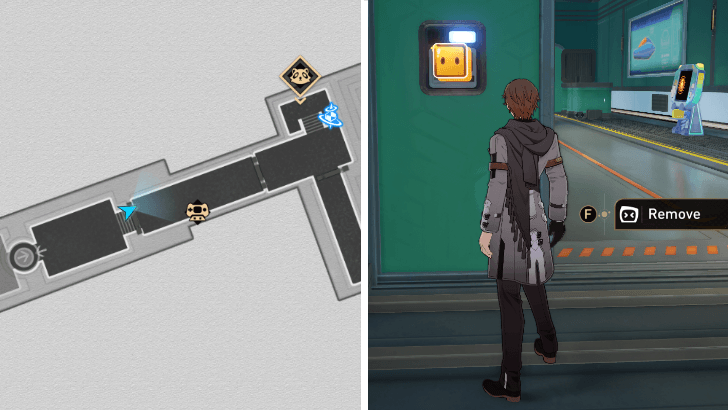 |
Found on the control panel by the door, west of the Star Rabbit console. |
| 10 | 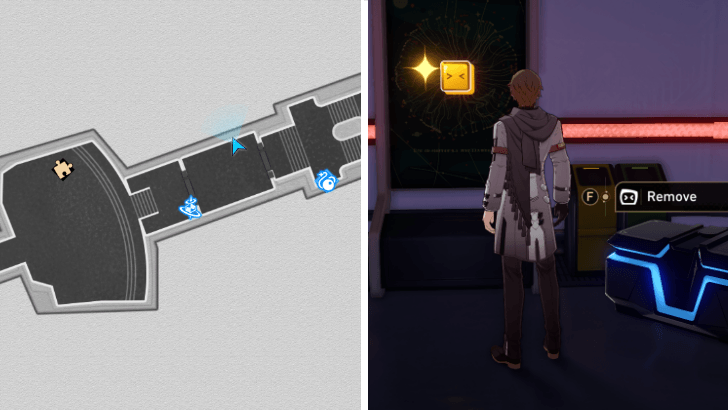 |
Found on a signboard in the reception area, before the Life Sciences Institute Hub Space Anchor. |
Nameless Wispae Rewards
Stellar Jade and Arcadian Tokens

Collecting all Nameless Wispae in an area will reward you 60 Stellar Jades and 200 Arcadian Tokens which you can redeem from the area's Star Rabbit Console.
Each individual Wispae collected also rewards a bit of material and credits.
Nameless Wispae Information
Collectible Stickers that Lower Star Rabbit Difficulty

Nameless Wispae are sticker-like imagenae with diverse personalities placed all throughout Planarcadia by the developers of the Interplanar Jump! game "Star Rabbit".
Collecting all nameless wispae in an area will reduce the difficulty of clearing the corresponding area in Star Rabbit is greatly reduced.
Honkai: Star Rail Related Guides

All Tips and Tricks Guides
Comment



Author

All Nameless Wispae Locations and Rewards

Premium Articles



Rankings
- We could not find the message board you were looking for.
Gaming News





Popular Games

Genshin Impact Walkthrough & Guides Wiki
Fire Emblem: Fortune's Weave (FEFW) Walkthrough & Guides Wiki
Aniimo Walkthrough & Guides Wiki
Wuthering Waves Walkthrough & Guides Wiki
Dragon's Dogma 2 (DD2) Dark Arisen Walkthrough & Guides Wiki
Umamusume: Pretty Derby Walkthrough & Guides Wiki
Honkai: Star Rail Walkthrough & Guides Wiki
Zenless Zone Zero Walkthrough & Guides Wiki
Pokemon TCG Pocket (PTCGP) Strategies & Guides Wiki
AION 2 Walkthrough & Guides Wiki









Recommended Games
Fire Emblem Heroes (FEH) Walkthrough & Guides Wiki
Where Winds Meet Walkthrough & Guides Wiki
Diablo 4: Lord of Hatred Walkthrough & Guides Wiki
Super Smash Bros. Ultimate Walkthrough & Guides Wiki
Persona 3 Reload Walkthrough & Guides Wiki
The Legend of Zelda: Tears of the Kingdom Walkthrough & Guides Wiki
Elden Ring Walkthrough & Guides Wiki
Pokemon Brilliant Diamond and Shining Pearl (BDSP) Walkthrough & Guides Wiki
Cyberpunk 2077: Ultimate Edition Walkthrough & Guides Wiki
Monster Hunter World Walkthrough & Guides Wiki










All rights reserved
Copyright © 2024 HoYoverse, COGNOSPHERE. All Rights Reserved.
The copyrights of videos of games used in our content and other intellectual property rights belong to the provider of the game.
The contents we provide on this site were created personally by members of the Game8 editorial department.
We refuse the right to reuse or repost content taken without our permission such as data or images to other sites.