
Best Builds for Charge Blade (Base Game)
NEW 9/29: Monster Hunter Outlanders 10/29 release!
Read Game8's exclusive interview with Capcom and TiMi producers!
★ Game8 Best Games Survey
Vote for your favorite games and share your voice!
These are the best builds for the Charge Blade in Monster Hunter World (MHW) Base Game. Read on to learn all the best armor sets to use for the Charge Blade and the best skills to help you progress!
List of Contents
Guardian Armor and Defender Weapon

One way to get through the Base Game quickly is by utilizing the Guardian Armor set and Defender Weapon.
The armor set is given to all players from the start of the game and has good defense and survival skills. Keep this armor upgraded and you should be able to take the hits of monsters all the way to Iceborne.
The Defender Weapon can be crafted from the Smithy and can be fully upgraded with ease. It packs enough damage to get you through Base Game and hunt the early Iceborne monsters to get you started on the DLC.
Not Recommended To Use For Endgame
Note that if you want to interact with some of the Base Game endgame content, like Extreme Behemoth or Arch Tempered Kulve Taroth, it will be better to craft an Iceborne build than use the Guardian Armor set and Defender Weapon.
Beginner's Guide | How to Play MHW
Monster Hunter World Best Charge Blade Skills
| Skill | Description | Priority |
|---|---|---|
| Health Boost | Increases health. | High |
| Weakness Exploit | Increases the affinity of attacks that exploit a monster weak spot. | Medium |
| Capacity Boost | Increases the gunlance's shell capacity and charge blade's phial capacity. | Medium |
| Artillery | Strengthens explosive attacks like gunlance shells, Wyvern's Fire, charge blade phial attacks, and sticky ammo. (Only works for Impact Phials) | Low |
| Focus | Increases the fill rate for weapons with gauges and the charge rate for weapons with charge attacks. | Low |
Look for Skills When Forging Armor
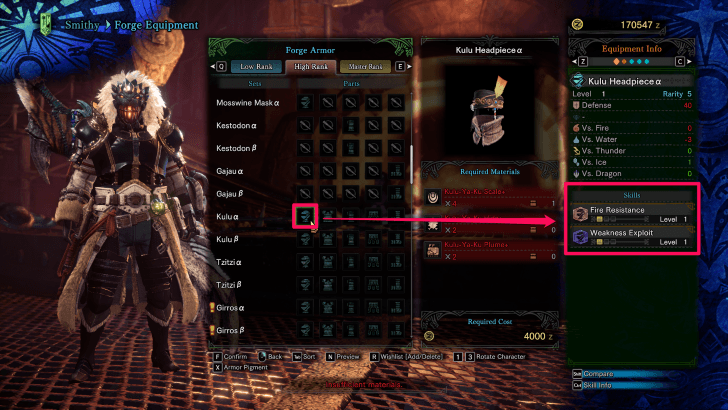
As you progress through the ranks, you will find yourself crafting gear to match the level of monsters you fight. As such, players building towards the endgame should keep these skills in mind when forging gear.
Monster Hunter World Best Charge Blade Builds
| Builds |
|---|
|
|

Master's Touch Charge Blade Build
| Weapon | Decorations | |
|---|---|---|
 Kjarr Strongarm "Ice" |
--- | |
| Armor | Slots and Skills | Decorations |
 Kaiser Crown Gamma |
Slots: ②②ー
Critical Eye (Lv 2) |
Critical Jewel 2 Critical Jewel 2 Critical Boost 1
x1Magazine Jewel 2 Magazine Jewel 2 Capacity Boost 1
x1 |
 Rathalos Mail Beta |
Slots: ①ーー
Weakness Exploit (Lv 2) |
Vitality Jewel 1 Vitality Jewel 1 Health Boost 1
x1 |
 Kaiser Vambraces Gamma |
Slots: ③ーー
Critical Eye (Lv 3) |
Brace Jewel 3 Brace Jewel 3 Flinch Free 1
x1 |
 Kulve Taroth's Malic Gamma |
Slots: ③ーー
Critical Boost (Lv 1) Weakness Exploit (Lv 1) |
Critical Jewel 2 Critical Jewel 2 Critical Boost 1
x1 |
 Kaiser Greaves Gamma |
Slots: ③①ー
Critical Eye (Lv 2) |
Vitality Jewel 1 Vitality Jewel 1 Health Boost 1
x1Vitality Jewel 1 Vitality Jewel 1 Health Boost 1
x1 |
| Frost Charm III | None | |
Skills
| Skills | |
|---|---|
| Critical Eye 7 | Weakness Exploit 3 |
| Critical Boost 3 | Health Boost 3 |
| Flinch Free 1 | Capacity Boost 1 |
| Critical Element 1 | Ice Attack 3 |
| Master's Touch 1 | |
This build utilizes the Master's Touch skill, preventing sharpness loss as long as you are landing critical hits, by having high affinity. This keeps you fighting for longer before needing to sharpen your weapon and keeps your damage at its maximum for longer.
Using Kjarr weapons automatically gives you Critical Element, increasing elemental damage since you'll likely be landing critical hits often. Pairing this with Critical Boost further increases the damage your critical hits deal.
The weapon and charm can be swapped to match the element you want to use, making sure to use Kjarr weapons if you can to utilize the build's high affinity but can still work with any elemental Charge Blade.
Alternatively, an Impact Phial Charge Blade can be used paired with an Artillery Charm III in this build.
The Brace Jewel can also be replaced with a Handicraft Jewel if you won't be hunting with other players or if you don't mind getting flinched by other players.
Non-Elemental (Raw) Charge Blade Build I
| Weapon | Decorations | |
|---|---|---|
 Diablos Tyrannis II |
--- | |
| Armor | Slots and Skills | Decorations |
|
Nergigante Helm Gamma
|
Slots: ②②ー
Stamina Surge (Lv 1) Agitator (Lv 1) |
Magazine Jewel 2 Magazine Jewel 2 Capacity Boost 1
x1Elementless Jewel 2 Elementless Jewel 2 Non-elemental Boost 1
x1 |
|
Kulve Taroth's Ire Gamma
|
Slots: ①ーー
Handicraft (Lv 2) Agitator (Lv 1) |
Ironwall Jewel 1 Ironwall Jewel 1 Guard 1
x1 |
|
Kushala Grip Gamma
|
Slots: ①①①
Focus (Lv 2) |
Vitality Jewel 1 Vitality Jewel 1 Health Boost 1
x3 |
|
Kushala Cocoon Gamma
|
Slots: ①①ー
Handicraft (Lv 2) |
Attack Jewel 1 Attack Jewel 1 Attack Boost 1
x2 |
|
Nergigante Greaves Gamma
|
Slots: ②②ー
Attack Boost (Lv 3) |
Mighty Jewel 2 Mighty Jewel 2 Maximum Might 1
x2 |
| Artillery Charm III | None | |
Skills
| Skills | |
|---|---|
| Attack Boost 5 | Handicraft 4 |
| Health Boost 3 | Artillery 3 |
| Maximum Might 2 | Agitator 2 |
| Focus 2 | Capacity Boost 1 |
| Non-elemental Boost 1 | Stamina Surge 1 |
| Guard 1 | |
The Diablos Tyrannis II has one of the highest attack stat in the Base Game but it comes with its down sides, it has negative affinity and low sharpness.
This build makes up for it by having Handicraft to boost sharpness and Maximum Might to compensate for the negative affinity. All the while boosting its already high attack using Attack Boost, Agitator, and Non-elemental Boost.
When you don't want to think about elemental weaknesses of monsters, this build works for anything!
Non-Elemental (Raw) Charge Blade Build II
| Weapon | Decorations | |
|---|---|---|
|
Diablos Tyrannis II
|
--- | |
| Armor | Slots and Skills | Decorations |
|
Nergigante Helm Alpha
|
Slots: ①ーー
Maximum Might (Lv 2) Attack Boost (Lv 1) |
Attack Jewel 1 Attack Jewel 1 Attack Boost 1
x1 |
|
Damascus Mail Beta
|
Slots: ①①①
Focus (Lv 2) |
Artillery Jewel 1 Artillery Jewel 1 Artillery 1
x3 |
|
Drachen Vambraces Alpha
|
Slots: ②②ー
Critical Eye (Lv 2) Attack Boost (Lv 1) |
Sharp Jewel 2 Sharp Jewel 2 Protective Polish 1
x1Magazine Jewel 2 Magazine Jewel 2 Capacity Boost 1
x1 |
|
Empress Coil Gamma
|
Slots: ③ーー
Evade Window (Lv 2) Health Boost (Lv 2) |
Elementless Jewel 2 Elementless Jewel 2 Non-elemental Boost 1
x1 |
|
Kushala Cocoon Gamma
|
Slots: ①①ー
Handicraft (Lv 2) |
Vitality Jewel 1 Vitality Jewel 1 Health Boost 1
x1Attack Jewel 1 Attack Jewel 1 Attack Boost 1
x1 |
| Handicraft Charm III | None | |
Skills
| Skills | |
|---|---|
| Handicraft 5 | Attack Boost 4 |
| Artillery 3 | Health Boost 2 |
| Focus 3 | Critical Eye 2 |
| Maximum Might 2 | Evade Window 2 |
| Non-elemental Boost 1 | Protective Polish 1 |
| Capacity Boost 1 | |
This build is a variation of the Non-Elemental (Raw) Charge Blade Build I. It follows the same principle but uses Protective Polish to keeps its sharpness for longer.
Non-Elemental (Raw) Charge Blade Build III
| Weapon | Decorations | |
|---|---|---|
|
Diablos Tyrannis II
|
--- | |
| Armor | Slots and Skills | Decorations |
|
Kushala Glare Gamma
|
Slots: ②ーー
Handicraft (Lv 2) |
Charger Jewel 2 Charger Jewel 2 Focus 1
x1 |
|
Damascus Mail Beta
|
Slots: ①①①
Focus (Lv 2) |
Artillery Jewel 1 Artillery Jewel 1 Artillery 1
x3 |
|
Xeno'jiiva Claws Gamma
|
Slots: ②②①
Power Prolonger (Lv 1) Special Ammo Boost (Lv 1) |
Mighty Jewel 2 Mighty Jewel 2 Maximum Might 1
x2Attack Jewel 1 Attack Jewel 1 Attack Boost 1
x1 |
|
Xeno'jiiva Spine Gamma
|
Slots: ③①ー
Critical Boost (Lv 1) |
Elementless Jewel 2 Elementless Jewel 2 Non-elemental Boost 1
x1Attack Jewel 1 Attack Jewel 1 Attack Boost 1
x1 |
|
Xeno'jiiva Spurs Gamma
|
Slots: ②①①
Critical Boost (Lv 1) |
Magazine Jewel 2 Magazine Jewel 2 Capacity Boost 1
x1Attack Jewel 1 Attack Jewel 1 Attack Boost 1
x2 |
| Handicraft Charm III | None | |
Skills
| Skills | |
|---|---|
| Handicraft 5 | Attack Boost 4 |
| Focus 3 | Artillery 3 |
| Critical Boost 2 | Maximum Might 2 |
| Power Prolonger 1 | Capacity Boost 1 |
| Special Ammo Boost 1 | Non-elemental Boost 1 |
| Razor Sharp/Spare Shot (Xeno'jiiva Divinity) | - |
This build is a variation of the Non-Elemental (Raw) Charge Blade Build I. It follows the same principle but uses Xeno'jiiva Divinity's Razor Sharp to decrease its sharpness loss.
Monster Hunter World (MHW) Related Guides
Best Builds (Base Game)

Best Builds Per Weapon
| Weapons | |||
|---|---|---|---|
 Long Swords |
 Great Swords |
 Sword and Shield |
 Dual Blades |
 Hammer |
 Hunting Horn |
 Lance |
 Gunlance |
 Switch Axe |
 Charge Blade |
 Insect Glaive |
 Bow |
 Light Bowgun |
 Heavy Bowgun |
||
Comment



Author

Best Builds for Charge Blade (Base Game)

Rankings
- We could not find the message board you were looking for.
Gaming News





Popular Games

Genshin Impact Walkthrough & Guides Wiki
Fire Emblem: Fortune's Weave (FEFW) Walkthrough & Guides Wiki
Aniimo Walkthrough & Guides Wiki
Wuthering Waves Walkthrough & Guides Wiki
Dragon's Dogma 2 (DD2) Dark Arisen Walkthrough & Guides Wiki
Umamusume: Pretty Derby Walkthrough & Guides Wiki
Honkai: Star Rail Walkthrough & Guides Wiki
Zenless Zone Zero Walkthrough & Guides Wiki
Pokemon TCG Pocket (PTCGP) Strategies & Guides Wiki
AION 2 Walkthrough & Guides Wiki










Recommended Games
Fire Emblem Heroes (FEH) Walkthrough & Guides Wiki
Where Winds Meet Walkthrough & Guides Wiki
Diablo 4: Lord of Hatred Walkthrough & Guides Wiki
Super Smash Bros. Ultimate Walkthrough & Guides Wiki
Persona 3 Reload Walkthrough & Guides Wiki
The Legend of Zelda: Tears of the Kingdom Walkthrough & Guides Wiki
Elden Ring Walkthrough & Guides Wiki
Pokemon Brilliant Diamond and Shining Pearl (BDSP) Walkthrough & Guides Wiki
Cyberpunk 2077: Ultimate Edition Walkthrough & Guides Wiki
Monster Hunter World Walkthrough & Guides Wiki









All rights reserved
©CAPCOM CO., LTD. 2018, 2019 ALL RIGHTS RESERVED.
The copyrights of videos of games used in our content and other intellectual property rights belong to the provider of the game.
The contents we provide on this site were created personally by members of the Game8 editorial department.
We refuse the right to reuse or repost content taken without our permission such as data or images to other sites.