
Best Charge Blade Builds for Iceborne
NEW 9/29: Monster Hunter Outlanders 10/29 release!
Read Game8's exclusive interview with Capcom and TiMi producers!
★ Game8 Best Games Survey
Vote for your favorite games and share your voice!
These are the best builds for the Charge Blade in Monster Hunter World (MHW) Iceborne for DLC progression and endgame. Learn about the best builds, skills, and weapons for the Charge Blade below!
List of Contents
Charge Blade Endgame Meta Build
Endgame Fatalis Armor Builds
| Weapon | Decorations | |
|---|---|---|
 True Fatalis Charger |
Ironwall/Expert Jewel 4 Ironwall/Expert Jewel 4 Guard 1, Critical Eye 1
x 2 |
|
| Armor | Slots and Skills | Decorations |
 Dragonhead Beta + |
Slots: ④④④
Stun Resistance (Lv 3) |
Guardian/Expert Jewel 4 Guardian/Expert Jewel 4 Offensive Guard 1, Critical Eye 1
x3 |
 Dragonhide Beta + |
Slots: ④④④
Weakness Exploit (Lv 1) |
Ironwall/Attack Jewel 4 Ironwall/Attack Jewel 4 Guard 1, Attack Boost 1
x3 |
 Brachydium Braces Alpha + |
Slots: ②②ー
Agitator (Lv 2) Artillery (Lv 3) |
Magazine Jewel 2 Magazine Jewel 2 Capacity Boost 1
x1Shield Jewel 2 Shield Jewel 2 Guard Up 1
x1 |
 Dragonbarbs Alpha + |
Slots: ④③③
Critical Eye (Lv 3) Weakness Exploit (Lv 1) |
Tenderizer/Protection Jewel 4 Tenderizer/Protection Jewel 4 Weakness Exploit 1, Divine Blessing 1
x2 Artillery Jewel+ 4 Artillery Jewel+ 4 Artillery 2
x1 |
 Dragonfeet Beta + |
Slots: ④④④
Evade Window (Lv 1) |
Critical/Protection Jewel 4 Critical/Protection Jewel 4 Critical Boost 1, Divine Blessing 1
x 3 |
| Challenger Charm V | None | |
Fatalis Build Skill List
| Skills | |
|---|---|
| Critical Eye 7 | Agitator 7 |
| Artillery 5 | Divine Blessing 5 |
| Guard 5 | Attack Boost 3 |
| Critical Boost 3 | Offensive Guard 3 |
| Stun Resistance 3 | Weakness Exploit 3 |
| Evade Window 2 | Capacity Boost 1 |
| Guard Up 1 | Inheritance (Fatalis Legend 2) |
| Transcendence (Fatalis Legend 4) | |
Taking advantage of Inheritance from the Fatalis Legend Set Bonus, this build provides high affinity and attack using the unlocked Agitator 7, complemented with Critical Eye, Critical Boost, Weakness Exploit, and Offensive Guard.
The unlocked Artillery 5 further enhances the damage of True Fatalis Charger's Impact Phials. Combined with Capacity Boost, this makes your Super Amped Elemental Discharge deal a trememdous amount of damage.
Transcendence from the Fatalis Legend Set Bonus provides comfort and survivability with True Razor Sharp and the huge Health and Stamina boost. This allows for less sharpening between each encounter and gets you to max HP without Health Boost and eating meals or consuming Max/Ancient Potions.
Guard Up and Guard let you use your shield to block more attacks while reducing the stamina blocking consumes and its knockback, allowing you to counter with the axe to make the most out of blocking.
Charge Blade Meta Builds
| Meta Builds |
|---|
|
|

Impact Phial Build
| Weapon | Decorations | |
|---|---|---|
 Lightbreak Charge Blade |
Ironwall/Expert Jewel 4 Ironwall/Expert Jewel 4 Guard 1, Critical Eye 1
x1Brace Jewel 3 Brace Jewel 3 Flinch Free 1
x1 |
|
| Armor | Slots and Skills | Decorations |
|
Frostfang Helm Beta +
|
Slots: ④②①
Critical Eye (Lv 2) |
Ironwall/Attack Jewel 4 Ironwall/Attack Jewel 4 Guard 1, Attack Boost 1
x1Guardian Jewel 2 Guardian Jewel 2 Offensive Guard 1
x1Artillery Jewel 1 Artillery Jewel 1 Artillery 1
x1 |
|
Brachydium Mail Beta +
|
Slots: ④②①
Agitator (Lv 2) |
Ironwall/Attack Jewel 4 Ironwall/Attack Jewel 4 Guard 1, Attack Boost 1
x1Tenderizer Jewel 2 Tenderizer Jewel 2 Weakness Exploit 1
x1Artillery Jewel 1 Artillery Jewel 1 Artillery 1
x1 |
|
Brachydios Braces Alpha +
|
Slots: ②ーー
Agitator (Lv 2) Blast Resistance (Lv 2) |
Magazine Jewel 2 Magazine Jewel 2 Capacity Boost 1
x1Shield Jewel 2 Shield Jewel 2 Guard Up 1
x1 |
|
Brachydium Faulds Beta +
|
Slots: ④①ー
Agitator (Lv 3) |
Ironwall/Expert Jewel 4 Ironwall/Expert Jewel 4 Guard 1, Critical Eye 1
x1Vitality Jewel 1 Vitality Jewel 1 Health Boost 1
x1 |
|
Brachydium Greaves Beta +
|
Slots: ④①①
Weakness Exploit (Lv 2) |
Ironwall/Expert Jewel 4 Ironwall/Expert Jewel 4 Guard 1, Critical Eye 1
x1Vitality Jewel 1 Vitality Jewel 1 Health Boost 1
x2 |
| Attack Charm V | None | |
Impact Phial Build Skill List
| Skills | |
|---|---|
| Attack Boost 7 | Agitator 7 |
| Artillery 5 | Critical Eye 5 |
| Guard 5 | Health Boost 3 |
| Weakness Exploit 3 | Flinch Free 1 |
| Offensive Guard 1 | Capacity Boost 1 |
| Guard Up 1 | Agitator Secret (Brachydios Will 2) |
| Artillery Secret (Brachydios Will 4) | Punishing Draw (Frostfang Absolute Art 2) |
An improved Impact Phial-focused build that uses Artillery Secret to boost its damage. The unlocked Agitator 7, Attack Boost, and a little bit of Offensive Guard further increases Impact Phial damage and Capacity Boost adds one more phial to boost your Super Amped Elemental Discharge damage.
Guard Up and Guard let you use your shield to block more attacks while reducing the stamina blocking consumes and its knockback, allowing you to counter with the axe to make the most out of blocking.
Elemental Phial Build
| Weapon | Decorations | |
|---|---|---|
 Kjarr Strongarm "Spark" |
Bolt Jewel 1 Bolt Jewel 1 Thunder Attack 1
x1 |
|
| Armor | Slots and Skills | Decorations |
|
Safi Crested Crown Beta +
|
Slots: ④①①
Evade Window (Lv 1) Critical Boost (Lv 1) |
Tenderizer/Vitality Jewel 4 Tenderizer/Vitality Jewel 4 Weakness Exploit 1, Health Boost 1
x1Ironwall Jewel 1 Ironwall Jewel 1 Guard 1
x2 |
|
Safi Crested Chest Beta +
|
Slots: ④②
Blight Resistance (Lv 1) Critical Boost (Lv 1) |
Tenderizer/Vitality Jewel 4 Tenderizer/Vitality Jewel 4 Weakness Exploit 1, Health Boost 1
x1Guardian Jewel 2 Guardian Jewel 2 Offensive Guard 1
x1 |
|
Safi Crested Vambraces Beta +
|
Slots: ④②②
Blight Resistance (Lv 1) |
Tenderizer/Vitality Jewel 4 Tenderizer/Vitality Jewel 4 Weakness Exploit 1, Health Boost 1
x1Magazine Jewel 2 Magazine Jewel 2 Capacity Boost 1
x1Guardian Jewel 2 Guardian Jewel 2 Offensive Guard 1
x1 |
|
Safi Crested Belt Beta +
|
Slots: ④①
Evade Window (Lv 2) |
Ironwall/Evasion Jewel 4 Ironwall/Evasion Jewel 4 Guard 1, Evade Window 1
x1Ironwall Jewel 1 Ironwall Jewel 1 Guard 1
x1 |
|
Safi Crested Boots Beta +
|
Slots: ④②①
Critical Boost (Lv 1) |
Ironwall/Evasion Jewel 4 Ironwall/Evasion Jewel 4 Guard 1, Evade Window 1
x1Guardian Jewel 2 Guardian Jewel 2 Offensive Guard 1
x1Ironwall Jewel 1 Ironwall Jewel 1 Guard 1
x1 |
| Shock Charm V | None | |
Elemental Phial Build Skill List
| Skills | |
|---|---|
| Thunder Attack 6 | Evade Window 5 |
| Guard 5 | Critical Boost 3 |
| Health Boost 3 | Offensive Guard 3 |
| Weakness Exploit 3 | Blight Resistance 2 |
| Capacity Boost 1 | Critical Element (Kjarr Weapon) |
| Dragonvein Awakening (Safi'jiiva Seal 3) | True Dragonvein Awakening (Safi'jiiva Seal 5) |
A build that concentrates on dealing a lot of elemental damage using the Kjarr Weapon's Critical Element combined with Safi'jiiva's True Dragonvein Awakening.
True Dragonvein Awakening provides increased elemental damage and affinity from continuously attacking the monster. Each swing of the weapon consumes your HP whether it hits something or not, but Health Regen augments can help mitigate this a little bit.
Critical Boost, Critical Element, and Weakness Exploit boosts and takes advantage of the high affinity True Dragonvein Awakening already provides.
Guard Up and Guard let you use your shield to block more attacks while reducing the stamina blocking consumes and its knockback, allowing you to counter with the axe to make the most out of blocking.
Just swap out the Charm and Weapon to match the element you're going for!
Iceborne Charge Blade Progression Builds
| Progression Builds |
|---|
|
|
Starter Iceborne Build
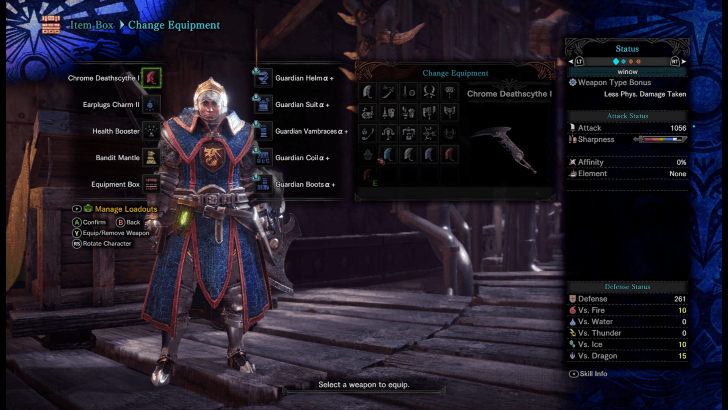
The Guardian Armor plus Defender Weapon combo is a viable starter build for Iceborne's early game. It has good enough defense to take hits from the early monsters, as well as enough damage to let you farm for your early Iceborne build.
The Guardian Armor set is given to all players from the start of the game and has good defense and survival skills while the Defender Weapon can be crafted from the Smithy and can be fully upgraded with ease.
Early Iceborne Progression Build
| Weapon | Decorations | |
|---|---|---|
 Wild Force I |
Handicraft Jewel 3 Handicraft Jewel 3 Handicraft 1
x1 |
|
| Armor | Slots and Skills | Decorations |
|
Barroth Helm Beta +
|
Slots: ④①ー
Guard (Lv 2) |
Charger/Evasion Jewel 4 Charger/Evasion Jewel 4 Focus 1, Evade Window 1
x1Artillery Jewel 1 Artillery Jewel 1 Artillery 1
x1 |
|
Banbaro Mail Alpha +
|
Slots: ③ーー
Speed Eating (Lv 1) Offensive Guard (Lv 1) |
Brace Jewel 3 Brace Jewel 3 Flinch Free 1
x1 |
|
Banbaro Vambraces Alpha +
|
Slots: ②ーー
Offensive Guard (Lv 1) Health Boost (Lv 2) |
Charger Jewel 2 Charger Jewel 2 Focus 1
x1 |
|
High Metal Coil Alpha +
|
Slots: ②②ー
Capacity Boost (Lv 1) Defense Boost (Lv 2) |
Elementless Jewel 2 Elementless Jewel 2 Non-elemental Boost 1
x1Shield Jewel 2 Shield Jewel 2 Guard Up 1
x1 |
|
Anja Greaves Beta +
|
Slots: ④①ー
Artillery (Lv 2) |
Charger/Evasion Jewel 4 Charger/Evasion Jewel 4 Focus 1, Evade Window 1
x1Vitality Jewel 1 Vitality Jewel 1 Health Boost 1
x1 |
| Handicraft Charm III | None | |
Early Iceborne Skill List
| Skills | |
|---|---|
| Handicraft 4 | Artillery 3 |
| Health Boost 3 | Offensive Guard 3 |
| Defense Boost 2 | Evade Window 2 |
| Guard 2 | Focus 2 |
| Flinch Free 1 | Speed Eating 1 |
| Capacity Boost 1 | Guard Up 1 |
| Non-elemental Boost 1 | |
A simple Impact Phial-focused build that uses Artillery and a high-attack weapon with Non-Elemental Boost.
Having some Guard and Guard Up in the build makes counterattacking after blocking a good way to unleash those Super Amped Elemental Discharges.
Mid-Late Iceborne Progression Build
| Weapon | Decorations | |
|---|---|---|
 Luna Eostre |
KO Jewel 2 KO Jewel 2 Slugger 1
x1Guardian Jewel 2 Guardian Jewel 2 Offensive Guard 1
x1 |
|
| Armor | Slots and Skills | Decorations |
|
Zorah Headgear Alpha +
|
Slots: ②②ー
Flinch Free (Lv 1) Artillery (Lv 2) |
Magazine Jewel 2 Magazine Jewel 2 Capacity Boost 1
x1Shield Jewel 2 Shield Jewel 2 Guard Up 1
x1 |
|
Zorah Hide Alpha +
|
Slots: ③①ー
Tremor Resistance (Lv 2) Artillery (Lv 2) |
Brace Jewel 3 Brace Jewel 3 Flinch Free 1
x1Vitality Jewel 1 Vitality Jewel 1 Health Boost 1
x1 |
|
Diablos Nero Braces Alpha +
|
Slots: ①①ー
Slugger (Lv 2) Marathon Runner (Lv 1) |
Vitality Jewel 1 Vitality Jewel 1 Health Boost 1
x2 |
|
Zorah Spine Alpha +
|
Slots: ③②ー
Tremor Resistance (Lv 1) Artillery (Lv 1) |
Handicraft Jewel 3 Handicraft Jewel 3 Handicraft 1
x1Guardian Jewel 2 Guardian Jewel 2 Offensive Guard 1
x1 |
|
Uragaan Greaves Alpha +
|
Slots: ①ーー
Guard (Lv 2) Offensive Guard (Lv 1) |
Satiated Jewel 1 Satiated Jewel 1 Free Meal 1
x1 |
| Ironside Charm III | None | |
Mid-Late Iceborne Progression Build Skill List
| Skills | |
|---|---|
| Artillery 5 | Guard 5 |
| Health Boost 3 | Offensive Guard 3 |
| Slugger 3 | Tremor Resistance 3 |
| Flinch Free 1 | Handicraft 1 |
| Marathon Runner 1 | Capacity Boost 1 |
| Free Meal 1 | Guard Up 1 |
| Artillery Secret (Zorah Magdaros Essence 3) | |
An improved Impact Phial-focused build that uses Zorah Magdaros' Artillery Secret to really amplify its damage.
Guard Up and Guard let you use your shield to block more attacks while reducing the stamina blocking consumes and its knockback. Use this to trigger Offensive Guard before unleashing Super Amped Elemental Discharge to really boost its damage.
Slugger makes it easier to stun the monsters if you land phial hits on the head. This gives you plenty of opportunity to position well to get the maximum amount of damage from your phials.
Best Charge Blade Weapons and Skills
Recommended Weapons for Charge Blade
| Weapon | |
|---|---|
 Chrome Fortress III [Atk] 972 | [Affinity] 0% |
・Easy to Build ・Damage can be increased by focusing on non-elemental enhancement. |
|
True Fatalis Charger
[Atk] 1224 | [Affinity] -20% |
・Highest Raw Charge Blade ・ Has two 4-slot decoration sockets. |
|
Luna Eostre
[Atk] 1044 | [Affinity] 10% |
・Has a base affinity of 10% ・Has two 2-slot decoration sockets. |
 Black Lightning Eagle [Atk] 864 | [Affinity] 10% |
・Long purple sharpness ・Damage can be increased by focusing on Thunder enhancement. |
Recommended Skills for Charge Blade
| Skill | Explanation |
|---|---|
| Health Boost ( ★★★ ) |
・Increase your vitality and greatly increases your survival rate. Essential for beginners who get hit a lot. |
| Offensive Guard (★★★) |
・Increases your damage when you perfectly guard attacks. |
| Guard (★★★) |
・Increases your survivability when guarding attacks. |
| Capacity Boost (★★★) |
・Increases your maximum shield charge duration. |
| Focus (★★★) |
・Increases the fill rate of your phials. |
| Teostra's Technique (★★) |
・Reduces the sharpness depletion of your weapon. |
| Zorah Magdaros Essence (★★) |
・Adds the Artillery Secret, raising the level cap of Artillery skill cap to 5. |
| Artillery ( ★★ ) |
・Increases the damage of your phial attacks. |
| Attack Boost ( ★★ ) |
・Increases your base damage and adds 5% affinity when at level 4. |
| Weakness Exploit ( ★★ ) |
・Increases your weapon's damage to a monster's weak and wounded parts. |
| Critical Eye ( ★★ ) |
・Increases your the base affinity of your weapon. |
Monster Hunter World (MHW) Iceborne Related Guides
Best Builds

Best Endgame Builds and Weapon Progression Builds
Best Builds Per Weapons
| Melee Weapons | |||
|---|---|---|---|
 Long Swords |
 Great Swords |
 Sword and Shield |
 Dual Blades |
 Hammer |
 Hunting Horn |
 Lance |
 Gunlance |
 Switch Axe |
 Charge Blade |
 Insect Glaive |
|
| Ranged Weapons | |
|---|---|
 Bow |
 Light Bowgun |
 Heavy Bowgun |
|
Best Counter Builds
| Monster Counterbuilds | |
|---|---|
 Fatalis |  Alatreon |



Author

Best Charge Blade Builds for Iceborne

Rankings
- We could not find the message board you were looking for.
Gaming News





Popular Games

Genshin Impact Walkthrough & Guides Wiki
Fire Emblem: Fortune's Weave (FEFW) Walkthrough & Guides Wiki
Aniimo Walkthrough & Guides Wiki
Wuthering Waves Walkthrough & Guides Wiki
Dragon's Dogma 2 (DD2) Dark Arisen Walkthrough & Guides Wiki
Umamusume: Pretty Derby Walkthrough & Guides Wiki
Honkai: Star Rail Walkthrough & Guides Wiki
Zenless Zone Zero Walkthrough & Guides Wiki
Pokemon TCG Pocket (PTCGP) Strategies & Guides Wiki
AION 2 Walkthrough & Guides Wiki










Recommended Games
Fire Emblem Heroes (FEH) Walkthrough & Guides Wiki
Where Winds Meet Walkthrough & Guides Wiki
Diablo 4: Lord of Hatred Walkthrough & Guides Wiki
Super Smash Bros. Ultimate Walkthrough & Guides Wiki
Persona 3 Reload Walkthrough & Guides Wiki
The Legend of Zelda: Tears of the Kingdom Walkthrough & Guides Wiki
Elden Ring Walkthrough & Guides Wiki
Pokemon Brilliant Diamond and Shining Pearl (BDSP) Walkthrough & Guides Wiki
Cyberpunk 2077: Ultimate Edition Walkthrough & Guides Wiki
Monster Hunter World Walkthrough & Guides Wiki









All rights reserved
©CAPCOM CO., LTD. 2018, 2019 ALL RIGHTS RESERVED.
The copyrights of videos of games used in our content and other intellectual property rights belong to the provider of the game.
The contents we provide on this site were created personally by members of the Game8 editorial department.
We refuse the right to reuse or repost content taken without our permission such as data or images to other sites.
Not sure if I'm missing something, but on the Elemental Charge Blade build the decos in the build don't match the skills that it's said you should have once it's all socketed.