
Best Great Sword Builds for Iceborne
NEW 9/29: Monster Hunter Outlanders 10/29 release!
Read Game8's exclusive interview with Capcom and TiMi producers!
★ Game8 Best Games Survey
Vote for your favorite games and share your voice!
These are the best builds for the Greatsword in Monster Hunter World (MHW) Iceborne for DLC progression and endgame. Learn about the best builds, skills, and weapons for Greatsword below!
List of Contents
Great Sword Endgame Meta Build
Full Fatalis Armor Build
| Weapon | Decorations | |
|---|---|---|
 Black Fatalis Blade |
Attack Jewel+ 4 Attack Jewel+ 4 Attack Boost 2
x2 |
|
| Armor | Slots and Skills | Decorations |
 Dragonhead Beta + |
Slots: ④④④
Stun Resistance (Lv 3) |
Critical/Protection Jewel 4 Critical/Protection Jewel 4 Critical Boost 1, Divine Blessing 1
x3 |
 Dragonhide Beta + |
Slots: ④④④
Weakness Exploit (Lv 1) |
Mighty/Maintenance Jewel 4 Mighty/Maintenance Jewel 4 Maximum Might 1, Tool Specialist 1
x3 |
 Dragonclaws Beta + |
Slots: ④④④
Weakness Exploit (Lv 1) Handicraft (Lv 3) |
Mighty/Maintenance Jewel 4 Mighty/Maintenance Jewel 4 Maximum Might 1, Tool Specialist 1
x 2 Expert Jewel+ 4 Expert Jewel+ 4 Critical Eye 2
x1 |
 Dragonbarbs Alpha + |
Slots: ④③③
Critical Eye (Lv 3) Weakness Exploit (Lv 1) |
Expert Jewel+ 4 Expert Jewel+ 4 Critical Eye 2
x1Handicraft Jewel 3 Handicraft Jewel 3 Handicraft 1
x1Charger Jewel 2 Charger Jewel 2 Focus 1
x1 |
 Dragonfeet Beta + |
Slots: ④④④
Evade Window (Lv 1) |
Challenger Jewel+ 4 Challenger Jewel+ 4 Agitator 2
x1Charger/Protection Jewel 4 Charger/Protection Jewel 4 Focus 1, Divine Blessing 1
x2 |
| Challenger Charm V | None | |
Fatalis Armor Build Skill Set
| Skills | |
|---|---|
| Agitator 7 | Critical Eye 7 |
| Divine Blessing 5 | Maximum Might 5 |
| Tool Specialist 5 | Handicraft 4 |
| Stun Resistance 3 | Weakness Exploit 3 |
| Critical Boost 3 | Focus 3 |
| Evade Window 1 | Inheritance (Fatalis Legend 2) |
| Transcendence (Fatalis Legend 4) | |
Taking advantage of Inheritance from the Fatalis Legend Set Bonus, this build provides high affinity and attack using the unlocked Agitator 7 and Maximum Might 5, complemented with Critical Eye and Weakness Exploit.
Transcendance from the Fatalis Legend Set Bonus provides comfort and survivability with True Razor Sharp and the huge Health and Stamina boost. This allows for less sharpening between each encounter and gets you to max HP without Health Boost and eating meals or consuming Max/Ancient Potions.
Tool Specialist and Divine Blessing let you tank attacks using the Rocksteady Mantle and the damage mitigation from Divine Blessing to launch charged attacks on the monster without waiting for openings.
Great Sword Meta Builds
| Meta Builds |
|---|
|
|

Frostcraft I Build
| Weapon | Decorations | |
|---|---|---|
|
Black Fatalis Blade
|
Attack Jewel+ 4 Attack Jewel+ 4 Attack Boost 2
x2--- |
|
| Armor | Slots and Skills | Decorations |
|
Rimeguard Helm Gamma +
|
Slots: ④④②
Coalescence (Lv 3) Resuscitate (Lv 1) |
Expert Jewel+ 4 Expert Jewel+ 4 Critical Eye 2
x2Attack Jewel 1 Attack Jewel 1 Attack Boost 1
x1 |
|
Rimeguard Mail Gamma +
|
Slots: ④②①
Critical Draw (Lv 3) Ice Attack (Lv 3) |
Critical/Vitality Jewel 4 Critical/Vitality Jewel 4 Critical Boost 1, Health Boost 1
x1Critical Jewel 2 Critical Jewel 2 Critical Boost 1
x1Attack Jewel 1 Attack Jewel 1 Attack Boost 1
x1 |
|
Frostfang Braces Beta +
|
Slots: ④④ー
Critical Eye (Lv 2) |
Tenderizer/Vitality Jewel 4 Tenderizer/Vitality Jewel 4 Weakness Exploit 1, Health Boost 1
x2 |
|
Rimeguard Coil Gamma +
|
Slots: ④①ー
Focus (Lv 3) Quick Sheath (Lv 1) |
Critical/Evasion Jewel 4 Critical/Evasion Jewel 4 Critical Boost 1, Evade Window 1
x1Expert Jewel 1 Expert Jewel 1 Critical Eye 1
x1 |
|
Rimeguard Greaves Gamma +
|
Slots: ④②ー
Peak Performance (Lv 3) Quick Sheath (Lv 2) |
Handicraft Jewel+ 4 Handicraft Jewel+ 4 Handicraft 2
x1Tenderizer Jewel 2 Tenderizer Jewel 2 Weakness Exploit 1
x1 |
| Challenger Charm V | None | |
Frostcraft I Build Skill List
| Skills | |
|---|---|
| Critical Eye 7 | Attack Boost 6 |
| Agitator 5 | Health Boost 3 |
| Ice Attack 3 | Critical Boost 3 |
| Weakness Exploit 3 | Focus 3 |
| Critical Draw 3 | Peak Performance 3 |
| Quick Sheath 3 | Coalescence 3 |
| Handicraft 2 | Resuscitate 1 |
| Evade Window 1 | Critical Element (Velkhana Divinity 2) |
| Frostcraft (Velkhana Divinity 4) | |
This build focuses on a draw attack playstyle, keeping the weapon sheathed most of the time while waiting for an opening to unleash a devastating attack, and this aligns with how the Greatsword plays.
Quick Sheath, Critical Draw, and Critical Boost combined with Velkhana's Frostcraft are the core of the build, allowing for hit-and-runs that deal massive damage. Critical Eye, Attack Boost, Agitator, and Weakness Exploit help keep the damage relatively high even after the first draw attack.
Frostcraft II Build
| Weapon | Decorations | |
|---|---|---|
 Safi's Shattersplitter |
Flawless/Vitality Jewel 4 Flawless/Vitality Jewel 4 Peak Performance 1, Health Boost 1
x1 |
|
| Awakened Ability | ||
| Velkhana Essence | Attack Increase VI | Attack Increase V x3 |
| Armor | Slots and Skills | Decorations |
|
Rimeguard Helm Beta +
|
Slots: ④②ー
Divine Blessing (Lv 2) |
Charger/Vitality Jewel 4 Charger/Vitality Jewel 4 Focus 1, Health Boost 1
x1Flawless Jewel 2 Flawless Jewel 2 Peak Performance 1
x1 |
|
Frostfang Mail Beta +
|
Slots: ④②ー
Attack Boost (Lv 3) |
Critical Jewel 2 Critical Jewel 2 Critical Boost 1
x1Charger Jewel 2 Charger Jewel 2 Focus 1
x1 |
|
Rimeguard Vambraces Beta +
|
Slots: ④ーー
Quick Sheath (Lv 1) Flinch Free (Lv 1) |
Charger/Protection Jewel 4 Charger/Protection Jewel 4 Focus 1, Divine Blessing 1
x1 |
|
Escadora Might Alpha +
|
Slots: ③①ー
Attack Boost (Lv 4) Dragon Resistance (Lv 3) |
Critical Jewel 2 Critical Jewel 2 Critical Boost 1
x1Sheath Jewel 1 Sheath Jewel 1 Quick Sheath 1
x1 |
|
Rimeguard Greaves Beta +
|
Slots: ④①ー
Critical Draw (Lv 2) |
Critical/Vitality Jewel 4 Critical/Vitality Jewel 4 Critical Boost 1, Health Boost 1
x1Sheath Jewel 1 Sheath Jewel 1 Quick Sheath 1
x1 |
| Challenger Charm V | None | |
Velkhana Awakened Safi Build Skill List
| Skills | |
|---|---|
| Attack Boost 7 | Agitator 5 |
| Dragon Resistance 3 | Health Boost 3 |
| Critical Boost 3 | Focus 3 |
| Divine Blessing 3 | Quick Sheath 3 |
| Critical Draw 2 | Peak Performance 2 |
| Flinch Free 1 | Punishing Draw (Frostfang Absolute Art 1) |
| Critical Element (Velkhana Divinity 2) | Frostcraft (Velkhana Divinity 4) |
A variation of the Froscraft I build that uses an Awakened Safi'jiiva weapon with Velkhana Divinity.
Raging Brachydios Build
| Weapon | Decorations | |
|---|---|---|
 Lightbreak Blade |
Attack Jewel+ 4 Attack Jewel+ 4 Attack Boost 2
x1Attack Jewel 1 Attack Jewel 1 Attack Boost 1
x1 |
|
| Armor | Slots and Skills | Decorations |
|
Brachydium Helm Beta +
|
Slots: ④④①
Weakness Exploit (Lv 1) |
Attack Jewel+ 4 Attack Jewel+ 4 Attack Boost 2
x1Charger/Vitality Jewel 4 Charger/Vitality Jewel 4 Focus 1, Health Boost 1
x1Expert Jewel 1 Expert Jewel 1 Critical Eye 1
x1 |
|
Damascus Mail Beta +
|
Slots: ④②①
Focus (Lv 2) |
Expert Jewel+ 4 Expert Jewel+ 4 Critical Eye 2
x1Critical Jewel 2 Critical Jewel 2 Critical Boost 1
x1Expert Jewel 1 Expert Jewel 1 Critical Eye 1
x1 |
|
Brachydium Braces Beta +
|
Slots: ④④ー
Agitator (Lv 2) |
Critical/Vitality Jewel 4 Critical/Vitality Jewel 4 Critical Boost 1, Health Boost 1
x2 |
|
Ruinous Coil Beta +
|
Slots: ④①ー
Attack Boost (Lv 2) Earplugs (Lv 1) |
Earplugs Jewel+ 4 Earplugs Jewel+ 4 Earplugs 2
x1Expert Jewel 1 Expert Jewel 1 Critical Eye 1
x1 |
|
Brachydium Greaves Beta +
|
Slots: ④①①
Weakness Exploit (Lv 2) |
Earplugs Jewel+ 4 Earplugs Jewel+ 4 Earplugs 2
x1Expert Jewel 1 Expert Jewel 1 Critical Eye 1
x2 |
| Challenger Charm V | None | |
Raging Brachydios Build Skill List
| Skills | |
|---|---|
| Critical Eye 7 | Agitator 7 |
| Attack Boost 7 | Earplugs 5 |
| Focus 3 | Weakness Exploit 3 |
| Critical Boost 3 | Health Boost 3 |
| Agitator Secret (Brachydios Will 2) | |
A standard damage build using Agitator Secret with maxed out Agitator, Attack Boost, and Critical Eye.
Earplugs is a nice bonus to lessen the times you get interrupted while charging, but this can be replaced with any other skill.
Great Sword Progression Builds
| Progression Builds |
|---|
|
|
Starter Iceborne Build
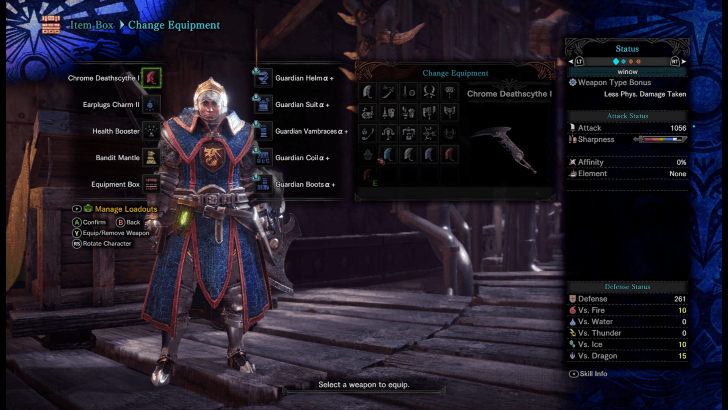
The Guardian Armor plus Defender Weapon combo is a viable starter build for Iceborne's early game. It has good enough defense to take hits from the early monsters, as well as enough damage to let you farm for your early Iceborne build.
The Guardian Armor set is given to all players from the start of the game and has good defense and survival skills while the Defender Weapon can be crafted from the Smithy and can be fully upgraded with ease.
Early Iceborne Progression Build
| Weapon | Decorations | |
|---|---|---|
 Jagras Deathclaw I |
Tenderizer Jewel 2 Tenderizer Jewel 2 Weakness Exploit 1
x2 |
|
| Armor | Slots and Skills | Decorations |
|
Jagras Helm Alpha +
|
Slots: ②ーー
Speed Eating (Lv 2) Attack Boost (Lv 2) |
Tenderizer Jewel 2 Tenderizer Jewel 2 Weakness Exploit 1
x1 |
|
Bone Mail Alpha +
|
Slots: ②ーー
Attack Boost (Lv 2) Health Boost (Lv 1) |
Elementless Jewel 2 Elementless Jewel 2 Non-elemental Boost 1
x1 |
|
Bone Vambraces Alpha +
|
Slots: ②ーー
Slugger (Lv 2) Attack Boost (Lv 1) |
Mighty Jewel 2 Mighty Jewel 2 Maximum Might 1
x1 |
|
Jagras Coil Beta +
|
Slots: ④①ー
Recovery Up (Lv 1) |
Earplug Jewel 3 Earplug Jewel 3 Earplugs 1
x1Attack Jewel 1 Attack Jewel 1 Attack Boost 1
x1 |
|
Jagras Greaves Alpha +
|
Slots: ②①ー
Free Meal (Lv 1) Recovery Up (Lv 1) |
Mighty Jewel 2 Mighty Jewel 2 Maximum Might 1
x1Attack Jewel 1 Attack Jewel 1 Attack Boost 1
x1 |
| Earplugs Charm III | none | |
Early Iceborne Skill List
| Skills | |
|---|---|
| Attack Boost 7 | Earplugs 4 |
| Health Boost 3 | Slugger 2 |
| Recovery Up 2 | Maximum Might 2 |
| Speed Eating 2 | Non-elemental Boost 1 |
| Free Meal 1 | |
A good beginner loadout that boasts a lot of attack from Attack Boost 7 and Non-elemental Boost. Maximum Might and Weakness Exploit provide good enough affinity to get crits in as long as you're hitting weak spots.
Some Earplugs let you charge your attacks without getting interrupted, but is always replaceable with something else.
Recovery Up, Speed Eating, and Free Meal are nice quality-of-life skills that let you top up your health quickly and can refund those consumables.
Mid-Late Iceborne Progression Build
| Weapon | Decorations | |
|---|---|---|
 Hidden Blade II |
Expert Jewel 1 Expert Jewel 1 Critical Eye 1
x1 |
|
| Armor | Decorations | |
|
Pride Helm Alpha +
|
Slots: ②①ー
Earplugs (Lv 2) Blast Attack (Lv 2) |
Tenderizer Jewel 2 Tenderizer Jewel 2 Weakness Exploit 1
x1Vitality Jewel 1 Vitality Jewel 1 Health Boost 1
x1 |
|
Damascus Mail Beta +
|
Slots: ④②①
Focus (Lv 2) |
Critical/Protection Jewel 4 Critical/Protection Jewel 4 Critical Boost 1, Divine Blessing 1
x1Tenderizer Jewel 2 Tenderizer Jewel 2 Weakness Exploit 1
x1Expert Jewel 1 Expert Jewel 1 Critical Eye 1
x1 |
|
Damascus Vambraces Alpha +
|
Slots: ②①ー
Handicraft (Lv 2) Speed Sharpening (Lv 1) |
Tenderizer Jewel 2 Tenderizer Jewel 2 Weakness Exploit 1
x1Expert Jewel 1 Expert Jewel 1 Critical Eye 1
x1 |
|
Beo Coil Alpha +
|
Slots: ②ーー
Health Boost (Lv 2) Earplugs (Lv 2) |
Critical Jewel 2 Critical Jewel 2 Critical Boost 1
x1 |
|
Pride Greaves Beta +
|
Slots: ④②ー
Earplugs (Lv 1) Jump Master (Lv 1) |
Elementless Jewel 2 Elementless Jewel 2 Non-elemental Boost 1
x1Critical Jewel 2 Critical Jewel 2 Critical Boost 1
x1 |
| Master's Charm IV | none | |
Mid-Late Iceborne Progression Build Skill List
| Skills | |
|---|---|
| Critical Eye 7 | Earplugs 5 |
| Weakness Exploit 3 | Health Boost 3 |
| Critical Boost 3 | Focus 2 |
| Blast Attack 2 | Handicraft 2 |
| Speed Sharpening 1 | Jump Master 1 |
| Non-elemental Boost 1 | Divine Blessing 1 |
A high affinity build that uses Hidden Blade II's high affinity, Critical Eye, and Weakness Exploit to guarantee crits. Combined with Critical Boost and Non-elemental Boost, this build also deals a significant amount of damage that can carry you until the late game.
Best Great Sword Weapons and Skills
Best Weapons for Great Sword
| Weapon | Explanation |
|---|---|
|
Black Fatalis Blade
[Atk] 1632 | [Affinity] -30% |
・Weapon with the highest raw damage ・ High Sharpness |
|
Lightbreak Blade
[Atk] 1440 | [Affinity] 0% |
・High attack damage and sharpness ・ Easy to craft |
Best Skills for Great Sword
| Skill | Explanation |
|---|---|
| Health Boost ( ★★★ ) |
Increases maximum health to increase your survival rate A must have for beginners |
| Weakness Exploit ( ★★★ ) |
Significantly increases your attack by targeting weakpoints |
| Velkhana Divinity ( ★★★ ) |
Raises your attack when your weapon is sheathed Great skill for Great Sword |
| Critical Draw ( ★★★ ) |
Increases affinity when using draw attacks Great with Velkhana Divinity |
| Agitator ( ★★★ ) |
Increases damage against enraged monsters |
| Teostra Technique (★★) |
Prevents sharpness loss with critical hits |
| Critical Boost ( ★★ ) |
Increases the damage of critical hits. Best used when paired with Weakness Exploit |
| Earplugs ( ★★ ) |
Nullifies most monster roars, allowing you to execute your attacks without flinching |
| Focus (★★) |
Shortens the charge time, making it easier to land attacks |
| Non-elemental Boost (★) |
Significantly increases the attack damage of non-elemental weapons |
Monster Hunter World (MHW) Iceborne Related Guides
Best Builds

Best Endgame Builds and Weapon Progression Builds
Best Builds Per Weapons
| Melee Weapons | |||
|---|---|---|---|
 Long Swords |
 Great Swords |
 Sword and Shield |
 Dual Blades |
 Hammer |
 Hunting Horn |
 Lance |
 Gunlance |
 Switch Axe |
 Charge Blade |
 Insect Glaive |
|
| Ranged Weapons | |
|---|---|
 Bow |
 Light Bowgun |
 Heavy Bowgun |
|
Best Counter Builds
| Monster Counterbuilds | |
|---|---|
 Fatalis |  Alatreon |
Comment
 Anonymous over 2 years
for the Raging Brachydios Armor Build build. there's only 5 Attack boost. two attack jewel 4, one attack jewel 1. says there's 7. please update.



Author

Best Great Sword Builds for Iceborne

Rankings
- We could not find the message board you were looking for.
Gaming News





Popular Games

Genshin Impact Walkthrough & Guides Wiki
Fire Emblem: Fortune's Weave (FEFW) Walkthrough & Guides Wiki
Aniimo Walkthrough & Guides Wiki
Wuthering Waves Walkthrough & Guides Wiki
Dragon's Dogma 2 (DD2) Dark Arisen Walkthrough & Guides Wiki
Umamusume: Pretty Derby Walkthrough & Guides Wiki
Honkai: Star Rail Walkthrough & Guides Wiki
Zenless Zone Zero Walkthrough & Guides Wiki
Pokemon TCG Pocket (PTCGP) Strategies & Guides Wiki
AION 2 Walkthrough & Guides Wiki










Recommended Games
Fire Emblem Heroes (FEH) Walkthrough & Guides Wiki
Where Winds Meet Walkthrough & Guides Wiki
Diablo 4: Lord of Hatred Walkthrough & Guides Wiki
Super Smash Bros. Ultimate Walkthrough & Guides Wiki
Persona 3 Reload Walkthrough & Guides Wiki
The Legend of Zelda: Tears of the Kingdom Walkthrough & Guides Wiki
Elden Ring Walkthrough & Guides Wiki
Pokemon Brilliant Diamond and Shining Pearl (BDSP) Walkthrough & Guides Wiki
Cyberpunk 2077: Ultimate Edition Walkthrough & Guides Wiki
Monster Hunter World Walkthrough & Guides Wiki








All rights reserved
©CAPCOM CO., LTD. 2018, 2019 ALL RIGHTS RESERVED.
The copyrights of videos of games used in our content and other intellectual property rights belong to the provider of the game.
The contents we provide on this site were created personally by members of the Game8 editorial department.
We refuse the right to reuse or repost content taken without our permission such as data or images to other sites.
oops sry. forgot about the 2 attack boost on ruiner nergi coil